Actions
Action is a procedure written in CJ Blocks that invokes whenever a trigger action occurs.
Trigger actions can be predefined or custom. Predefined actions happen whenever a particular moment in the page life cycle is reached (for example,
Actions can be executed in the user’s browser (“client-side” actions) or on a web server (“server-side” actions). When building, client-side actions are translated to JavaScript code and server-side actions to Java code. Therefore developers can mix CJ Blocks code with code written in JavaScript or Java depending on whether the action is run on the client or server. The server-side actions require a rebuild for the changes to take effect.
Different actions can be performed within the App Builder, and they are shared into two categories - Type and Field actions.
Table of contents:
Type actions
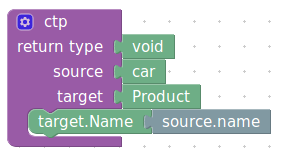
Load
Name and Surname fields that are saved in the database. Suppose you need to display Full name field (it should be transient, hence not kept in the database). You need to fill the Full name field with values that are calculated from the Name + " " + Surname. 
Loaded
The set show style to display the specified button.

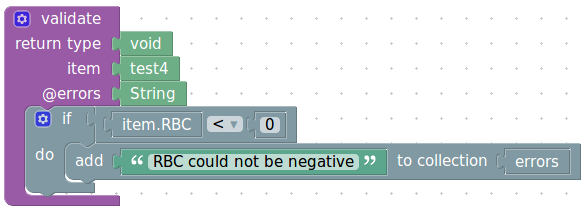
Validate
The
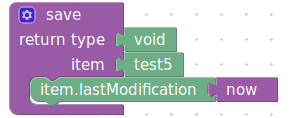
Save
The
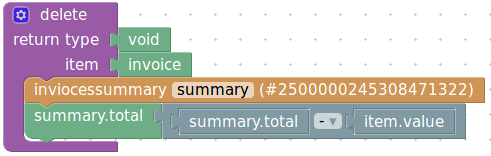
Delete
The Item is deleted. One could use it to remove some references, recalculate some statistics, etc. For example, you have created an invoice containing individual orders and their prices and the total amount. If one of the orders is paid, then it should be removed or deleted from the invoice. Once it is deleted, the total amount to be paid is recalculated.
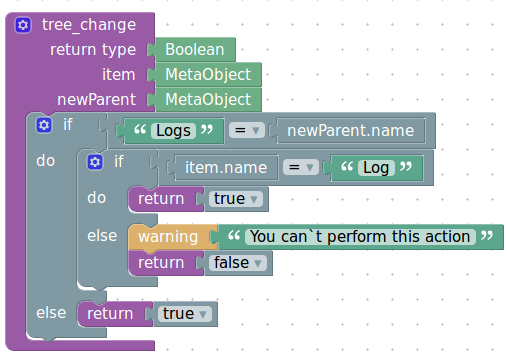
Tree change
The “Log”. So, if the item's name is not “Log” it can’t be added to the Logs folder.
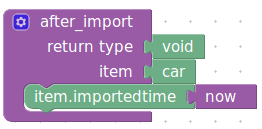
After import
The
Test
The
Resource not found
The
Build
The
Get data leaves
The
Fill functions
A
Post
The
Field actions
Basic field actions
These actions can be accessed by clicking the three vertical dots on the left side of the field created found in the Fields section.
-
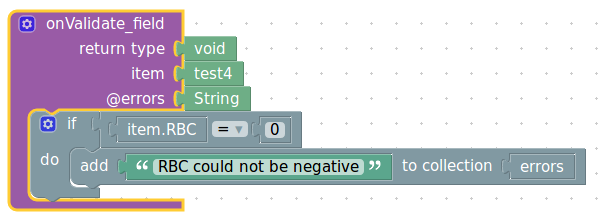
On field validate : The validate action can be used to check your data for errors in a specific field. It is triggered before the save action. It is the same as theValidate action explained above, with the difference being that it checks only for a specified field. -
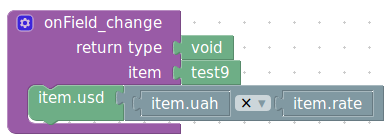
On field change : the action is triggered on the server-side when the user changes data in the field and leaves the field (loses focus on the field). For example, in a currency converter app, inputting the value of a currency will automatically calculate its value in another currency. -
On field changed action: the action is the same as theOn field change only that it occurs on the client-side. -
On value suggest : this is the server-side action triggered when the user focuses on the input (clicks on the field and starts interaction). -
On value suggested : action is almost the same as theOn value suggest , but runs after it on the client-side. -
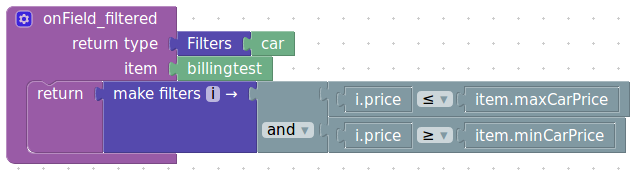
On field filtered event : This action is triggered when a list of instances is displayed. For example, you have built a web app for buying cars. It is possible to add a filter to the car field, which helps users see only the cars within the price range they have set. See filters for more information.
-
On open clicked : the action is available only for Composite data types. The action overrides the default navigation behavior of the "Open" link. The link appears as and typically opens the default web page view of a data type.
However, there might be situations when you want to override the default behavior. For example, it might be necessary to open a non-default web page view or ask a user to save the page he is about to leave. In such a case, you can add this action and run whatever calculation is needed. The action is executed client-side (in the browser).
To enable this action, you have to choose the option"Run 'On open clicked' action"in the GENERAL → Open property. -
On create clicked : the action is available only for Composite data types.
Implement this action if you want to override the default navigational behavior of"Create new"link. Usually, the link opens the default web page view targeted data type in create mode. However, there might be situations when you want to override the default behavior. For example, filling some of the newly created instances with current page data might be necessary. In such a case, you can add this action and run whatever calculation is needed. The action is executed client-side (in the browser).
To enable this action, you have to set the GENERAL → 'Create new' property to"Run 'On create clicked' action".

Collection field actions
These are actions that can be carried out on collection fields. Few actions are specific to these fields:
-
Row inserted : it is triggered when an item is added to the collection. For example, once the invoice is added to the collection of invoices, the total value of all the invoices is recalculated. -
Row deleted : the action is triggered when an item is removed from the collection. For example, deleting an invoice from a collection of invoices. Same as the above example, the total value of all the invoices is calculated once the invoice is deleted.
-
Row Click : this is a server-side action, and it is triggered when the user clicks on a table row.
For example, this action can be used when working with several invoices on a form. The developer can set theRow Click action on a row so that when it is clicked, the name of the active invoice is displayed. -
Row Clicked : This is a client-side action that is triggered when the user clicks on a table row. For example, clicking on a row redirects the user to the homepage.

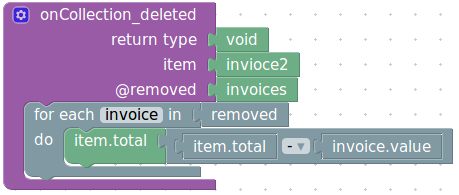


Table actions
-
On rowLoad : this is a server-side event triggered only for virtual and index tables when it loads data. For example, you have created a cryptocurrency trading app. A user has Bitcoins and Eutherum and displays their values in USD. Every time the data is displayed, the exact values for the cryptocurrencies are calculated on the server. -
On rowLoaded : it is a client-side action triggered only for a virtual and index table when it loads data. The same example above can be applied here. The only difference is that the action takes place on the client side.


Other actions
Custom actions
The custom actions enable the user to assign actions to buttons that have been manually added to the app. Custom actions are triggered when the user clicks the button. When creating a custom action, you will need to choose if it is client-side or server-side.
Here, there are three types of actions that you can set:
-
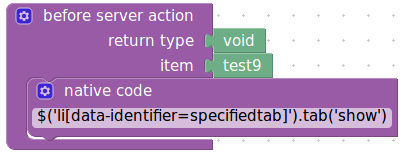
Before server action - This is the first client-side action to be executed when the user clicks the button. For example, you may need to create a button that will open the specified tab. -
Server action - This is the server-side action to be executed. It is executed after 'before server action'. For example, creating a button to check for the temperature. It calculates information about the temperature on the server and returns the results. -
After server action - the client-side action to be executed after server-side action. For example, you need to create a button to save and go to your homepage.


Custom permission action
This action is found on the Permissions page, where you can edit the permissions of the app. The custom permission action allows users to set functions that will grant permission to perform some actions. This action is triggered before a specified action is performed. For example, we created a custom permission action to check if the user has permission to view transaction history. In this case, we granted permission to view the history only to the users with an account balance of more than zero.

API function
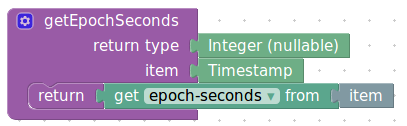
In the app builder, it is possible to create custom API functions triggered when another app requests your created URL. Sometimes, your app may have a feature that is needed by a third-party app. For the third-party app to access this feature, it needs to send a request through an API. For instance, your app can convert Epoch to human-readable data. If a third-party app wants access to this information, it will have to send a request through an API.
Add to scheduler
You can find this action in the Code Blocks section on the data type details page. It can be applied to the
custom server actions
only. A scheduler is used when one needs to repeat the same action multiple times. To add an action to a custom server action, expand the downside arrow near the action name, then select