Web page editor
Use the Web Page editor to modify and create web pages for your project.
HOW TO:
Add a new field
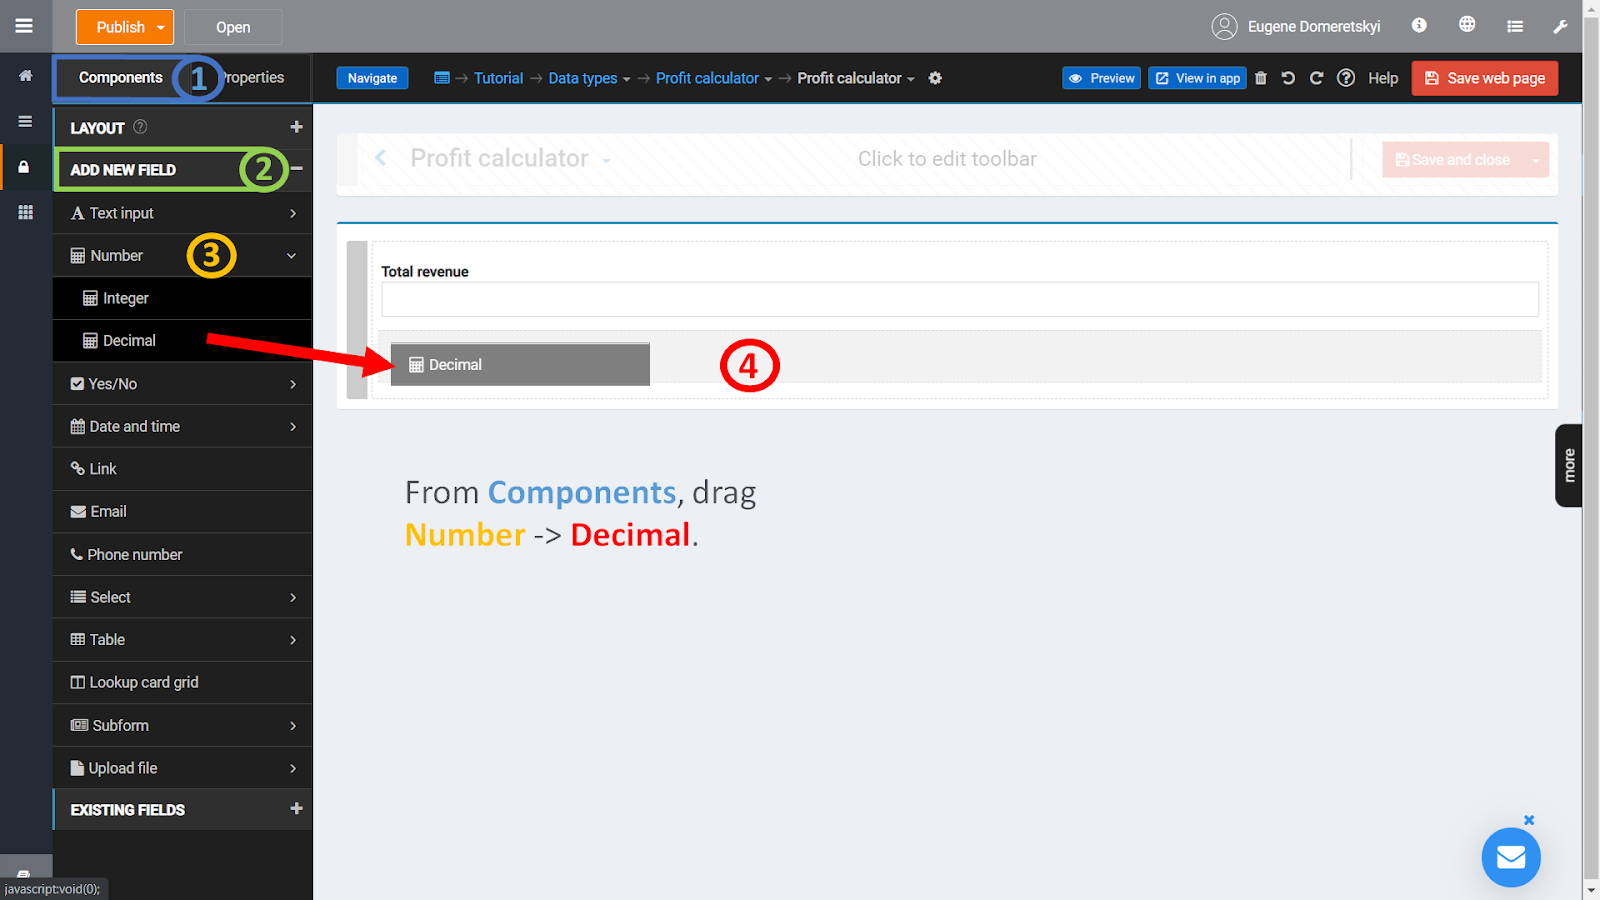
Open Components -> ADD NEW FIELD section.
Choose a field that you would like to add (text input, number, etc) and drag it onto the editor’s working area. You can drop it anywhere but the usual choice is to place it onto a group box (white rectangle with blue line at the top).
A modal window will pop up. Give your field a descriptive name and press the “Create” button. The field will appear on the page.
The image below shows how to add an Integer field. Click the image to enlarge it.
Delete a field
Click on a field to select it. Move the mouse pointer over a cross icon located at the top-right corner of the selection rectangle and click on it.
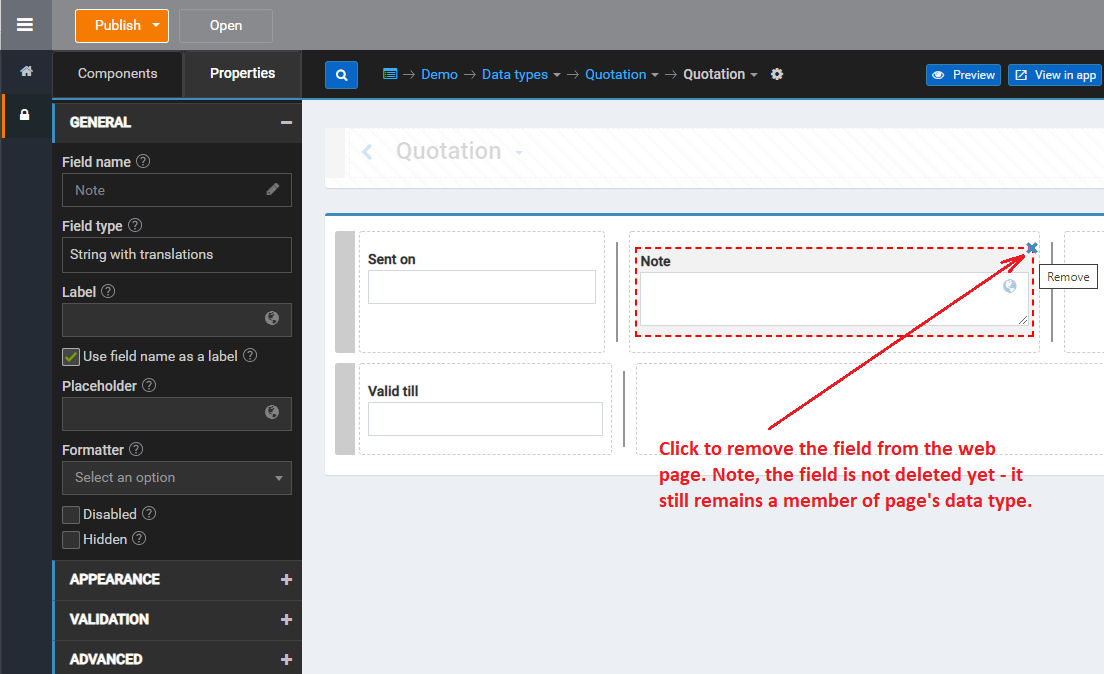
The field will be removed from a web page but it still remains a part of your data type. It is displayed in the Components -> EXISTING FIELDS section and you can place it on your page again by drag-and-drop.

To delete the field permanently, first save the current page by pressing the Save web page button. This step is necessary because App Builder enforces code integrity and it is not possible to delete a field that is referenced from any view or code block. If the field has just been removed from the web page but the page itself has not yet been saved, the reference checking routine would still consider the field to be in use and prohibit its deletion.

Press on the ellipsis next to the field’s name and choose the “Delete” option. If there are no references, the operation will succeed.
If there are references, their list will be displayed. You can check them and decide whether to discard the delete operation or modify referencing views / code blocks and perform it again.
Run an action on button click
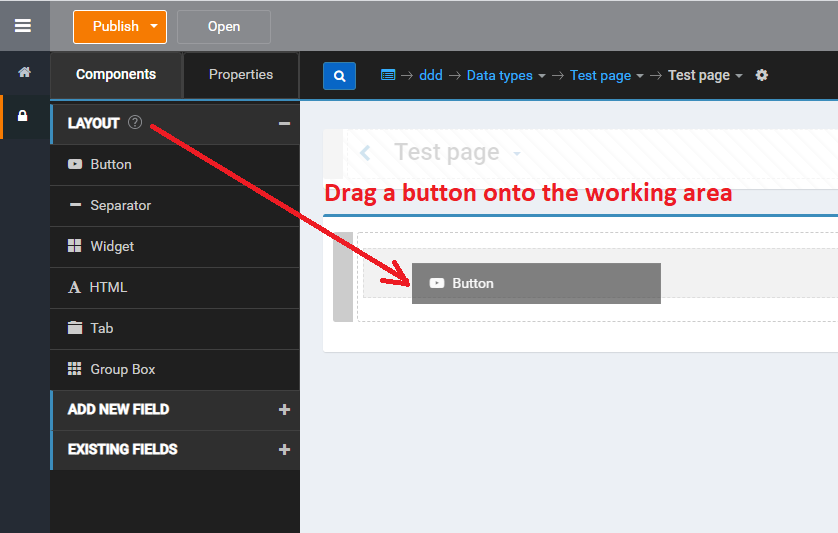
Drag a button from Components -> Layout section onto the working area.
Click on the button to select it. The Properties -> Actions section will open.
You can attach up to three different actions to the same button. They are executed in the following order.
1. Before server action is run in the browser. Use it to provide fast validation or interactivity.
2. If specified, Server action is run on the server - use it to query the database or for secure validations.
3. After server action is run in the browser as the last one. Use it to implement interactivity which depends on the results of server action.
Choose one of the actions and click onto the “Create new” link as shown.

The modal window will appear. Give a descriptive name to the action and press “Create”. An empty action will be created and another modal window will appear, suggesting to “Save page and redirect to the block”. Accept the offer, switch to code block editor and implement business logic of your action.
Run an action when value changes
Click on a field to select it and open Properties -> Actions section.
Click either On field change (server-side action) or On field changed (client-side action) . The builder will switch to the block editor where you can implement necessary business logic.
Take a look at the example below.

The action will be triggered whenever the application user changes the Sent on field from the user interface. Note, that if you change the value of Sent on field by code, the action won’t be triggered.
The action would be implemented with code blocks like shown.

Publish app
Whenever you’ve made the changes and want to test them, you have to publish the app. Publishing consists of code generation, code compilation and deployment.
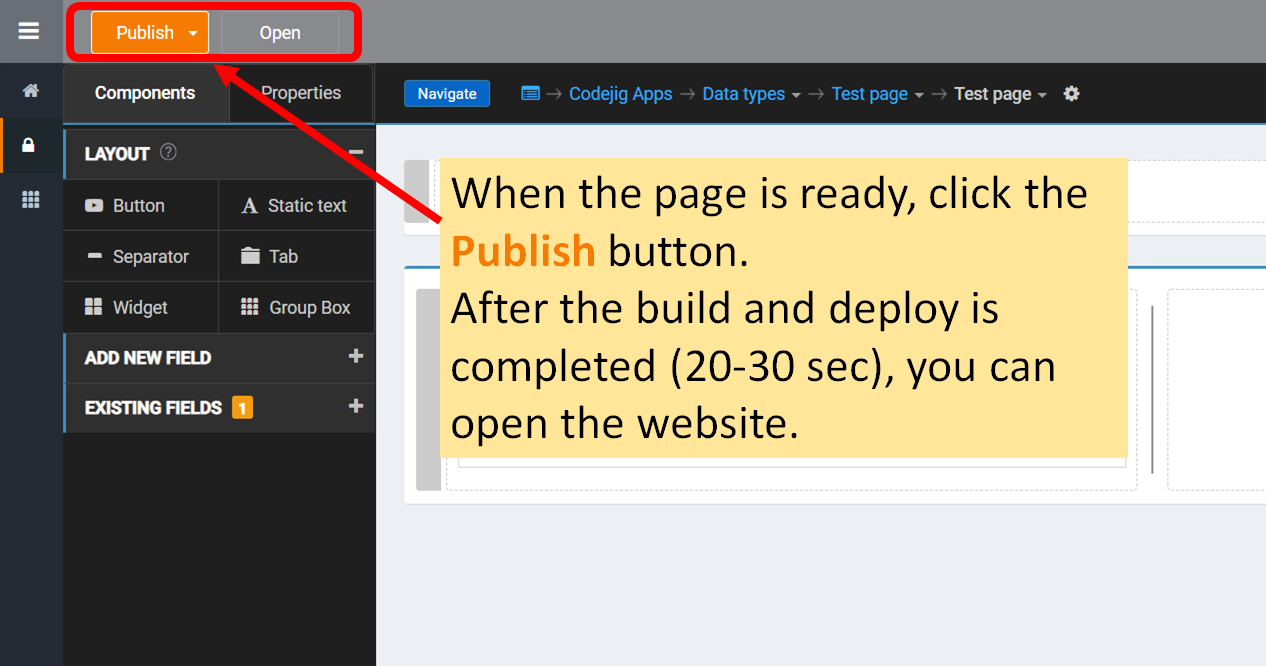
Click the Publish button to start publishing. The whole process takes about 40 seconds.
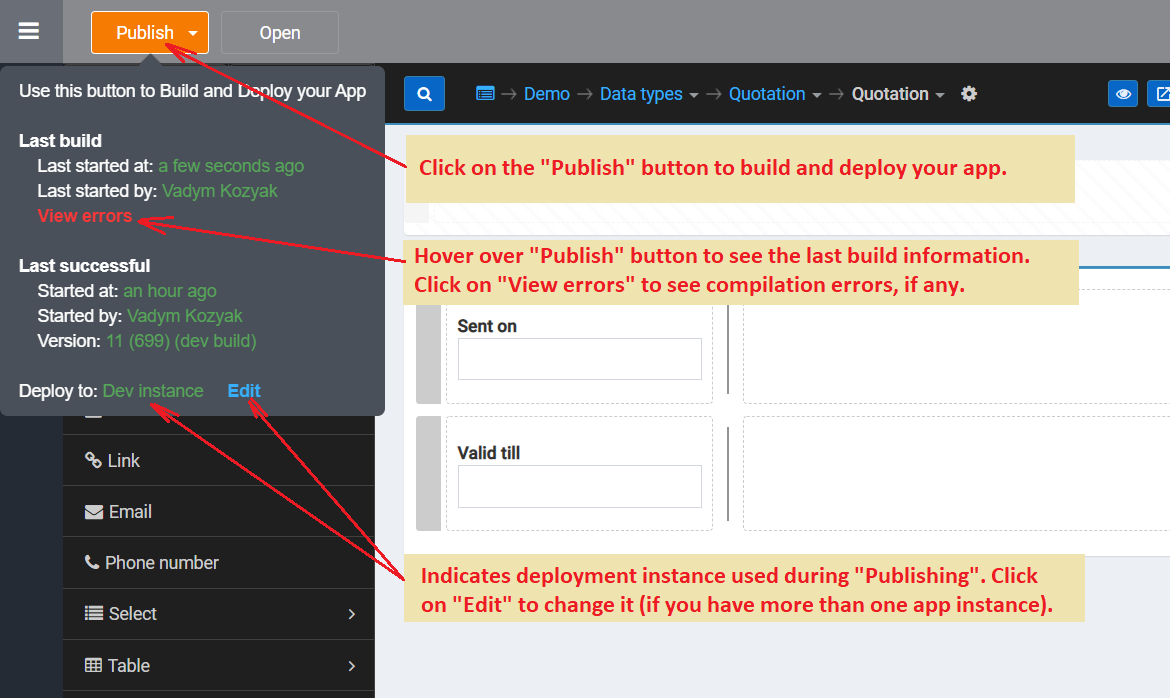
Most of the time you are publishing to a development app container. Development container has been optimized to save development time needed for re-compilation and application restart. Changes that do not require project rebuild are automatically pushed to the running application when saved (for example, changes to page layout or client-side code). When the running application matches the latest version of the project, they are considered to be in sync. In such a case the Publish button is drawn with grey color.
If you make the changes that require rebuilding (define new or delete existing fields, make changes to server-side code), the Publish button changes its color to orange. Color change does not mean that you have to publish the app immediately. It just indicates that the application is running on a non-latest project version and therefore may behave incorrectly if you try to invoke the non-published functionality.
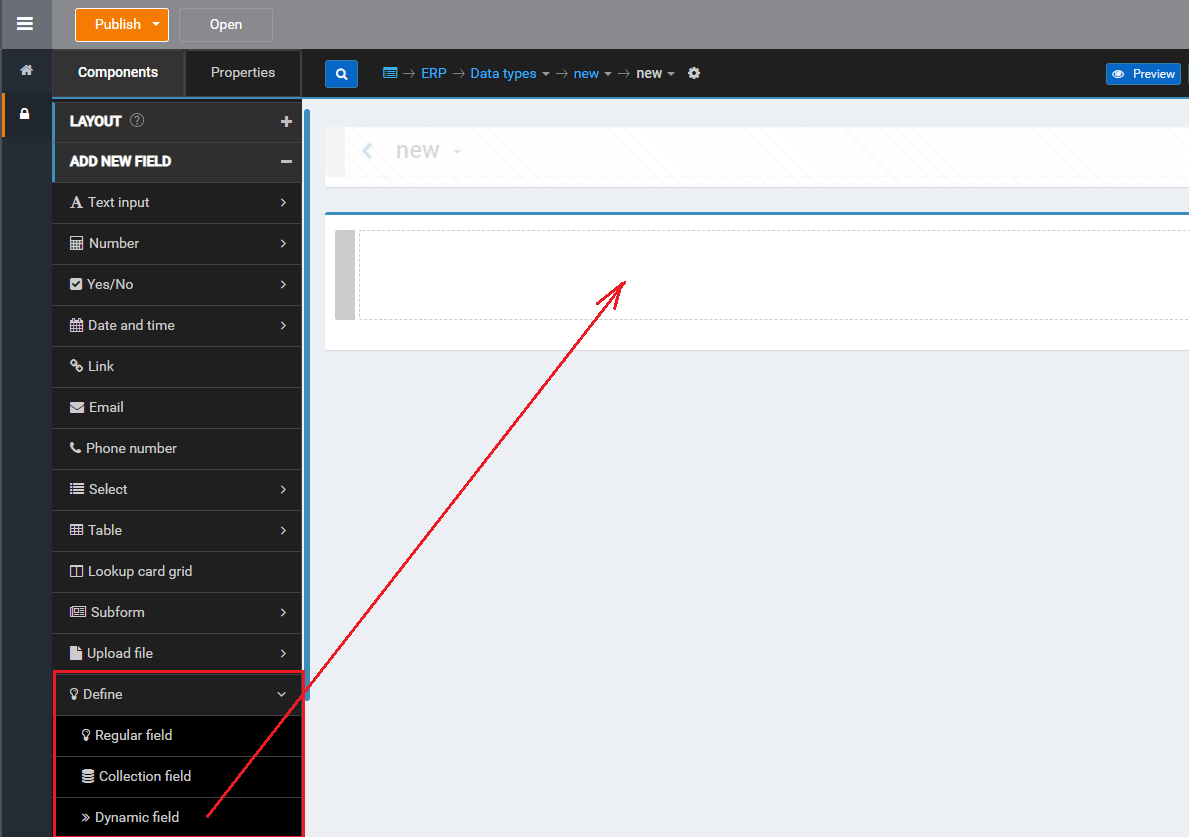
Add a field by definition
Most often you add a new field by dragging it from the ADD NEW FIELD section. It is a fast and convenient standard procedure which results in creation of regular fields. Regular fields are strongly-typed and store their value in the database.
Sometimes you need to exert more control over the field creation process. For example, you might want to use a field that is not stored in a database or dynamic field. Dynamic fields can accept values of different types.
In such a case you can use one of Define field templates and specify data type and other field’s properties in a precise way.
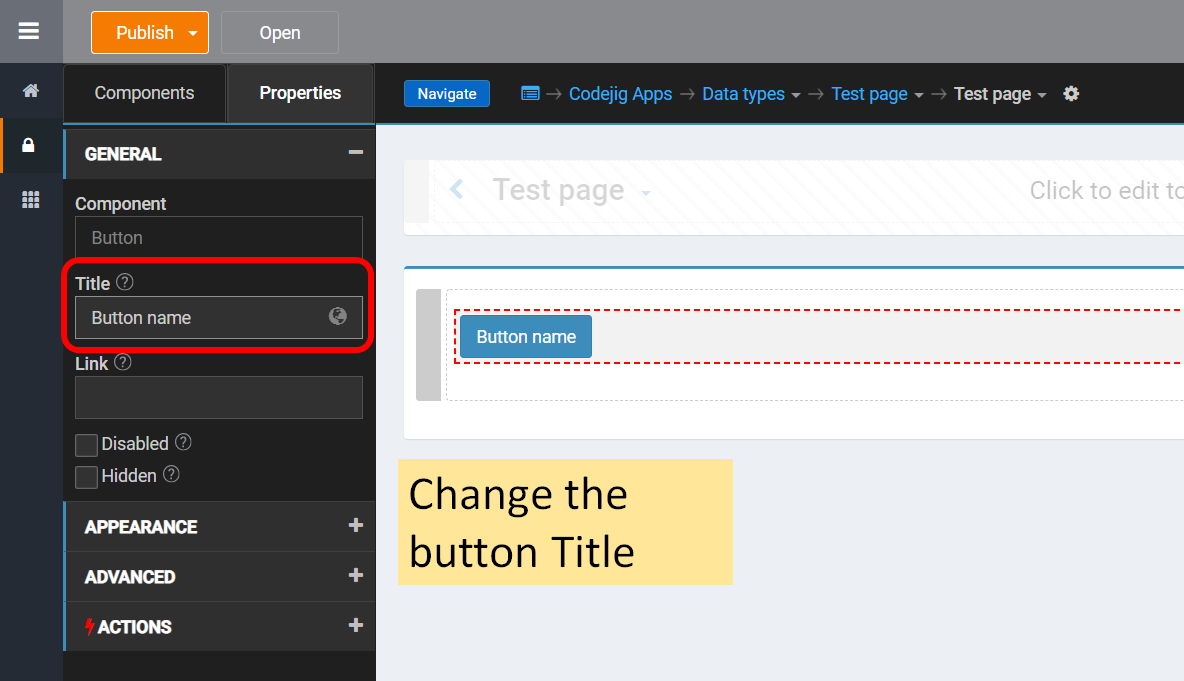
Change button appearance
Click on the button and in its Properties, Appearance select the styles you want or create your own using CSS box.
On the figure below, we have size: lg, style: success and alignment: right.

To rename a button, go to the General Properties and change the Title:
FAQ:
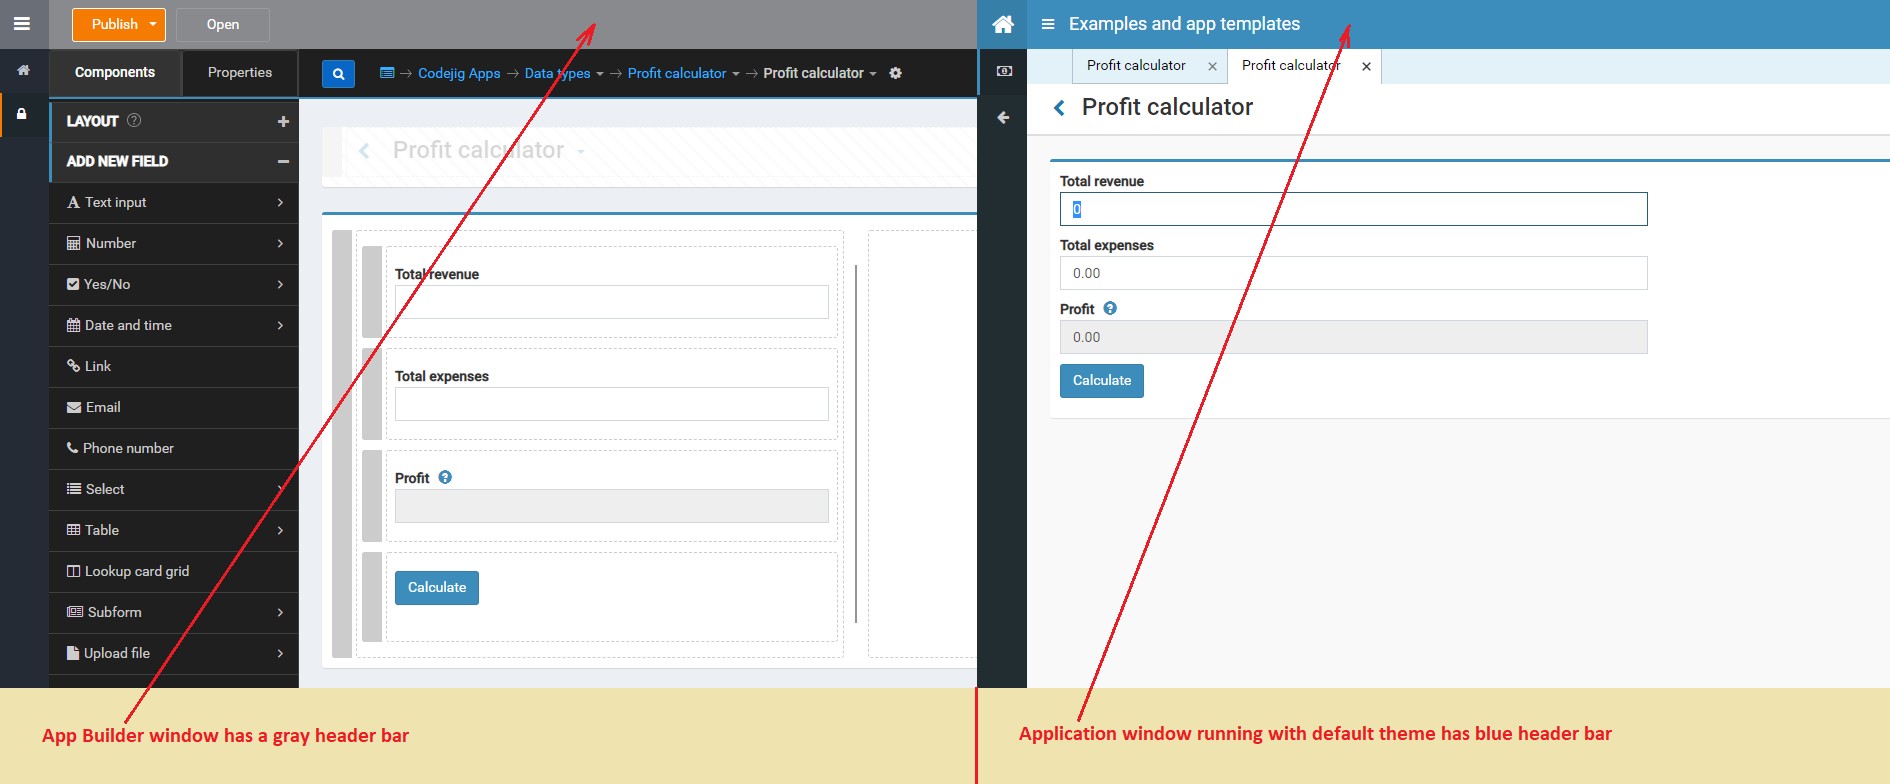
I can not enter data?
Probably you are trying to enter the data while working in the web page editor or viewing the page in Preview mode.
In order to use your app and start entering data, you have to save the page, publish the app and Open it once publishing is finished.

As a new user you can easily distinguish between App Builder and application by looking at the color of their respective header bars.
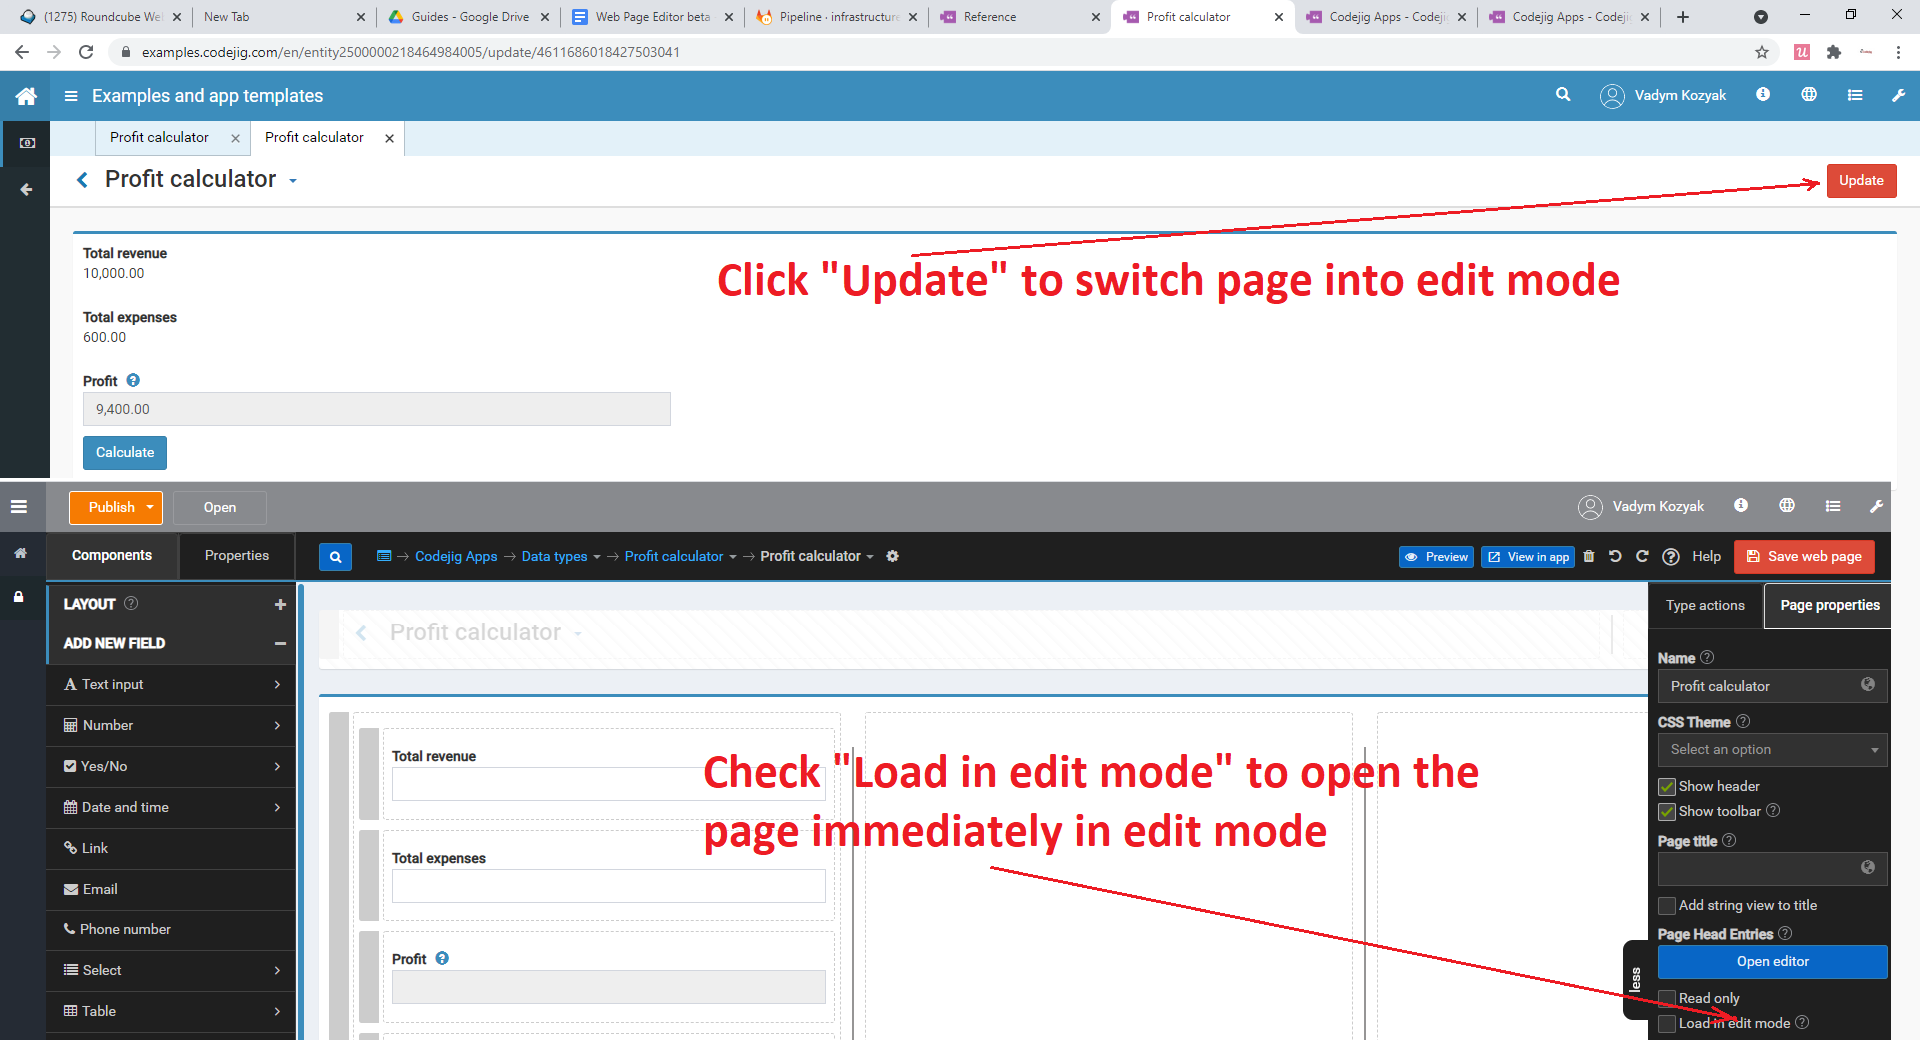
Another reason for not being able to enter the data might be opening an existing record in the application in view mode. In such a case you would have to press the “Update” button to switch a page into edit mode.
I do not see the fields I added?
A chance is that you exited the page you were editing or closed the browser window without saving the page. In such a case the fields that you have added won’t appear on the page layout but in the section
Components -> EXISTING FIELDS .

How to make a login page?
Do not do it ! You are not supposed to implement user authentication and should leave this work to App Builder.
Login page will be displayed automatically whenever authentication is required.

Login form looks as follows. You can customize its look by adding custom CSS to the default theme in the theme editor.

To remove anonymous access to your web app, reset the Default permission (marked with green color in list of permissions) as shown.

You can create / delete users of your organization on the users page of Codejig user portal. Use the same page to grant users access to your apps.
You can define application roles as shown below.

App admins can log-in into the application and can view the list of users and manage their role membership as shown below.

How to hide the “Save” button?
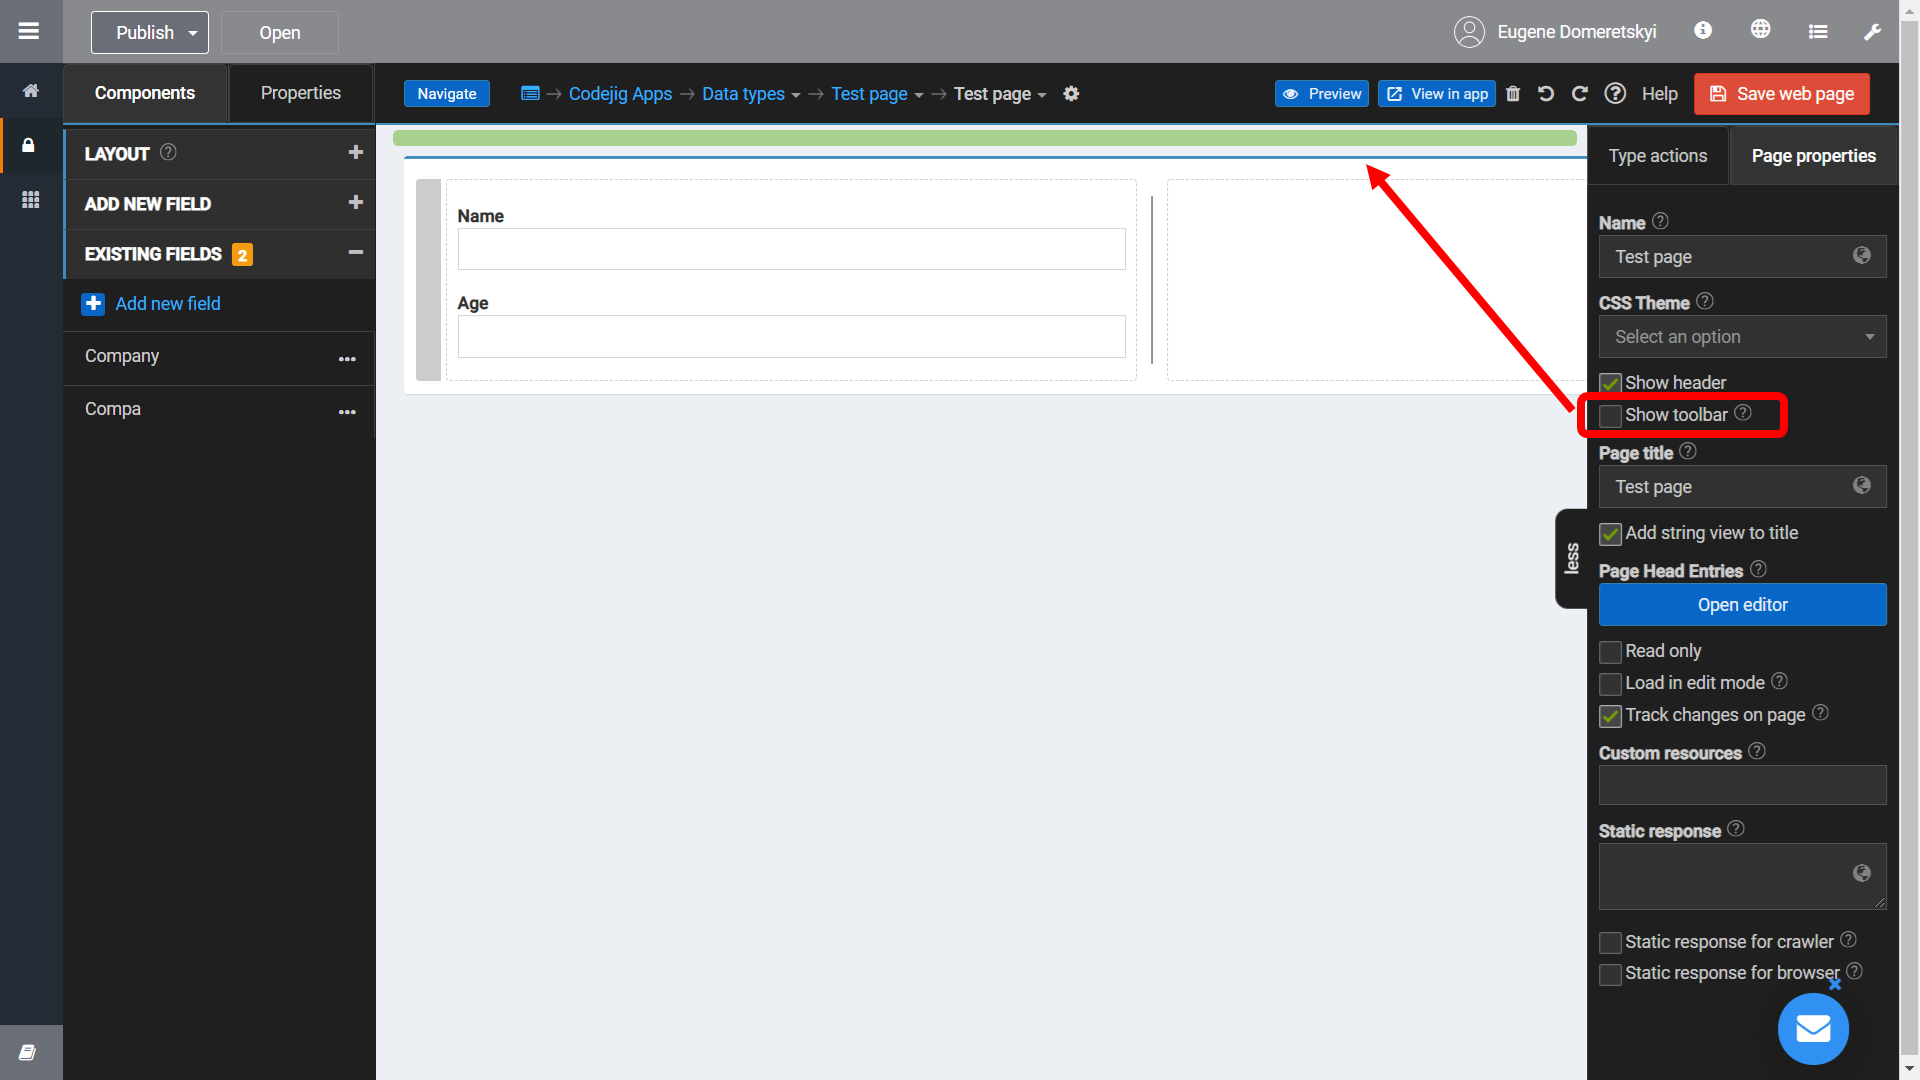
You can hide the toolbar with the Save button by un-checking corresponding option in the Page Properties panel.
The components of the Toolbar behave in the same way as in the body part of the web page view.
You can remove, edit and add the toolbar components including Save button.

Is my page responsive?
Yes. Web page editor is based on Twitter Bootstrap and uses group boxes, rows, and columns to layout and align content. You can have from 1 to 12 columns in a row.


The created layout is automatically responsive and usually you do not have to make special adjustments to use it on mobile devices.

I cannot find my web page?
The top three ways to open web pages in Codejig App Builder:
1. Using the Web Pages section.

2. Using the Navigation panel.
Click on the Navigate button on the Navbar.

3. Using the Data Types section.


How to rename my web page?
The easiest way to rename page in the Builder is to open your web page properties from the Web pages editor and edit the Name field:

If you want to change the generated page name, click on the toolbar to start editing it. Select the element containing page name and in Properties -> GENERAL set its Title property to a new value.

Share my page with the others?
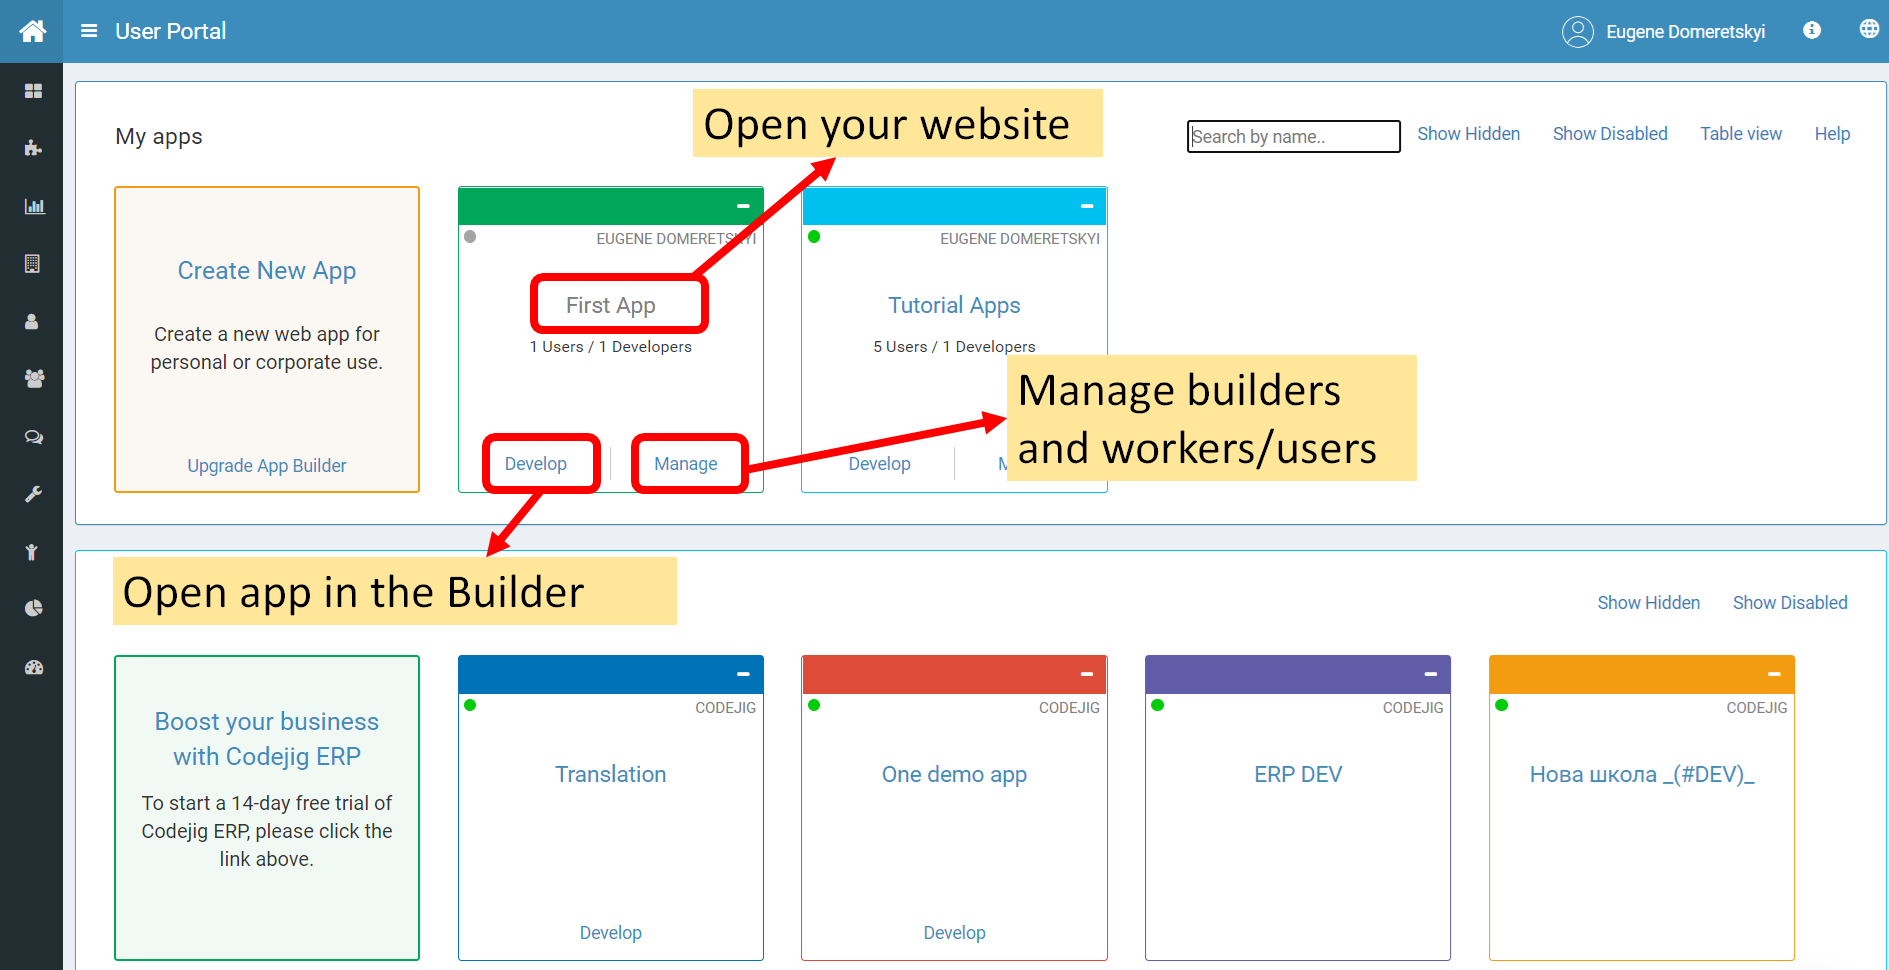
First of all, publish the app.
After you publish and open the app, you will be redirected to your app website. Copy an URL and share it!
You can always find your app in the Codejig user portal, where you can manage your projects and users.