Rudolfo Hotel: Part 1
WELCOME TO RUDOLFO HOTEL: PART 1 TUTORIAL
In Part 1 of Rudolfo Hotel tutorials, you will learn how to create an application with support for multiple languages and work with a local database.
Application created during this part will be used as a base for Part 2.
This is an Advanced tutorial, and a lot of basic steps will be skipped. If you are a new App Builder user, we highly encourage you to familiarise yourself with App Builder by working on Beginner tutorials.
ADD SUPPORT OF MULTILANGUAGE TO THE BUILDER
Go to apps.codejig.com and create a new app Rudolfo Hotel. Click on the Manage link inside of the box of the Rudolfo Hotel application.
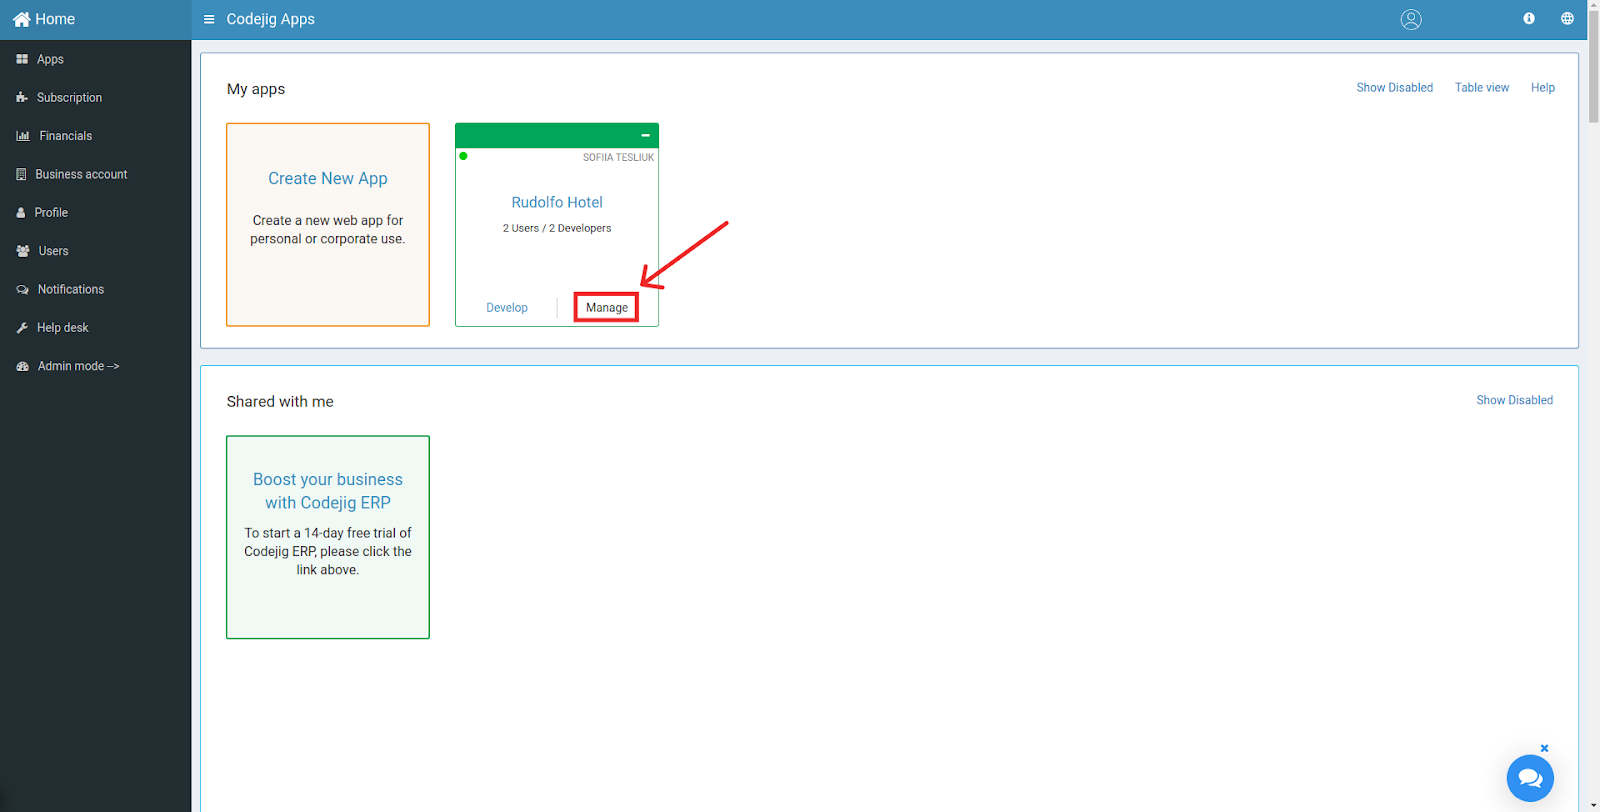
Click on Manage builder.

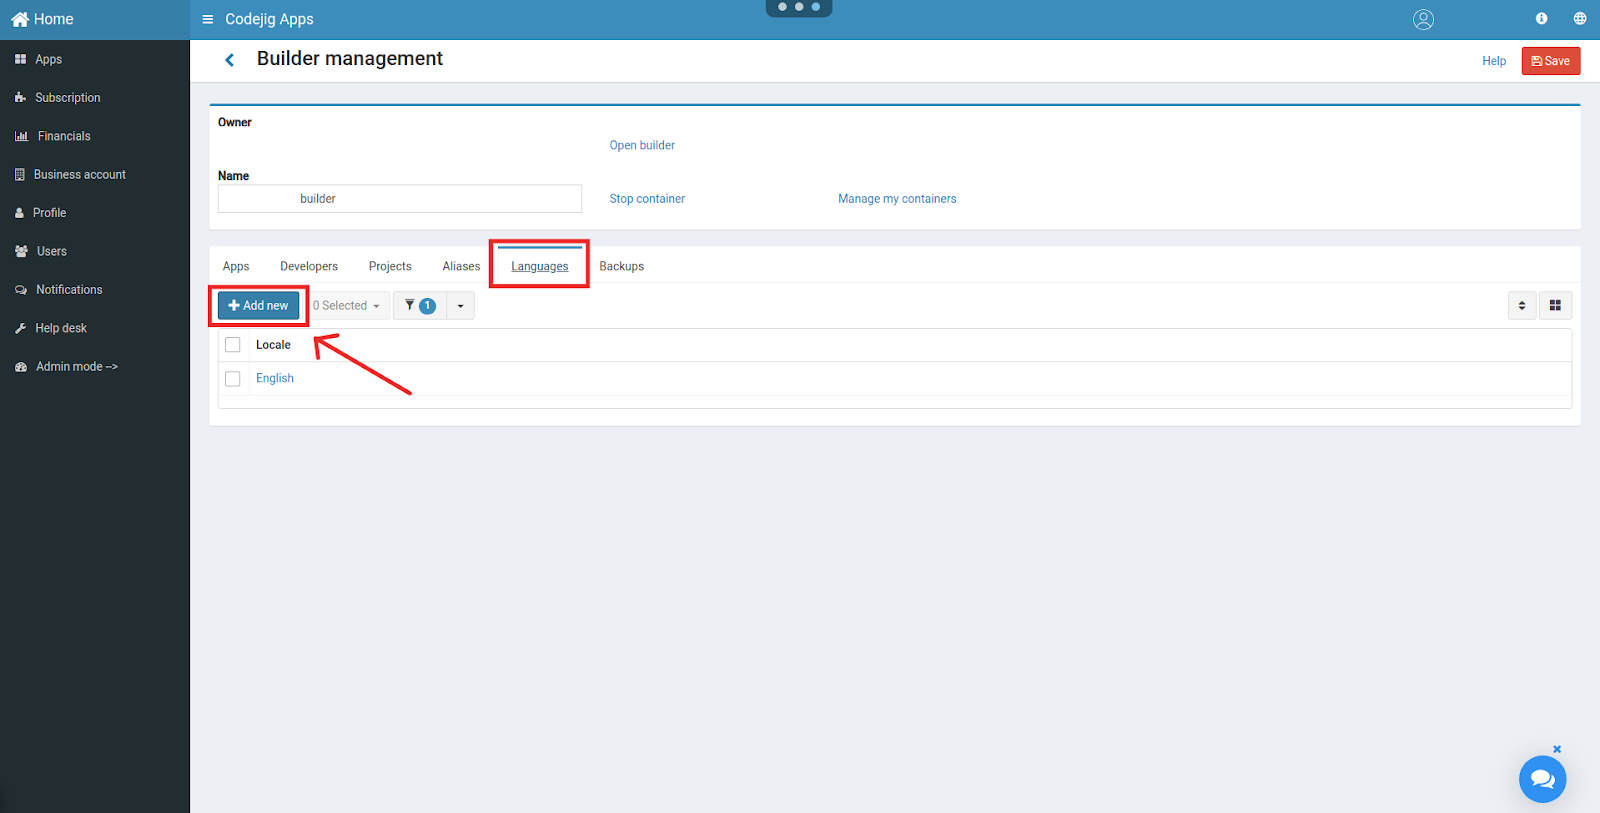
In Builder management, click on the Languages tab and add more languages. In the tutorial, we have added Ukrainian and German, but you can replace them with your choice languages.
REORDER LANGUAGES
The preferred order of the languages can be changed for App Builder and separately for application. The order of languages is crucial as it would be used to locate substitutes for any missing translations.
To change order, click on the up-down arrow button in the top right corner of the languages table to allow reordering languages.

By dragging a row with the selected language, you can change its order.

Save the Builder management page.

ACTIVATE LANGUAGES IN THE APPLICATION
Go back to the application management. In the Languages tab, tick the boxes in the Active column for languages that you want to support in this specific application.
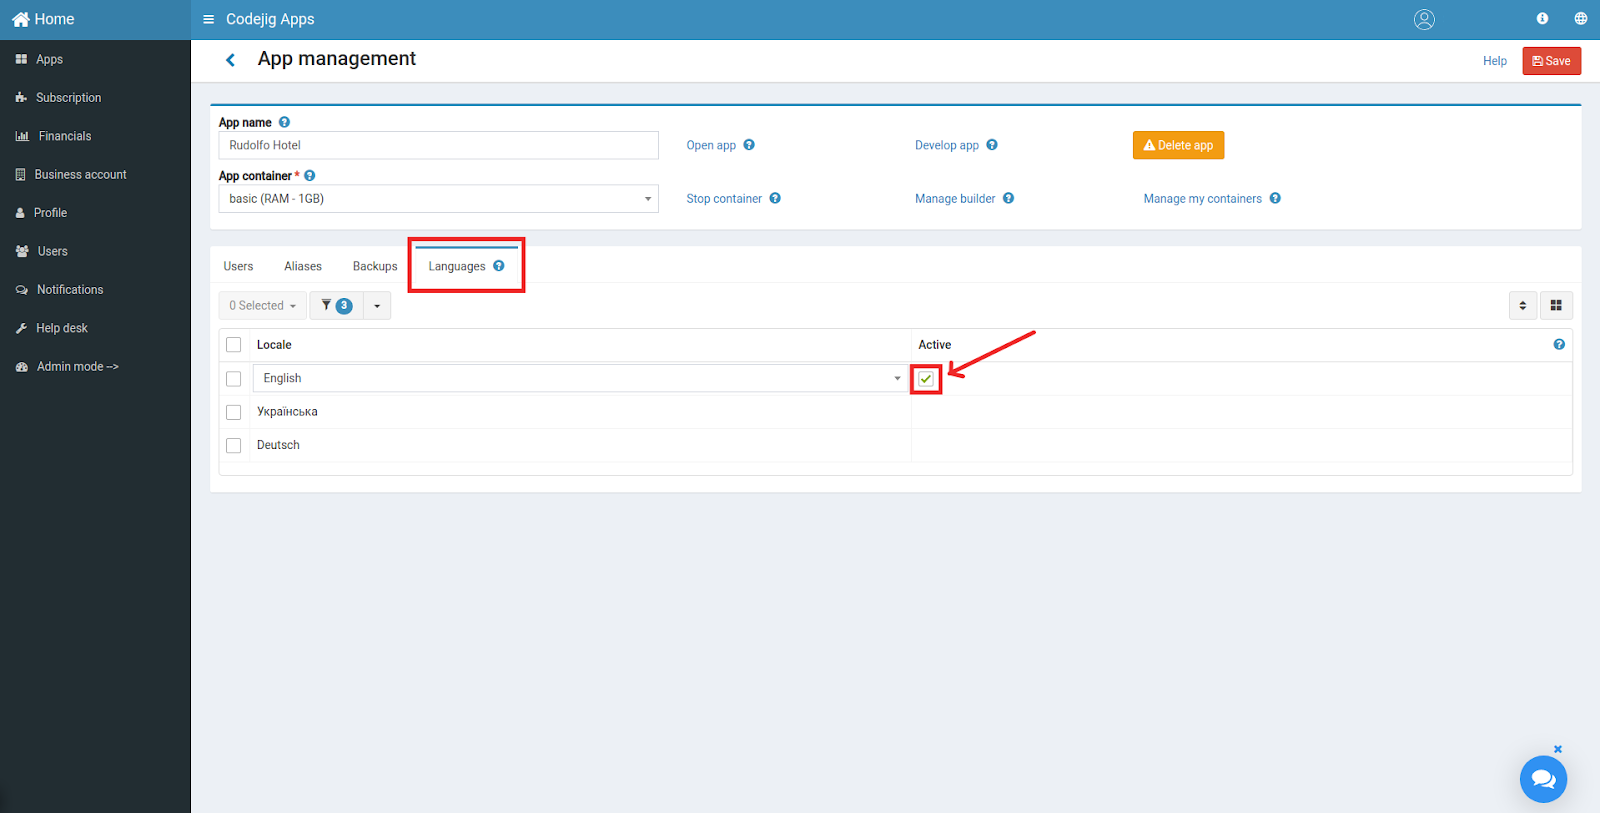
We will support all three languages added to this builder.

You can set the preferred order of languages specifically for this application in the same way as it was done for the builder.
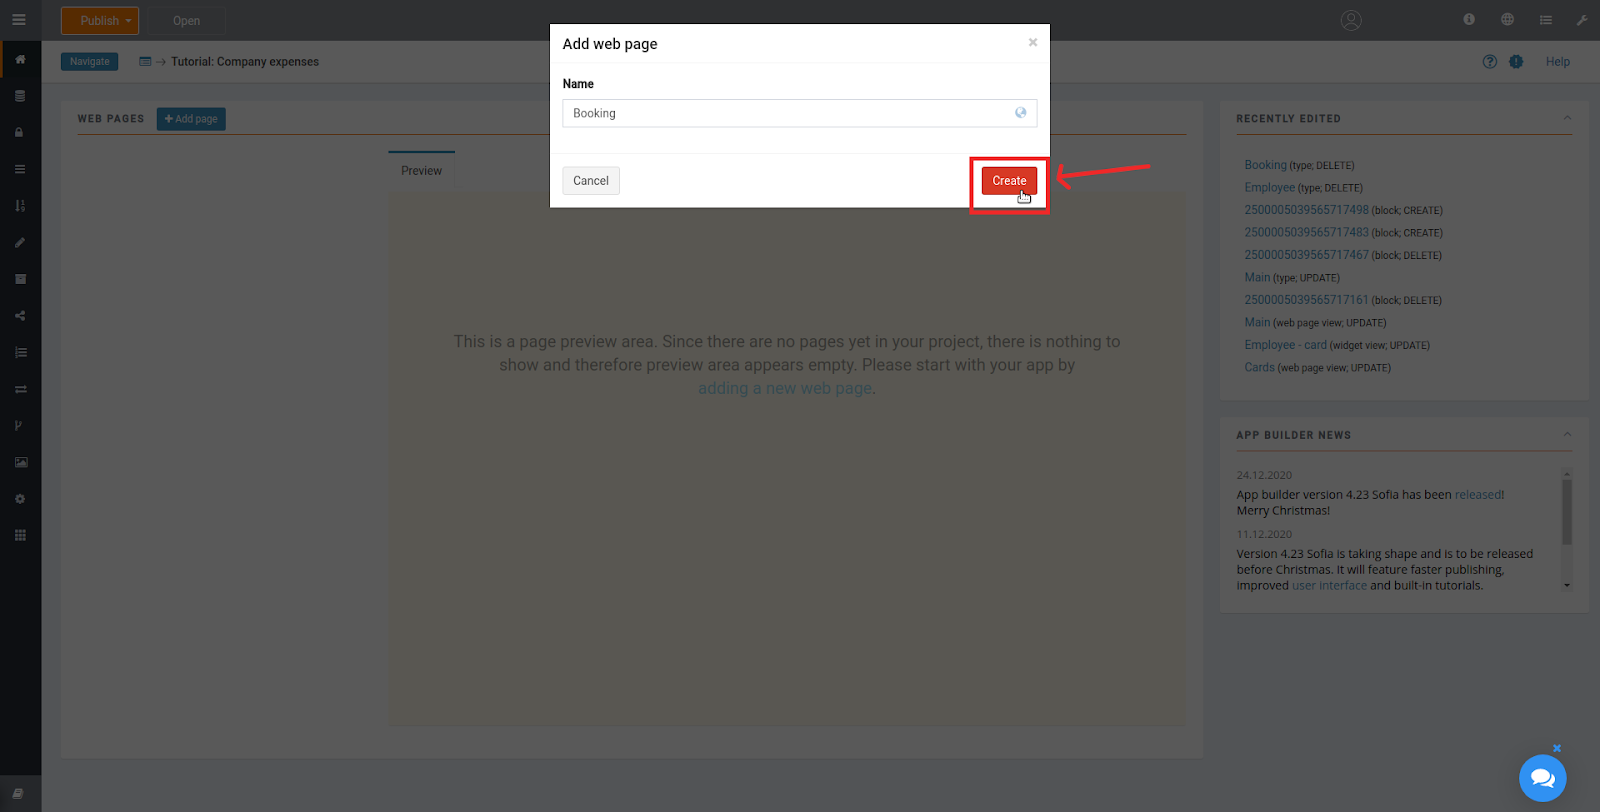
ADD NEW WEB PAGE
Return to the apps overview page and click on Develop link to go to the Rudolfo Hotel project.
Create a new web page.

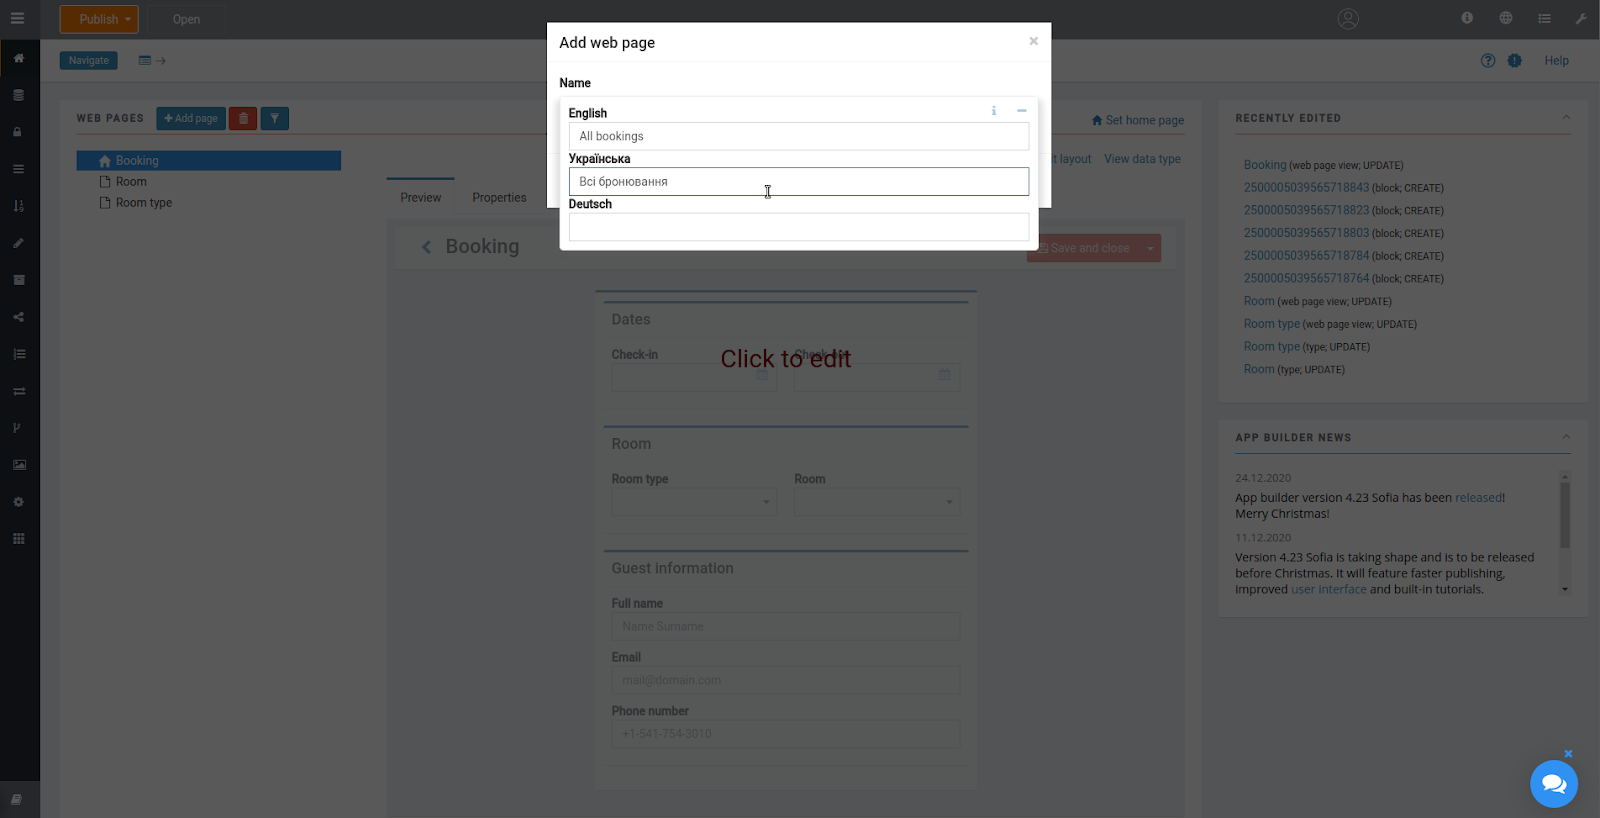
To provide names in other languages, click on the languages icon on the right of the Name field.

Name it Booking for english version and provide translation for other languages (Бронювання in Ukrainian and Buchung in German).
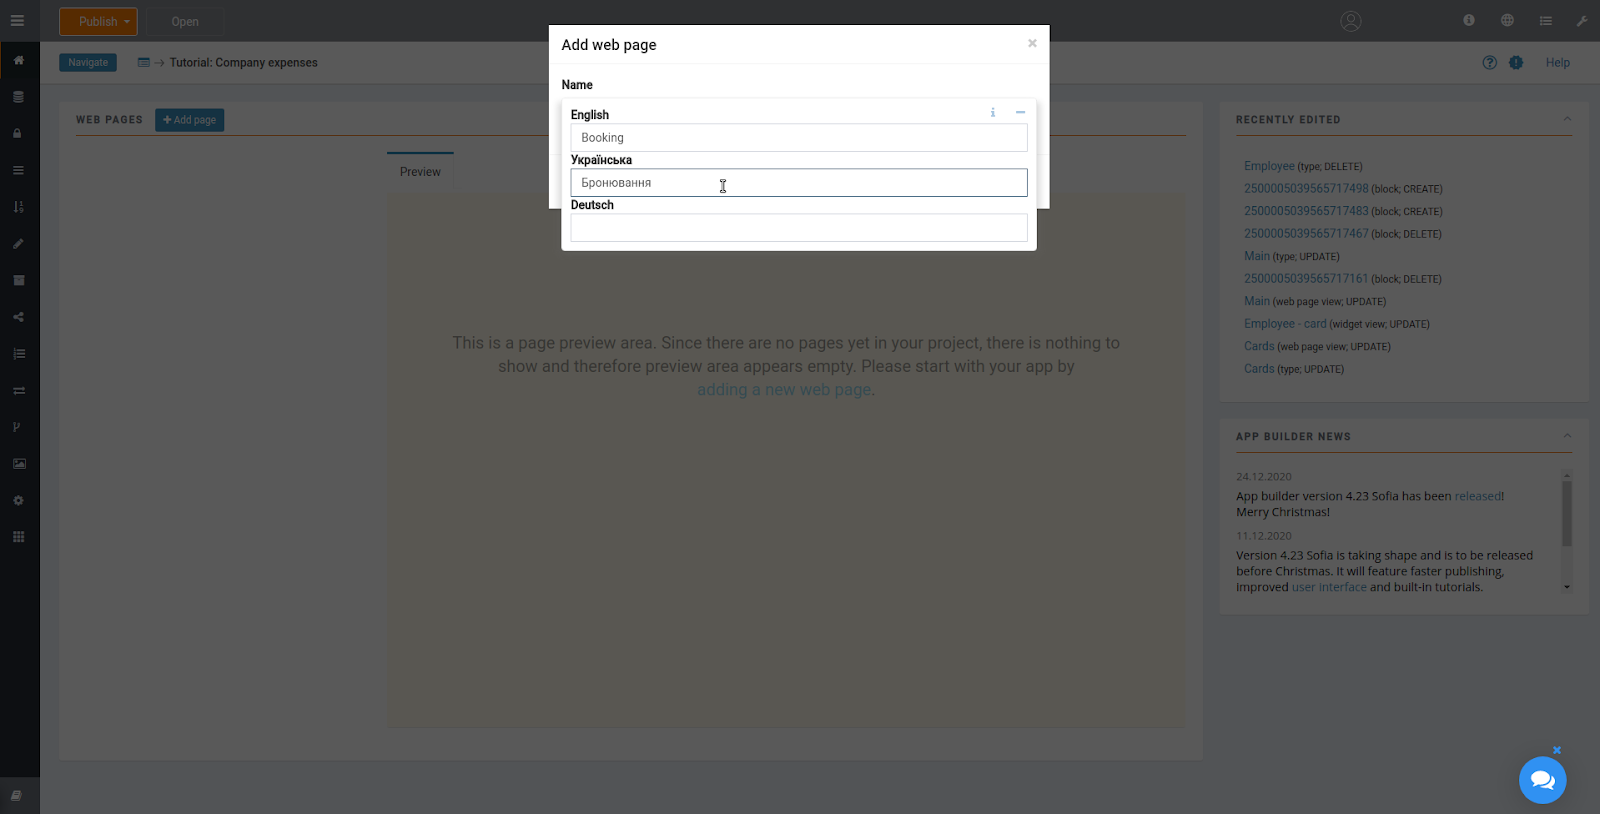
To close this multilanguage field editor click outside of the multilanguage name panel, but inside creating a web page panel. Click on Create.
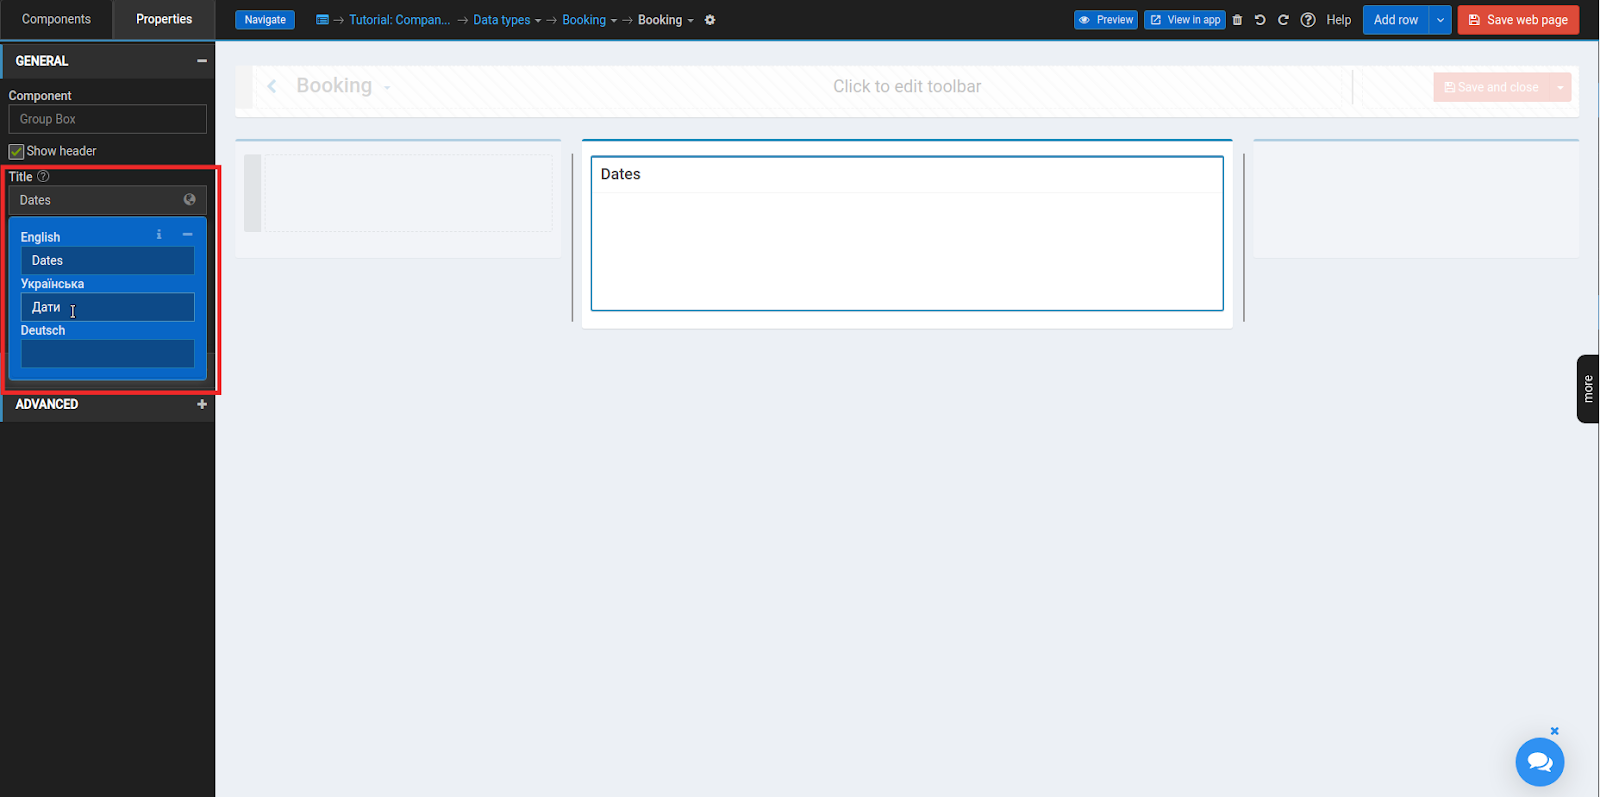
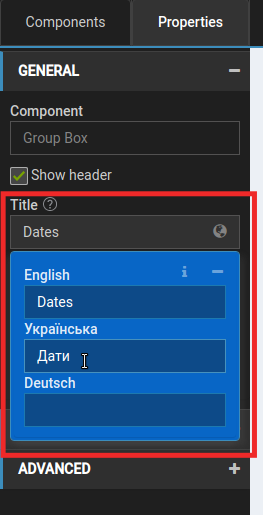
MULTILANGUAGE GROUPBOX HEADER
Click on the Group Box. In Properties → GENERAL tick the box Show header. Below that, click inside the Title field on the languages icon.
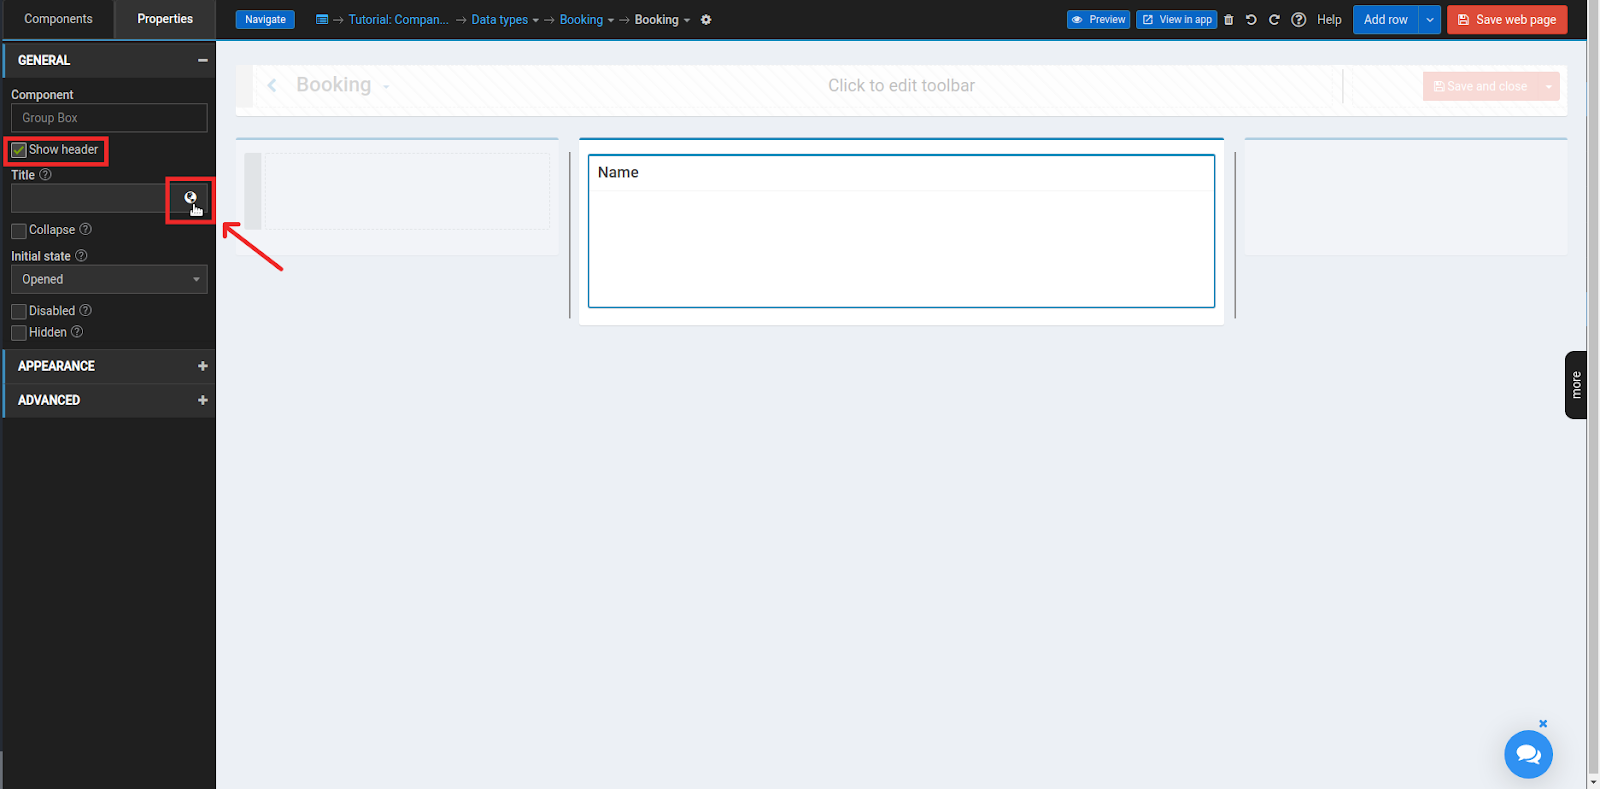
Provide the name of the header in several languages. Name it Dates in English, Дати in Ukrainian and Termine in German.
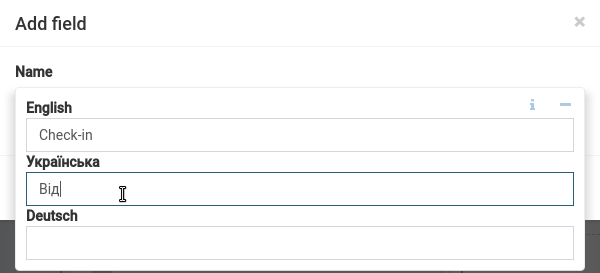
ADD FIELDS TO THE PAGE
From Components → ADD NEW FIELD drag into the page:
Inside previously created Dates group box:
- Check-in : Date & time → Date field type
- Check-out : Date & time → Date field type
Room group box:
- Room type : Select → Select field type
- Room : Select → Select field type
Guest information group box:
- Full name : Text input → Text field type
- Email : Email field type
- Phone number : Phone number field type
Each time is creating a new field. You can provide its Name in other supported languages too.
Place those fields as shown below:
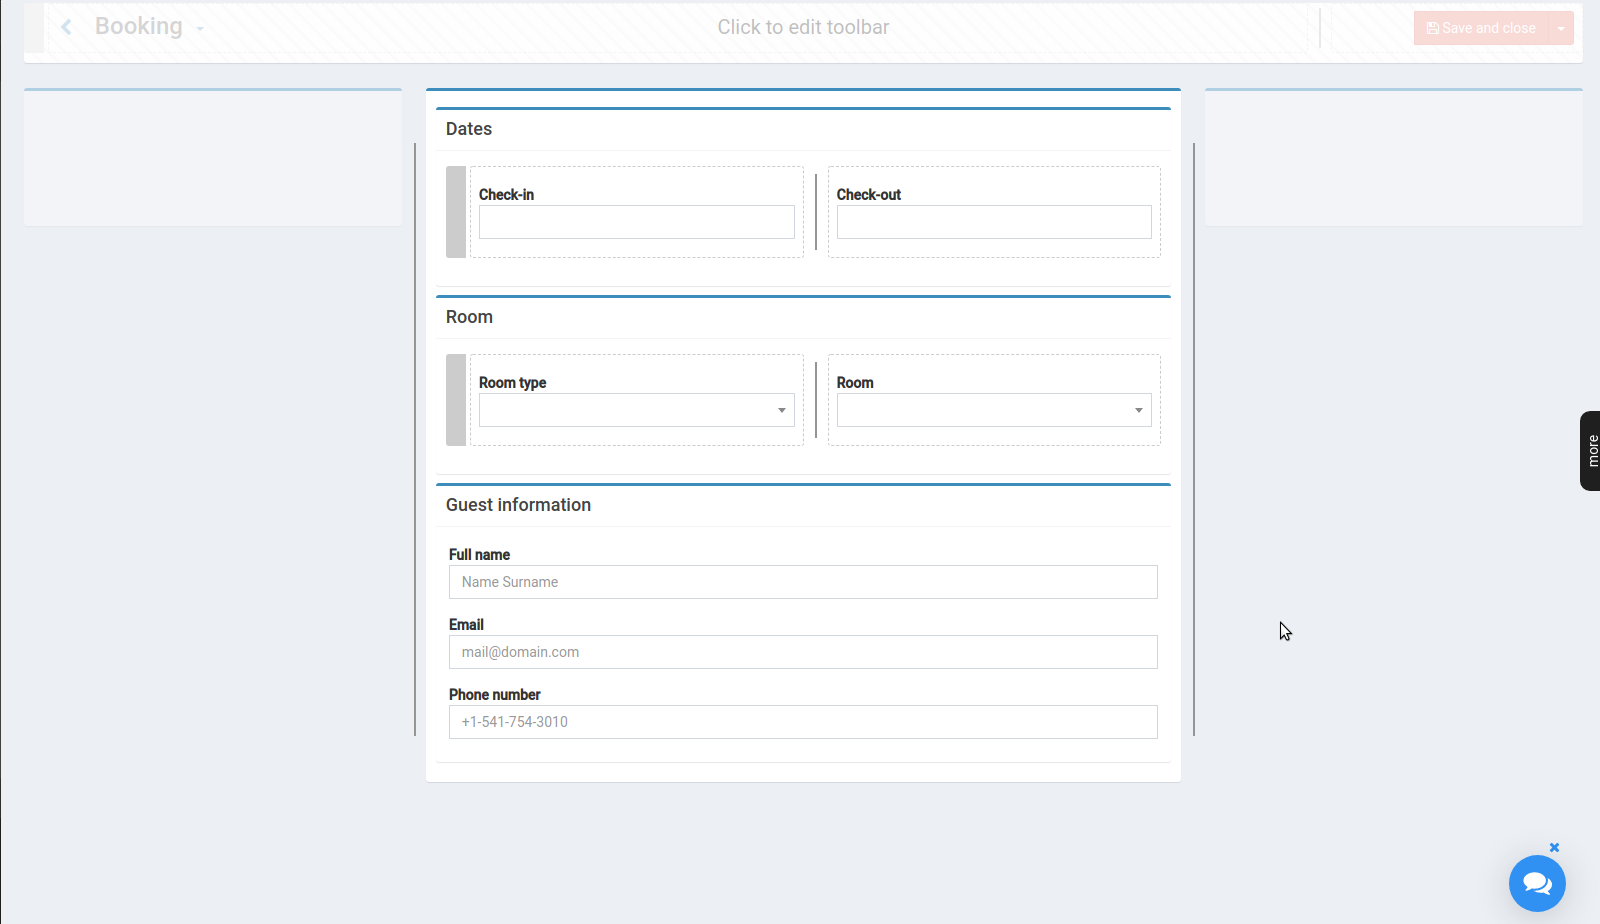
Save the web page.
ADD LOOKUP TABLE
In further steps, we will need a storage collection for available rooms. To add such a field for Booking data type, simply drag in Table → Lookup table to the web page.

Table on the web page is always saved as a collection of items for the owner data type.
Name it Available rooms. Assign Room as Data type for this table.
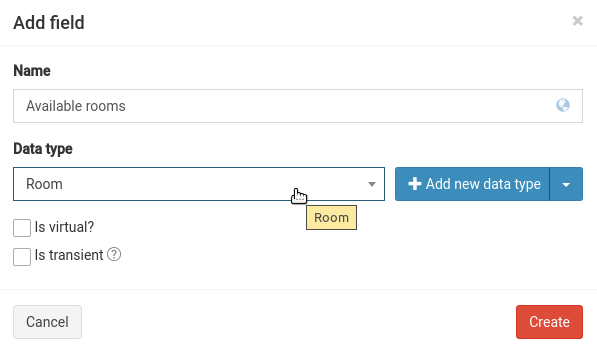
Hide this table from the web page by ticking the box Hidden in Properties → GENERAL.

Save the web page.
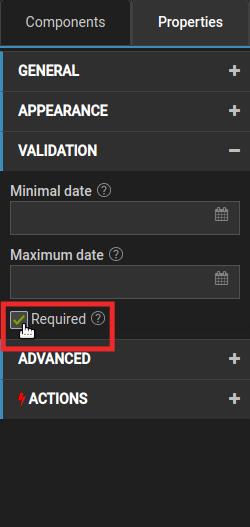
MAKE FIELDS REQUIRED
For each field:
- Check-in
- Check-out
- Room type
- Room
- Full name
- Phone number
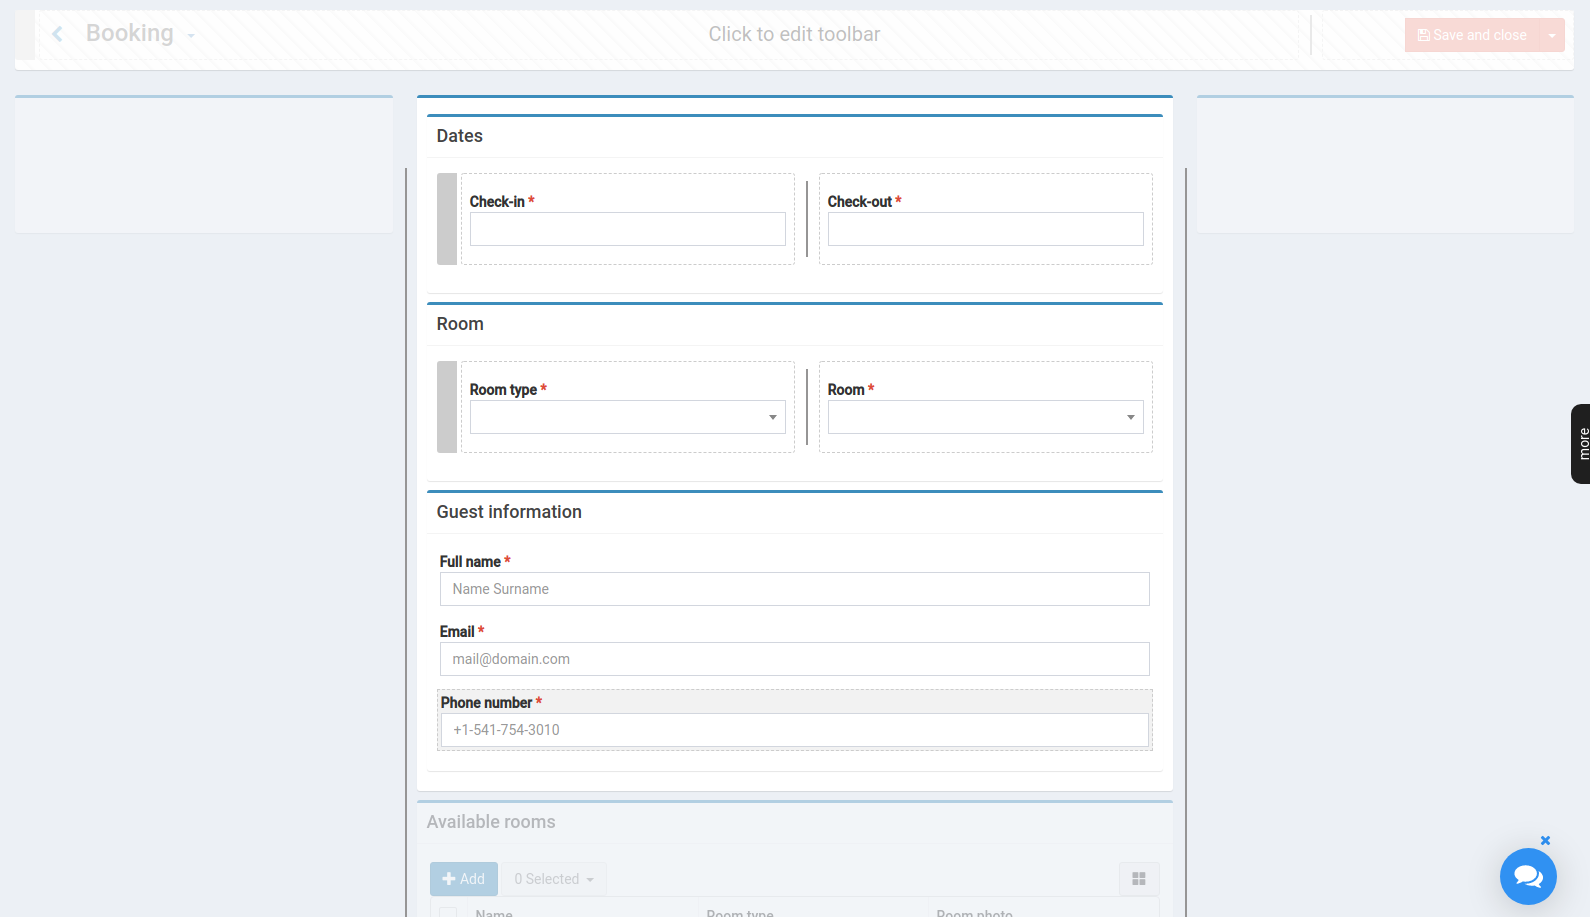
In Properties → VALIDATION, tick the Required box to forbid saving Booking with empty fields.
In the end Booking web page should look like this:
UPDATE ROOM WEB PAGE
By adding the Room field to the Booking web page, the Room data type was automatically added to our application. It already has the inside Name property of type String. However, we would like to update the Room data type with new properties. For that, simply go to the Room web page.
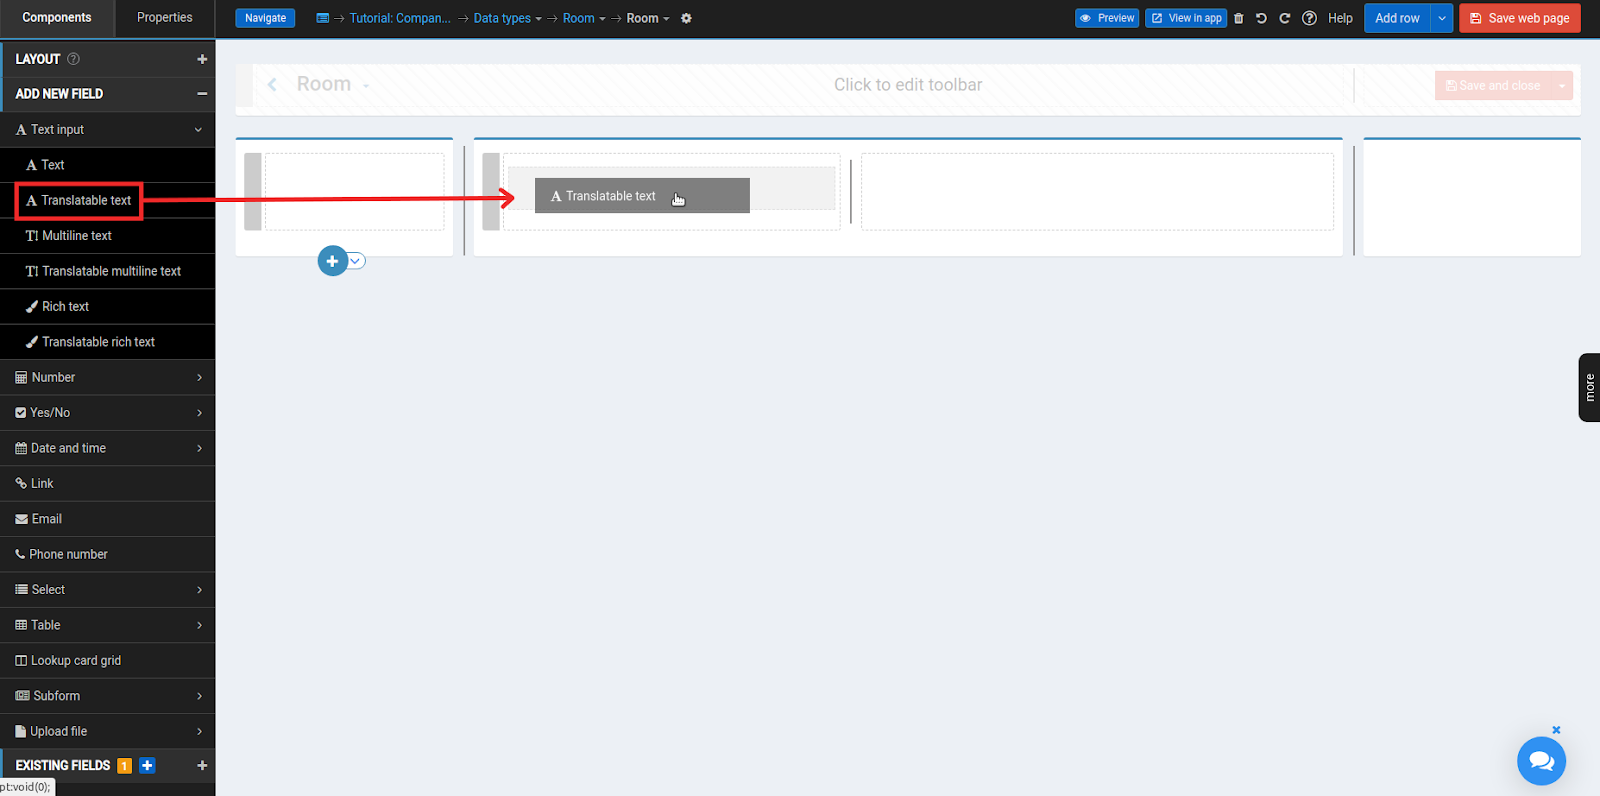
As we would like to show the Room’s Name in other supported languages, delete the current Name field (because it’s of type Text input → Text that doesn’t allow multi-language input), save the web page, and add Text input -> Translatable text. Name it as well Name.
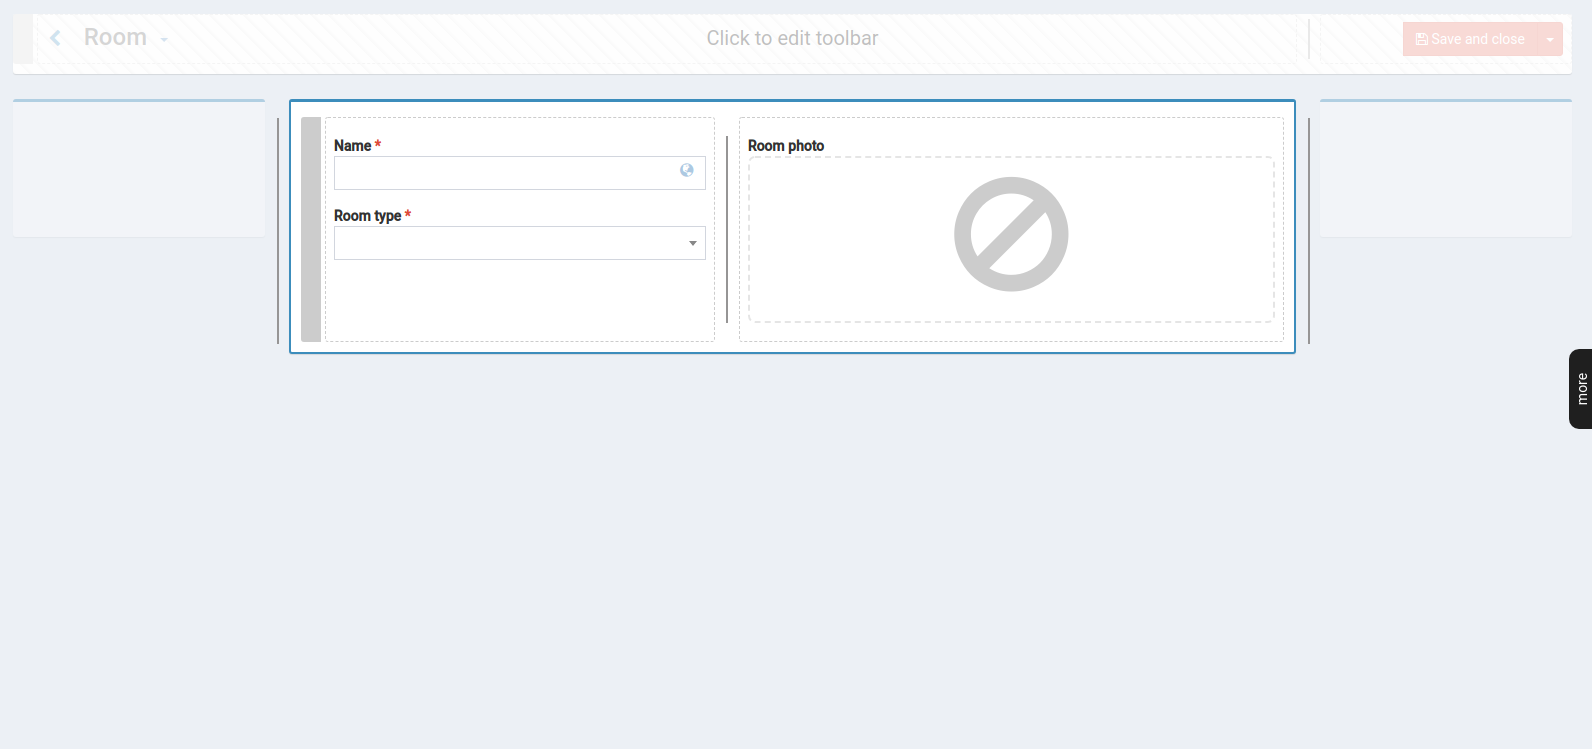
Add two more field to this web page:
- Room type : Select → Lookup (choose Data type: Room type)
- Room photo : Upload file → Image
Make Name and Room type fields required.
Place fields on the page as it is shown below.
UPDATE ROOM TYPE
As it was with the Room web page, replace the current Name field and Text input → Translatable text Name field.
Add a new field Capacity : Number → Integer.
Make both fields on the web page required.
In the end, Room type web page should look like this.

FILTER DROPDOWN OPTIONS
Go back to the Booking web page.
For the Room field selection dropdown, we would like to list only available rooms to choose from, depending on dates and Room type.
Let’s list rooms that are in the collection of the table Available rooms.
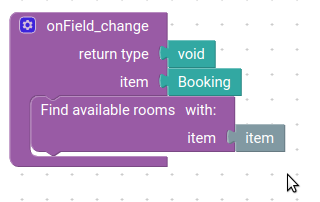
On the Booking web page, click on the Room field. In Properties → Actions add a client function On field filtered that will be executed each time when selection dropdown for Room is opened.

Save the web page and redirect to the code block.
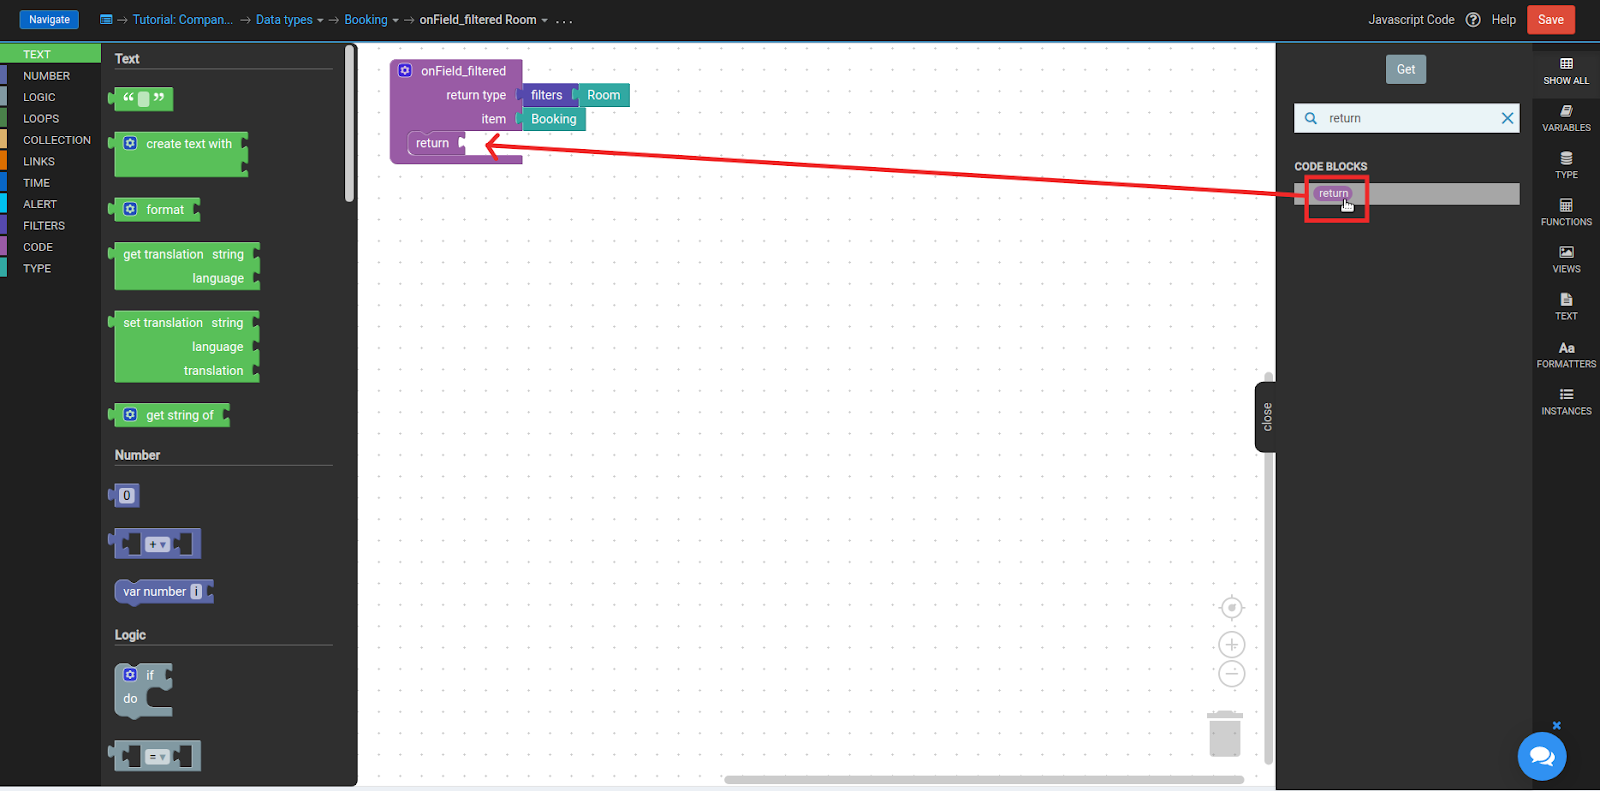
This function should return a filter for a data type Room, where each room is in the table Available rooms.
In the Block panel → CODE drag in a return code block or find it in the data panel on the right.
From Block panel → FILTERS drag in make filters i → code block. Place it next to the return statement.
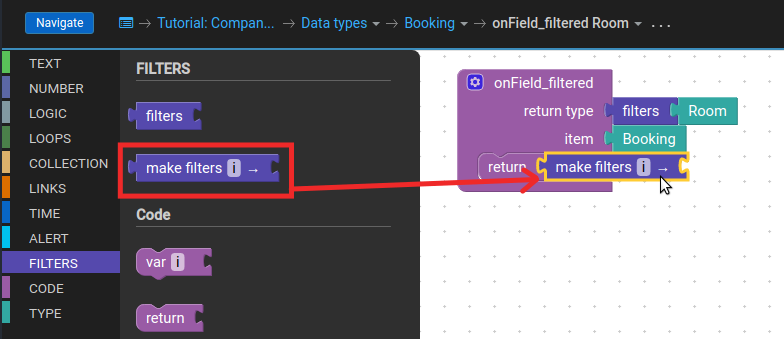
Inside make filters i → code block rename i variable into room.

Filter requires a check if the value room is worth being accepted in further procession. Such a check should return a boolean value depending on passed value.
Let’s add a check if the room is in collection item@Available rooms.
From the Blocks panel → COLLECTION drag in is item … in collection … code block next to the filter.

Place a room inside the free slot after “is item”.

Place item@Available rooms inside free slot after “collection”.

Save the code block.
CREATE CUSTOM SERVER ACTION
Since in the selection dropdown of Room field only rooms that are in table Available rooms are shown, we should update a collection of Available rooms with relevant entries.
In the Project menu on the left, navigate to Data types.

Find and click on Booking data type.

Add a CUSTOM ACTION by clicking on the plus icon next to the CODE BLOCKS.
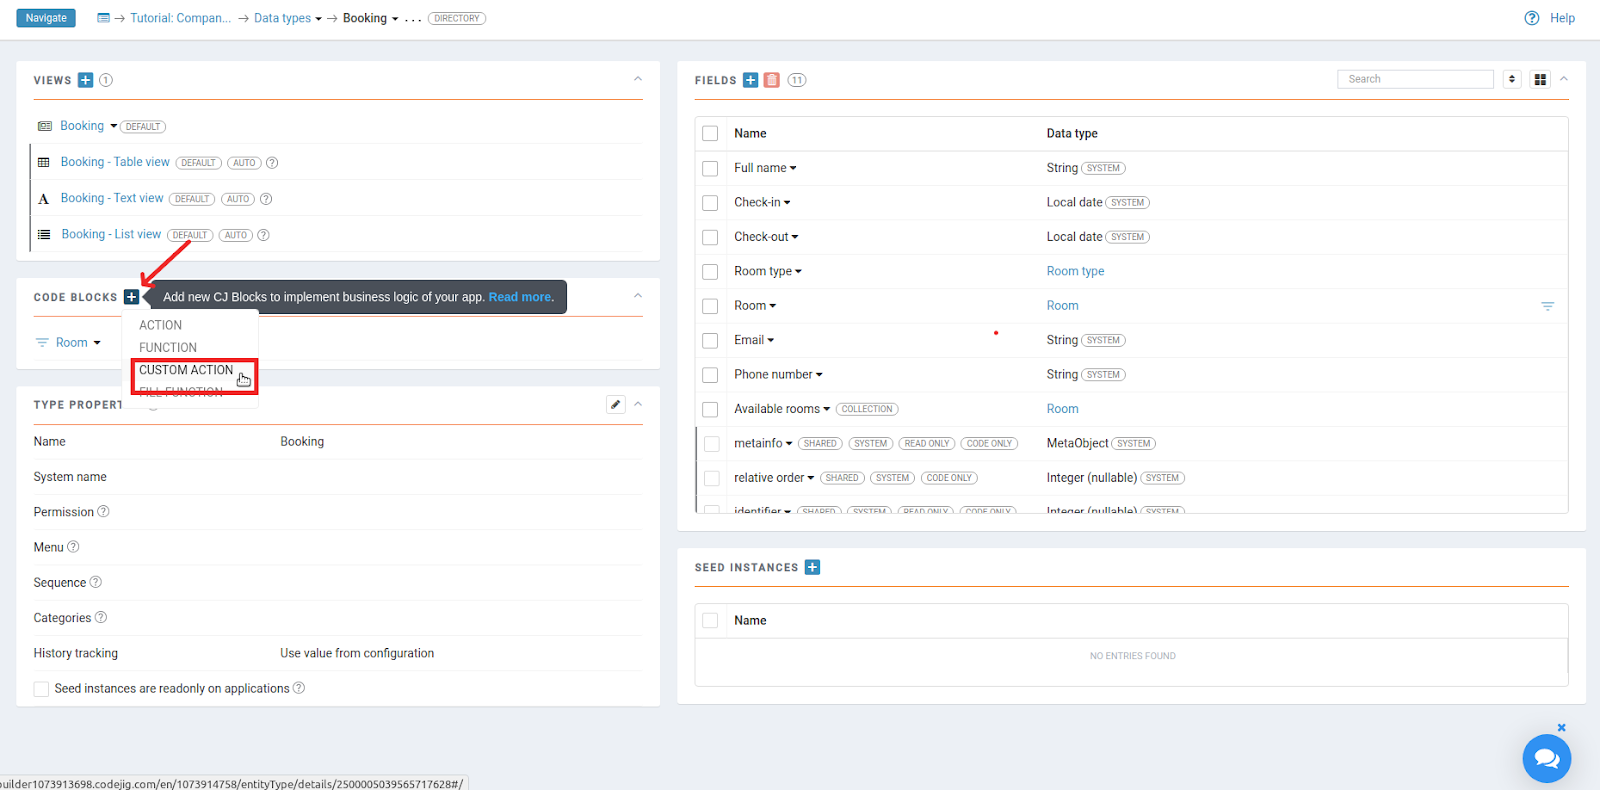
Name it Find available rooms. Choose the Data type of the action Server, as we will need access to the database to retrieve entries of Room data type.

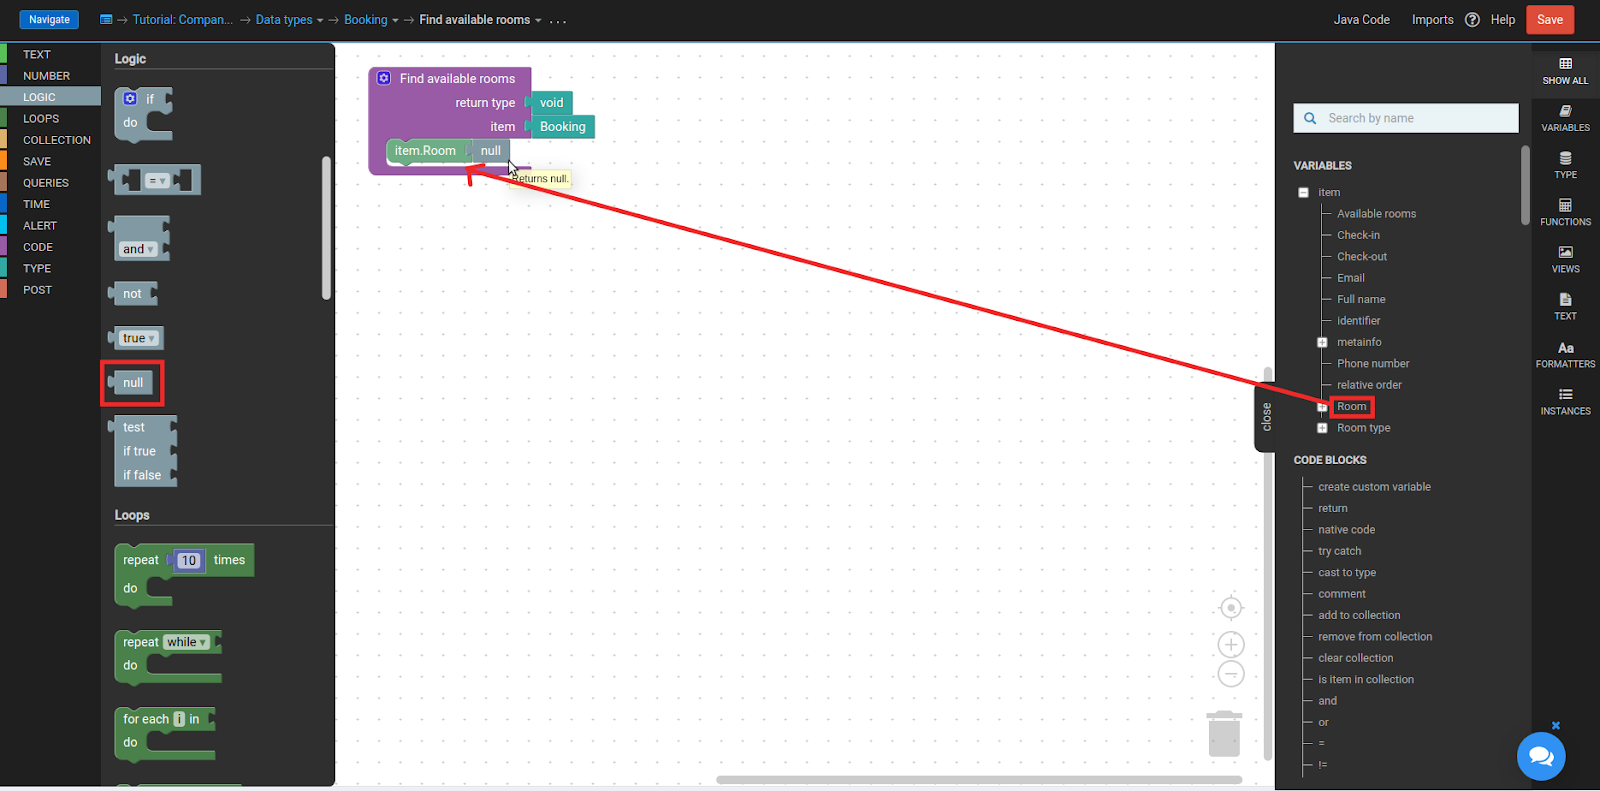
FIND AVAILABLE ROOMS
Drop the selection in the Room field.
For that assign item@Room to null.
Add a check if item@Room type value is unselected by checking if it is null.
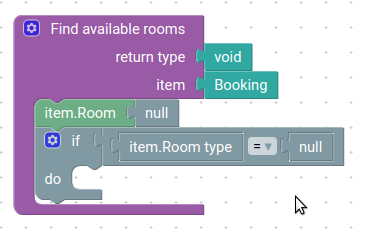
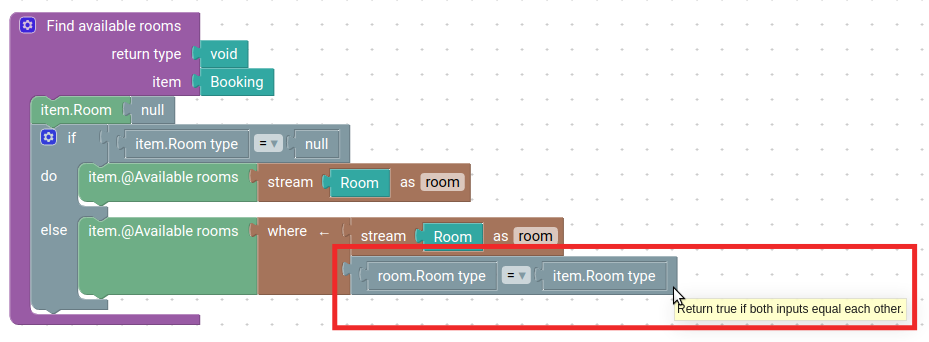
If item@Room type isn’t selected, add to item@Available rooms all entries for data type Room. For that, we need to use Queries (available only for Server actions).
Add a Set for item@Available rooms value.
From Block panel → QUERIES drag in stream … as i block next to the Set item@Available rooms.

To stream all entries for a specific data type, from Data panel → Type place Room type inside free slot of stream … as i code block.

ADD ELSE OPTION TO IF BLOCK
If Room type is selected, we would like to assign to Available rooms only rooms with the chosen type. For that, let’s add an else option to the if block.
Click on the Settings button on the left top corner of the if block.

Drag the else option and attach it next to the if option.
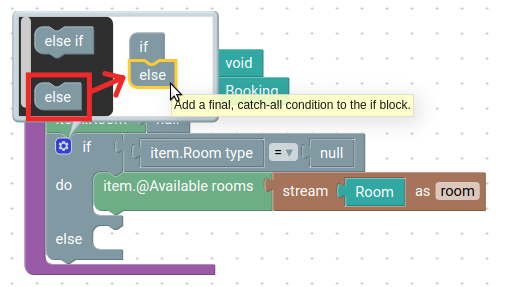
Add a Set for item@Available rooms value.
To filter elements from the query, use the where code block.
From Block panel → QUERIES drag in where block next to the Set item@Available rooms.

First free cell of the where block receives a query for the procession and the second cell receives a function for filtering elements in the query.
Place a query of all rooms (a stream of Room data type) into the first free cell of where block.

Place a filtering function into the next free cell of the where block. In our case, the filtering function checks if room has selected item@Room type.
REMOVE ROOMS THAT ARE BOOKED FOR CHOSEN DATES
If dates on the web page are selected, we would like to exclude rooms from the item@Available collection, which dates don’t intersect with selected ones.
Add a check if dates are selected on the page.

Add iteration of filtered bookings, for which dates overlap with selected ones.
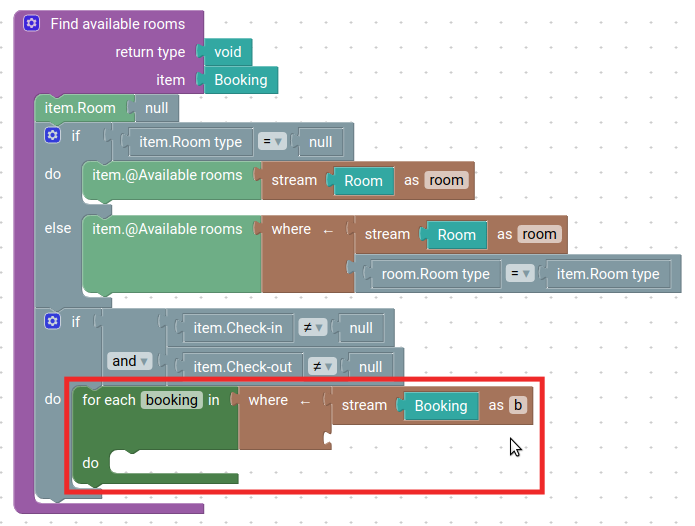
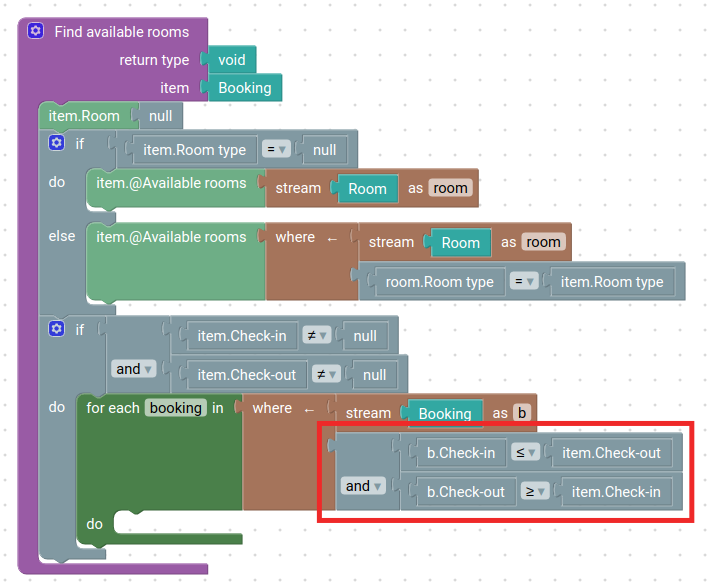
Check if booking.Room is in collection
of item@Available rooms.

If so, remove this booking.Room from item@Available rooms.

Save the code block.
EXECUTE CUSTOM ACTION ON FIELD CHANGE
Navigate to the Booking web page.
Click on the Check-in field. In Properties → Actions, create a new Server event block On field change.
Note: server actions are marked with a red icon when client actions are marked with a blue icon.
Server functions can only be used in other server actions. Since Find available rooms is a server action, we need to choose server-side events.
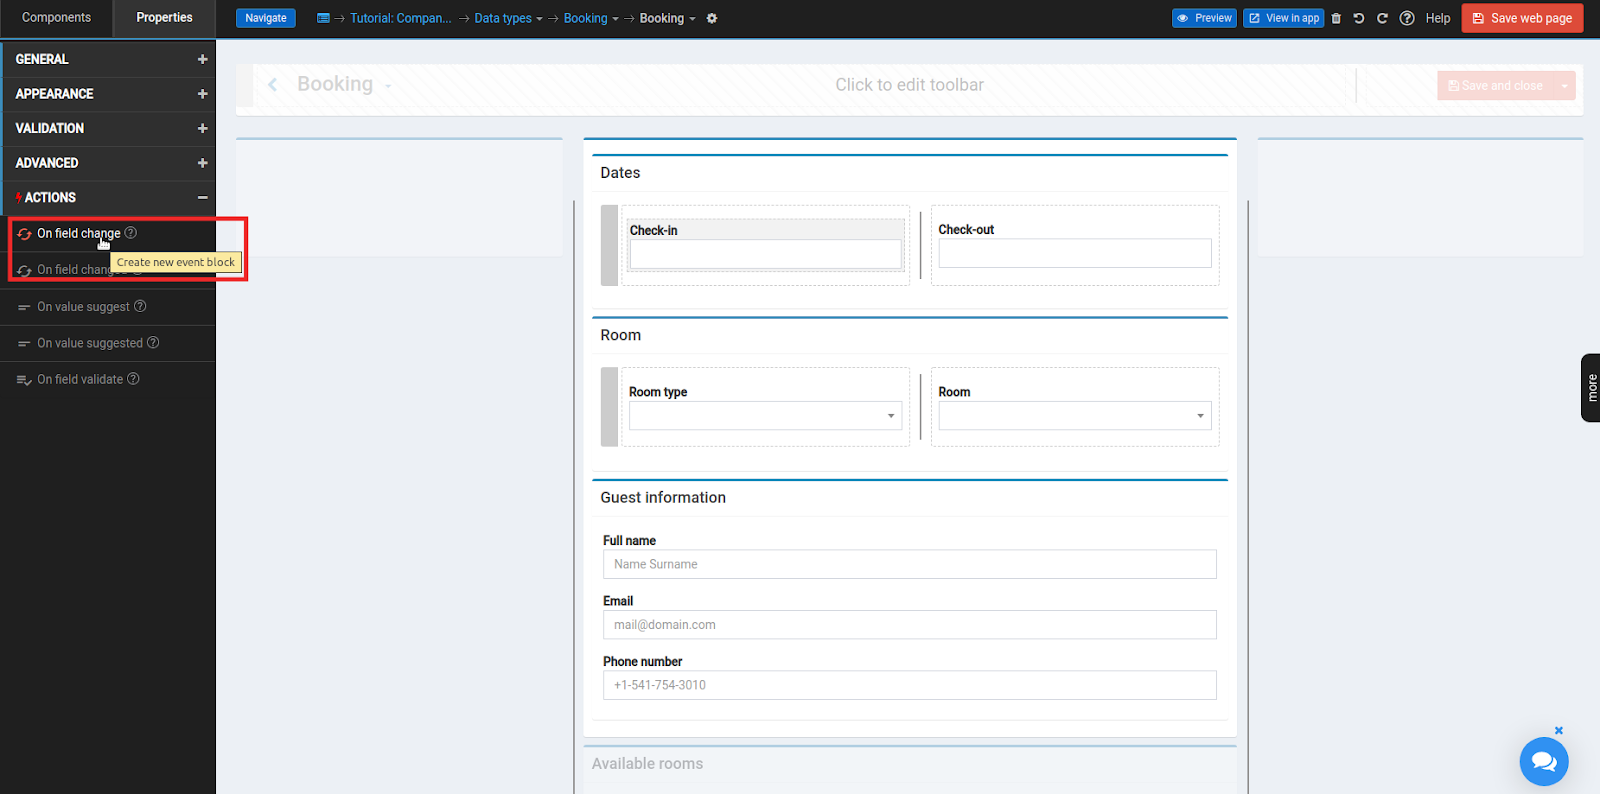
Save the page and go to the created code block.
In the Data panel get a Find available rooms action.

Pass the item as an argument of Find available rooms custom action.
Repeat this step with fields:
- Check-out
- Room type
CREATE WEB PAGE ALL BOOKINGS
Now we would like to simplify work for hotel administrators and add a new page for monitoring bookings and available rooms depending on selected dates.
Create a new web page and name it All bookings.
Hide the toolbar (use checkbox in Page Properties)
On web page editor, add next fields:
- From : Date & time -> Date
- To : Date & time -> Date
- Bookings : Lookup table (choose Data type: Booking)
- Available rooms : Lookup table (choose Data type: Room)
Arrange them as shown below.

Add a Filter bookings button from Component → LAYOUT → Button near date fields.
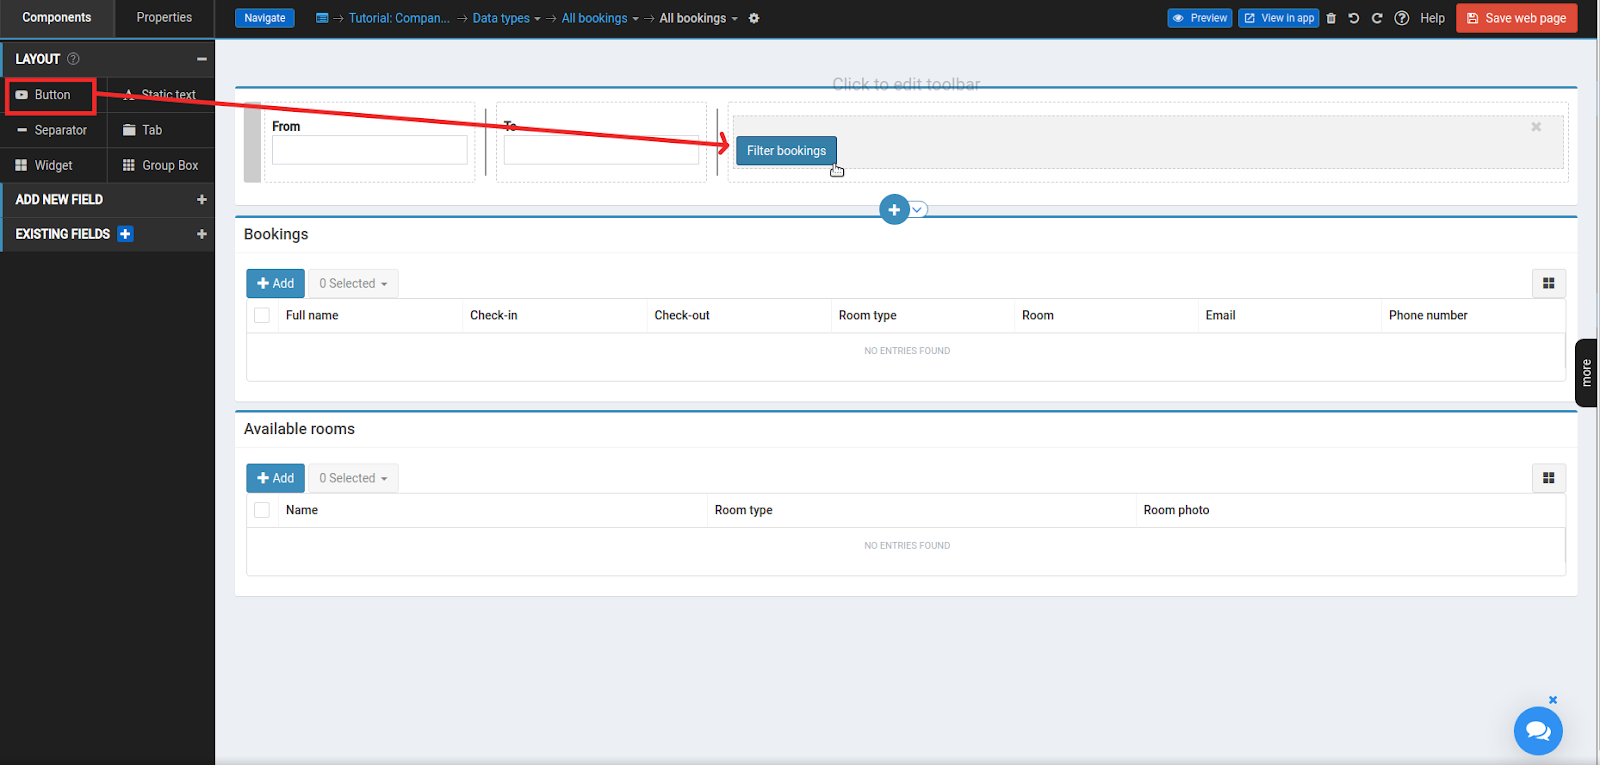
You can also add static text on top with the title of the page.

FILTER BOOKINGS ACTION
We want to update tables of Bookings and Available rooms on the Filter bookings button click.
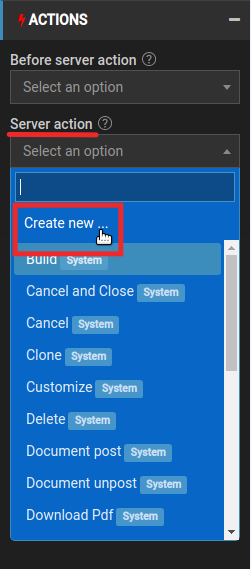
Click on the Filter bookings button, and in Properties → ACTIONS create a new Server action. Name it Filter bookings.
Save the page and go to the created code block.
FILTER BOOKINGS CODE
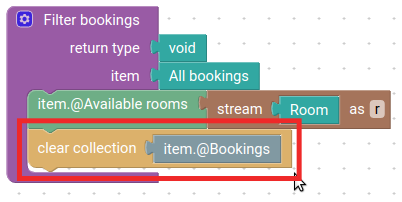
Populate collection item@Available rooms with all entries for Room data type.

Clear collection of item@Bookings.
ADD ERROR MESSAGE
Check if From and To dates are selected on the page.
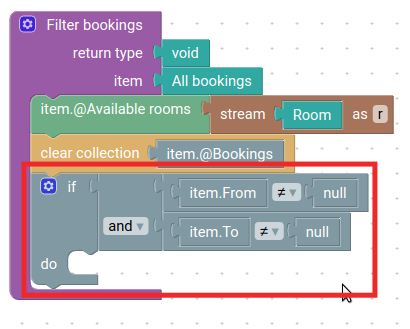
If they are not selected, notify the user with an error message that dates should be selected.
Add an else option for if block.
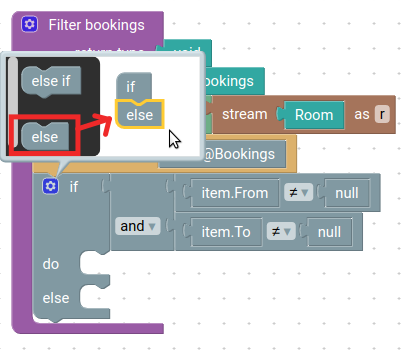
From Blocks panel drag in ALERT → error code block. Place next to it TEXT → ... code block with the message “Please select date range.”

If dates are selected on the page, add a check that the From date is before To date.

If From date is after To date, notify the user with an error message: “From date should be before To date”.

After a successful check that From date is before To date, add iteration over Booking entries, which dates overlap with chosen dates.

Add each booking to the collection item@Bookings.

Remove booking.Room from item@Available rooms.

Save the block.
FILTER BOOKINGS FOR NEXT WEEK ON PAGE LOAD
Go back to All bookings web page.
Click on the more button on the right of the web editor.
In Type events → GENERAL click On load.

Save the page and go to the created block.
SET DEFAULT DATES ON LOAD
Set to From field today’s date. Find now function in Data panel.
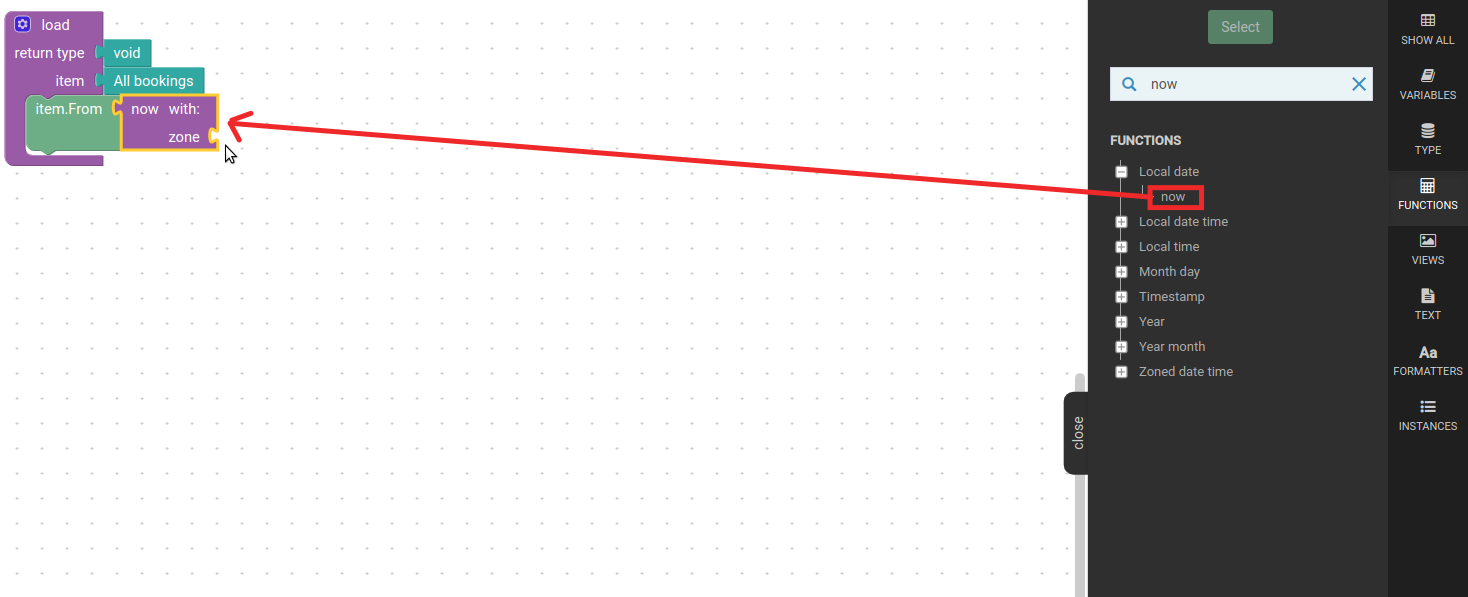
Put a default timezone as a zone argument.
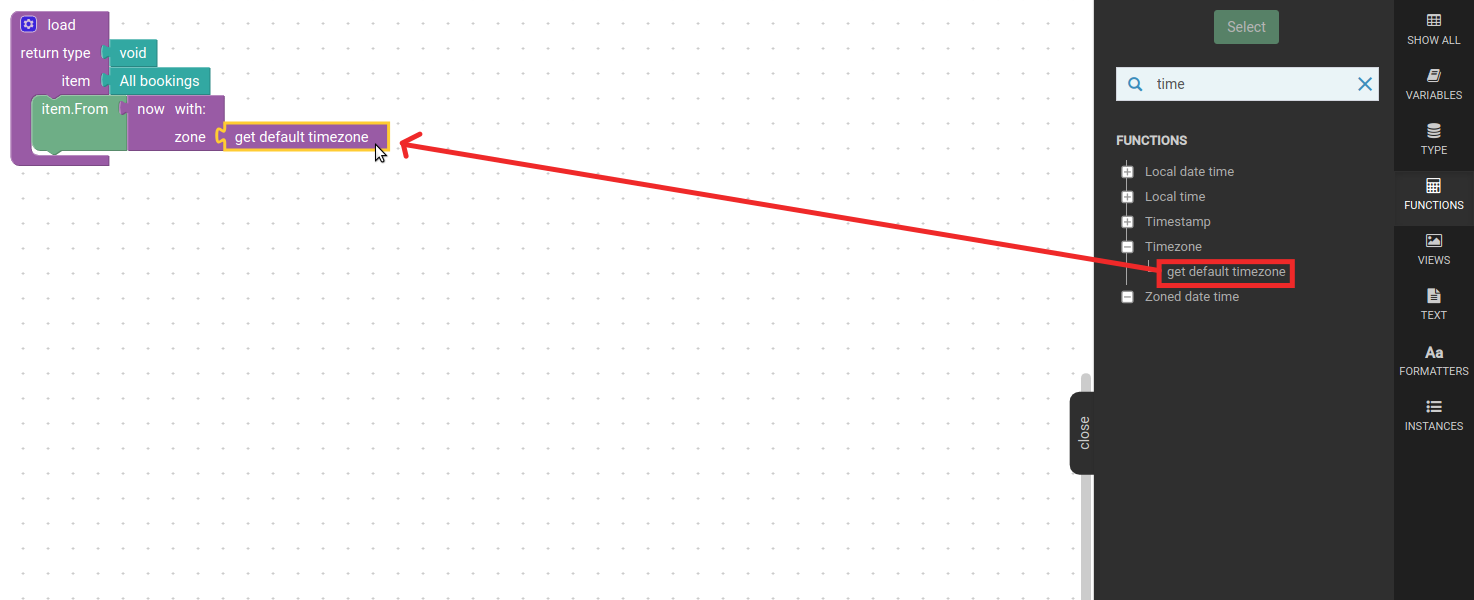
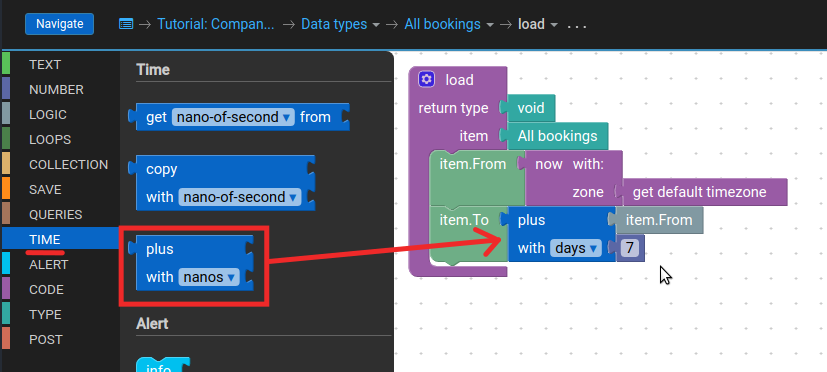
Set to To field the date in a week by adding seven days to today.
Run Filter bookings after setting dates to fields.

ADD MISSING TRANSLATIONS
In case you forgot to add a translation for:
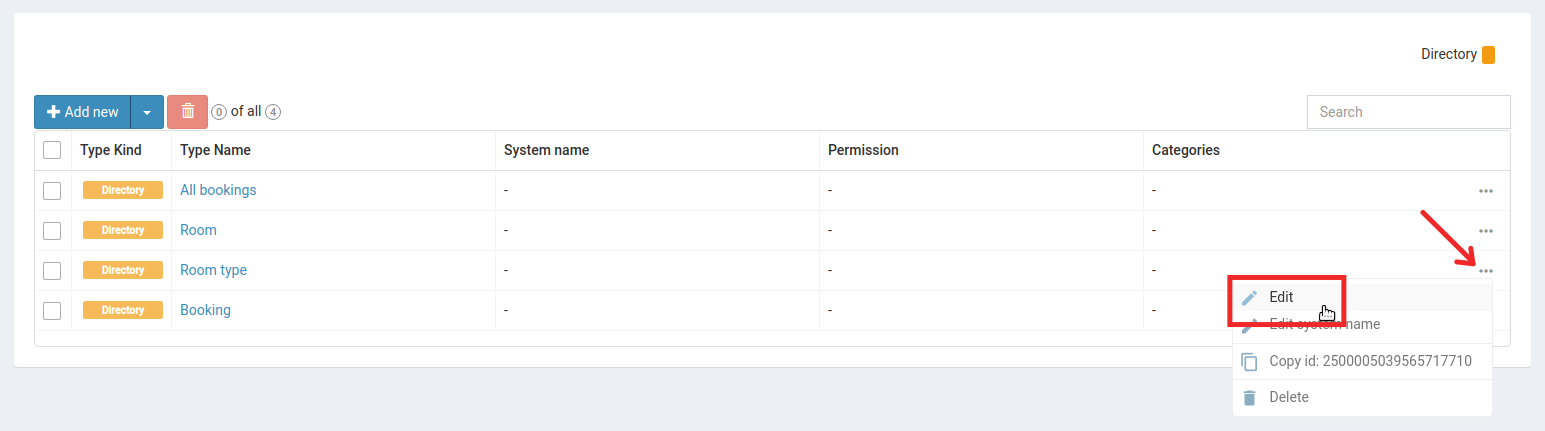
- Data type
Go to Data types and click on the more icon on the left of the interested data type. After clicking on edit add needed translations.

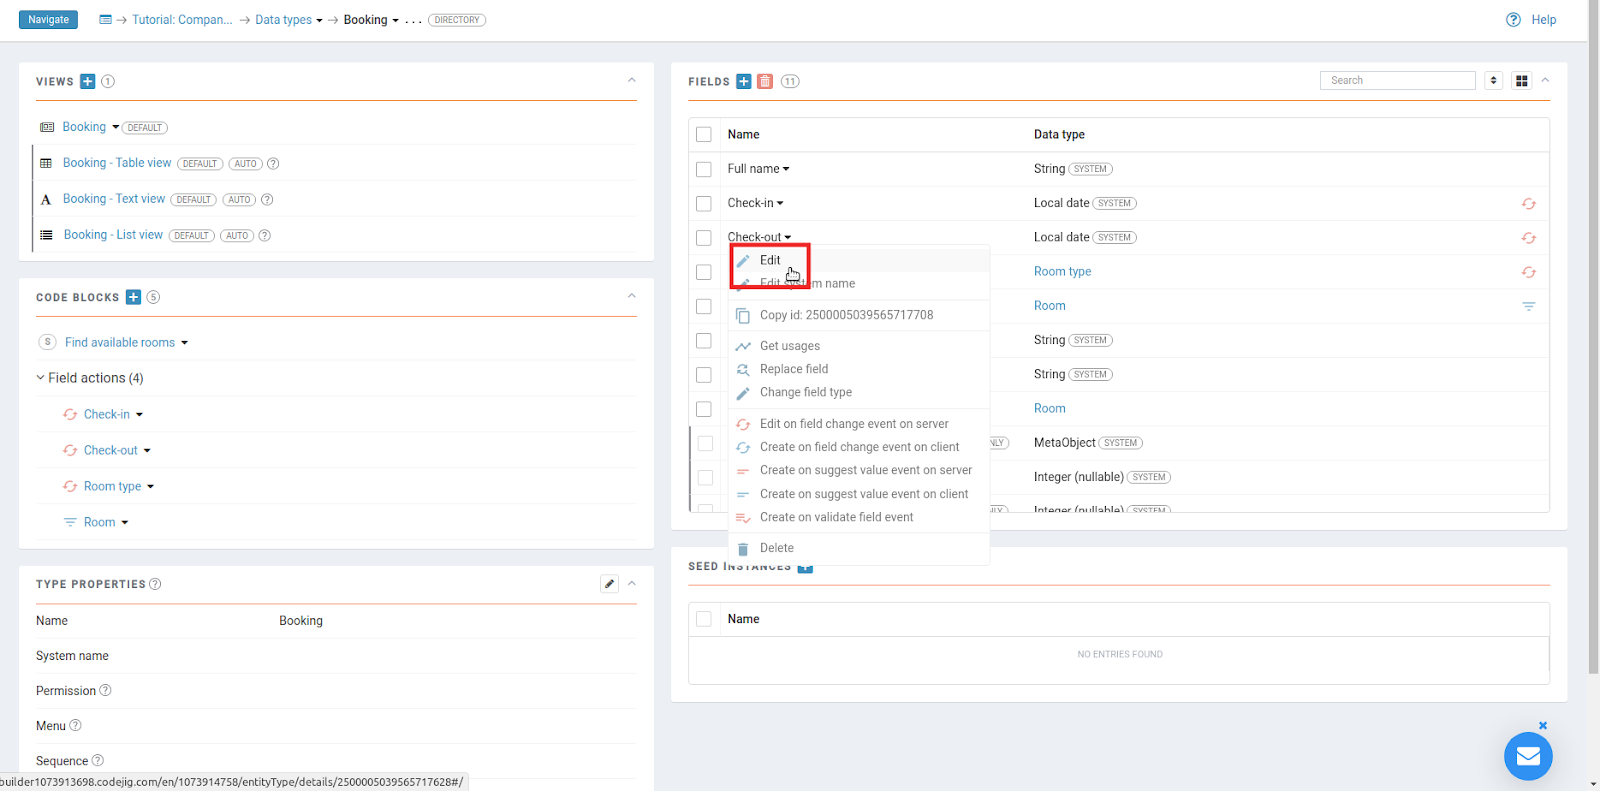
- Field of the data type
On the data type page, click on the arrow icon next to the field name. In the dropdown, click on Edit.
- Static text
Click on the static text. In Properties → GENERAL open the editor. Toggle between languages on top of a text editor.

- Group boxes, Buttons and Widgets
In Properties → GENERAL click on the language icon inside the Title field.
It is highly encouraged to provide translation as soon as possible to avoid asynchronization of translations in the future.
Example of asynchronization:
The Web page of Room data type is created before other translations of the name of Room data type were defined. But the name of the web page wasn’t automatically updated.
CHANGE LANGUAGE FOR THE APPLICATION
Publish the application.
Open the application.
On the left of the App Builder header, click on the earth icon. From the dropdown you can choose the language to show the application.
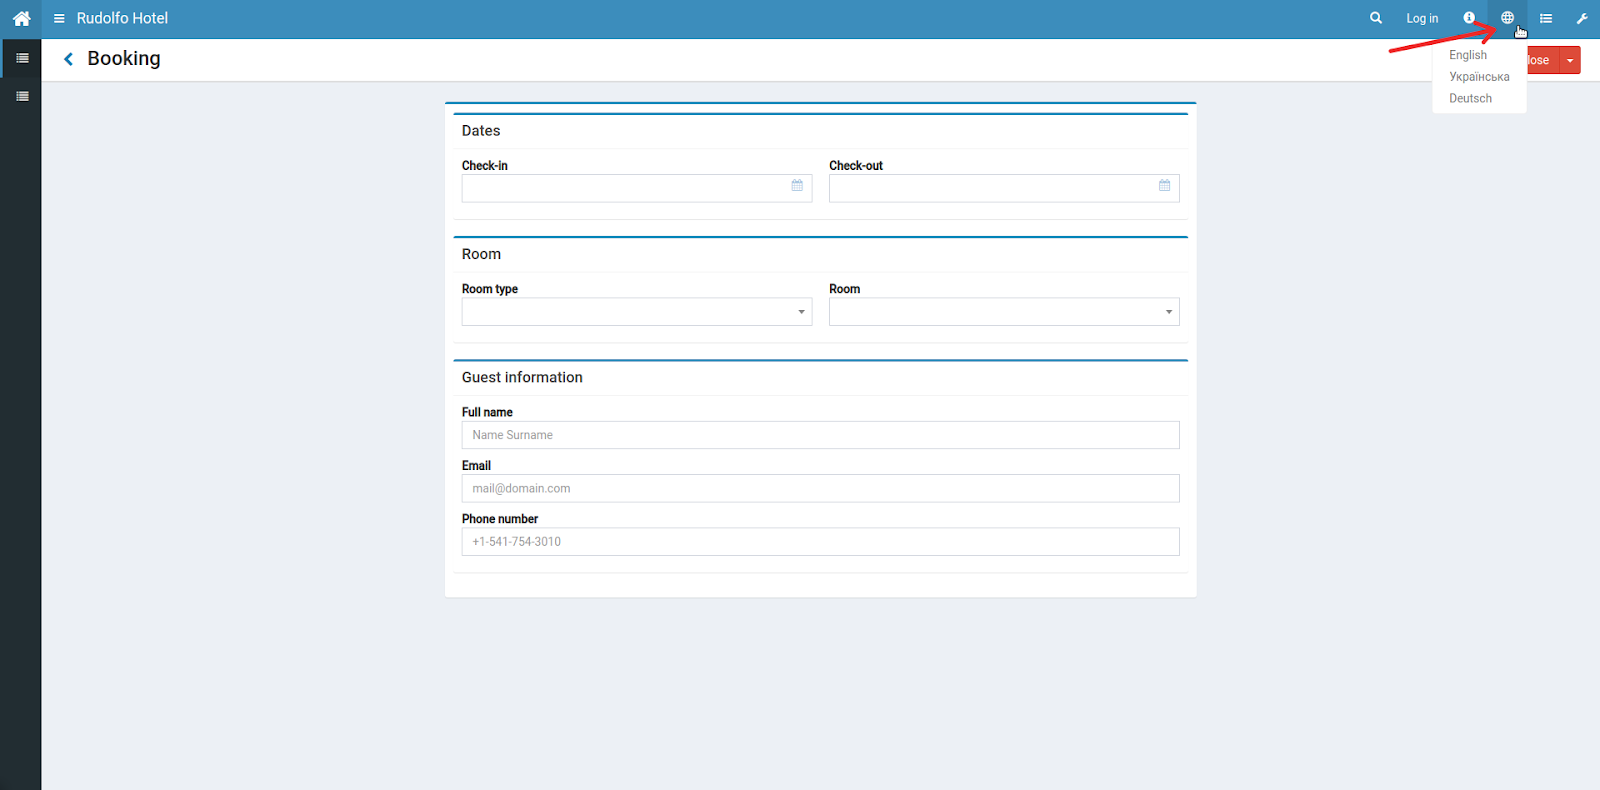
If the translation of chosen language isn’t provided for some fields, then first (in languages order of application) available translation will be shown with mention of shown translation.
Example of Booking page in german.

CONGRATS ON FINISHING THE FIRST PART
You have created the first part of the Rudolfo Hotel application. It allows hotel administrators to manage the booking of rooms in the hotel.
In the next part, you will learn how to create a web page of the hotel for hotel guests with a friendly UI.