List of Customers
INTRO TO THE ENVIRONMENT
That is another good starter app to try some features of Codejig App Builder. In this tutorial, we'll build an app that can easily save your customers’ data.
You will learn how to manage the layout, add and edit fields, code actions.
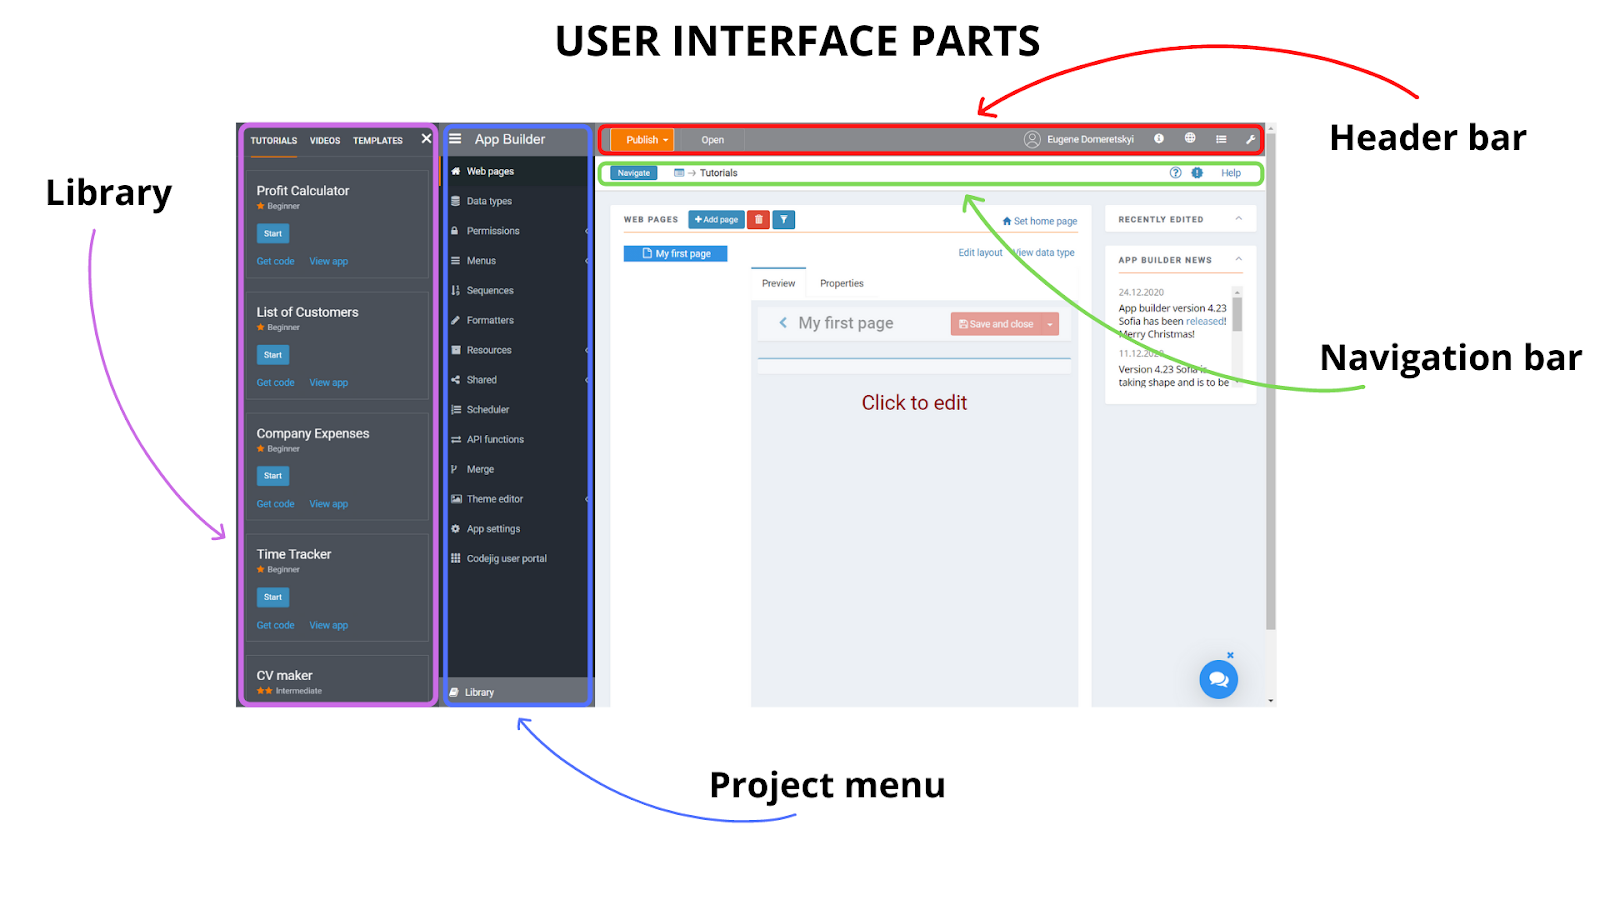
Let’s take a quick look at the home page of App Builder IDE.
Click on the image to enlarge it.
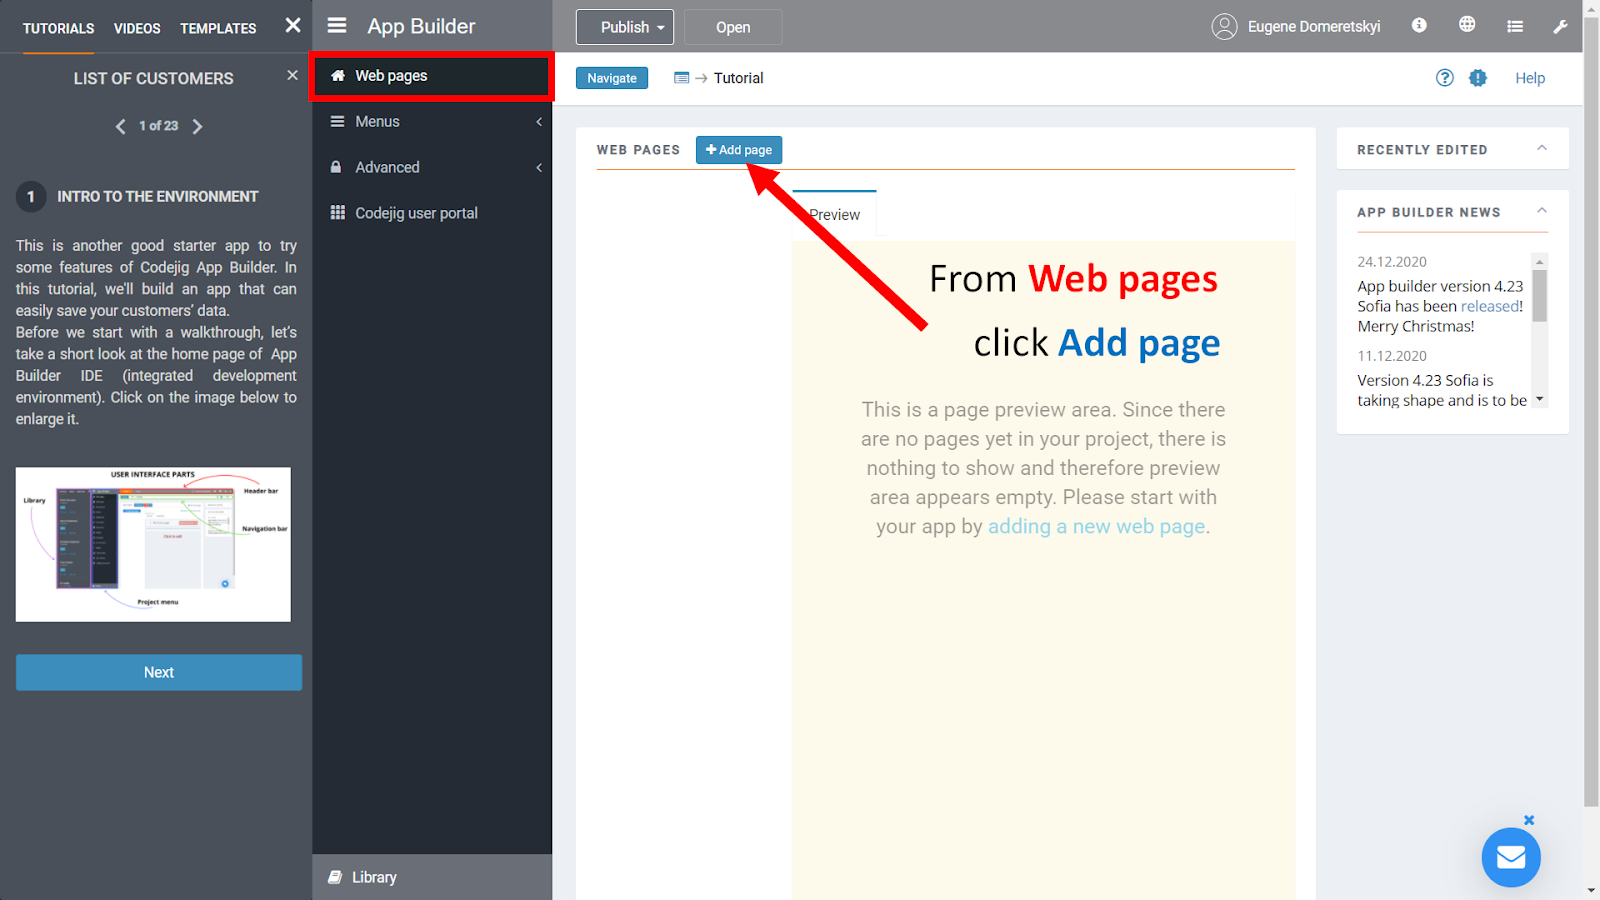
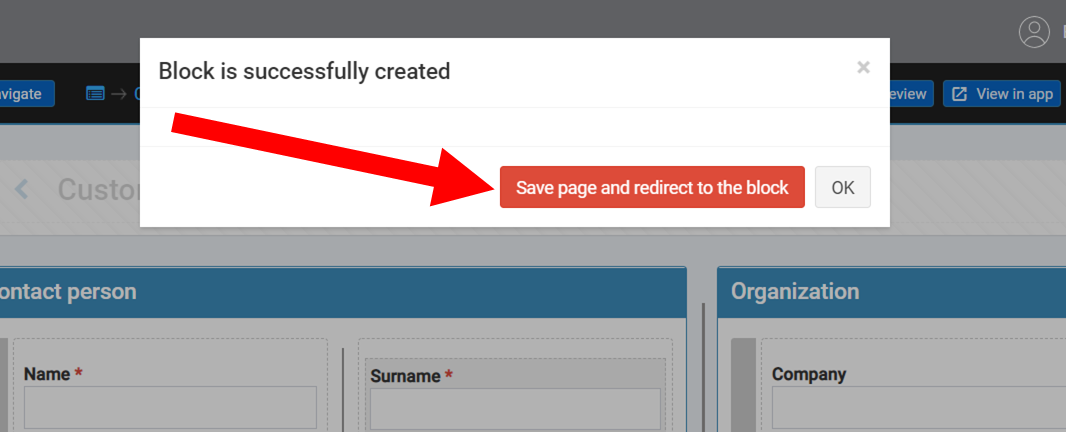
ADD NEW PAGE
From the Web pages section click on the Add page button.
Name the new page List of Customers and click Create.

INTRO TO THE WEB PAGE EDITOR
Take a look at the elements of the Web page editor.

Note: Components and Properties interchage each other.

SPLIT GROUPBOX
The key to a good design is the correct arrangement of elements. Let’s do it in our Web Page Editor.
Hover near the middle top of a blue groupbox and click on a two-sided arrow. As a result, we get two groupboxes.

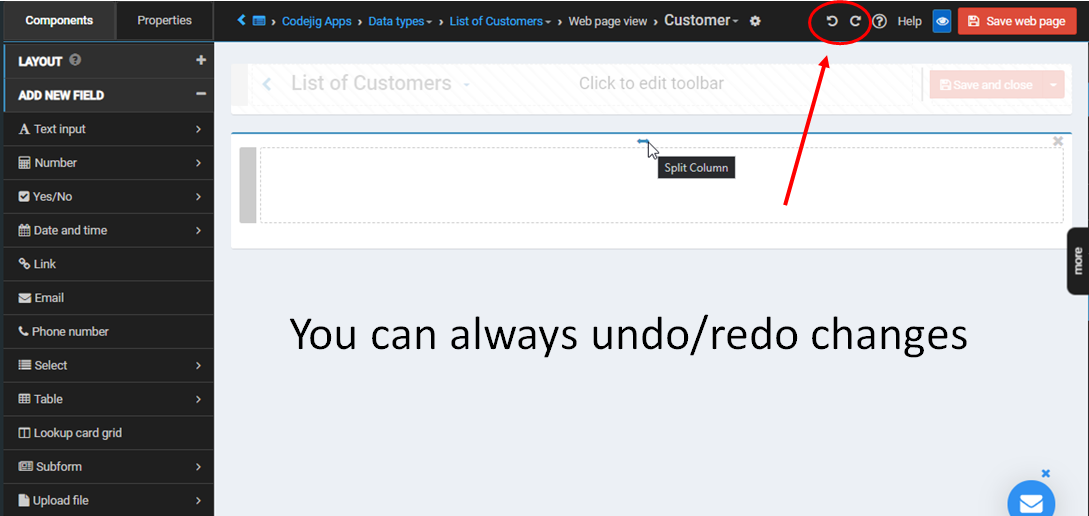
In case you did something wrong, you can always undo your actions by clicking on the return arrow on the top right corner of the screen:
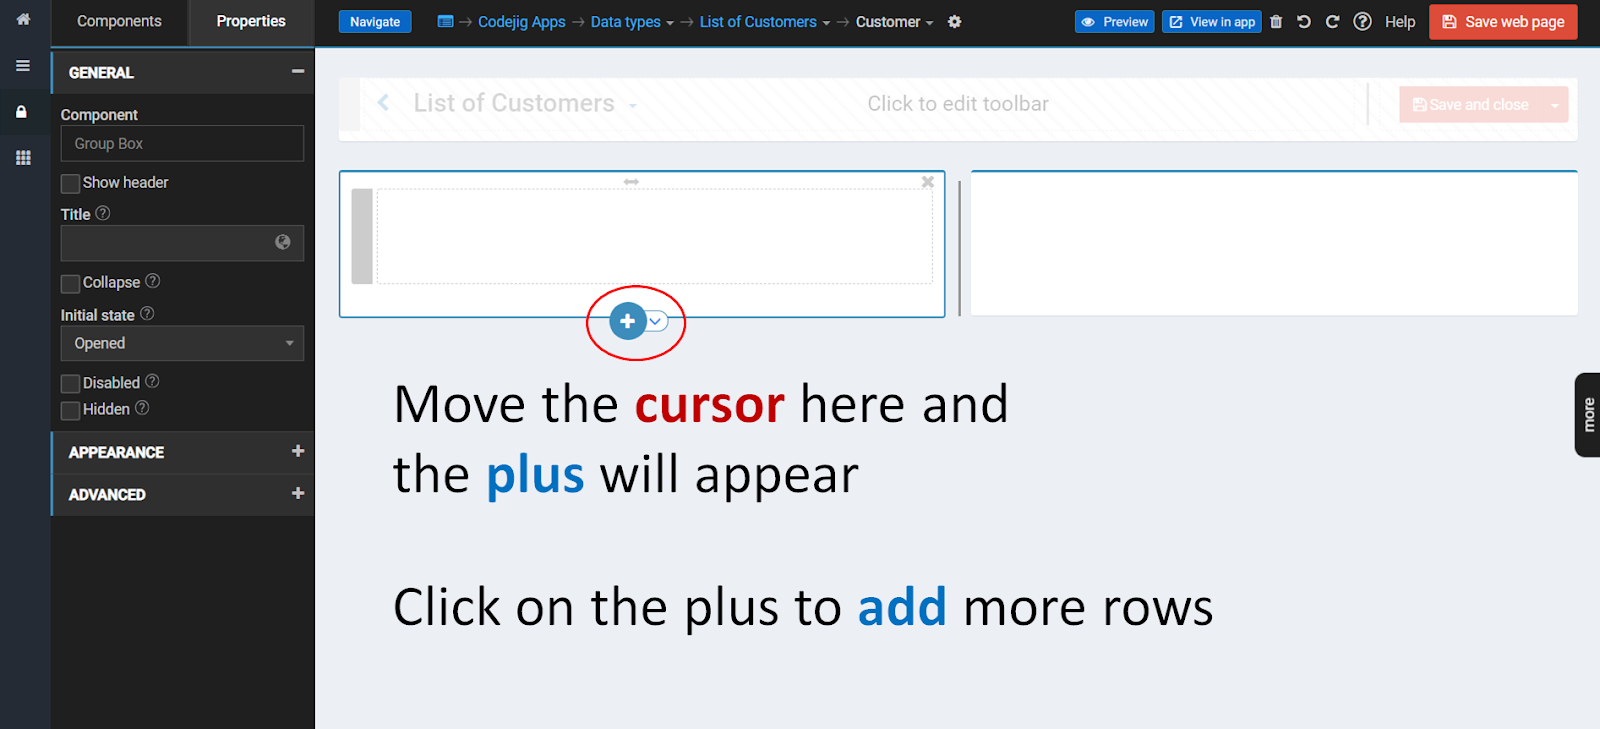
ADD ROWS
One row isn’t enough for a good App.
Move the cursor to the middle bottom of a groupbox. A round plus should appear. Click on it.
A new row was added.
Note: rows are not visible on the App pages, but they are used to create a good layout.
Add three left and two right rows to get the following result.

Save web page:

SPLIT COLUMNS
Split a column as we did with groupboxes.
Hover on the middle and click on the two-sided arrow.

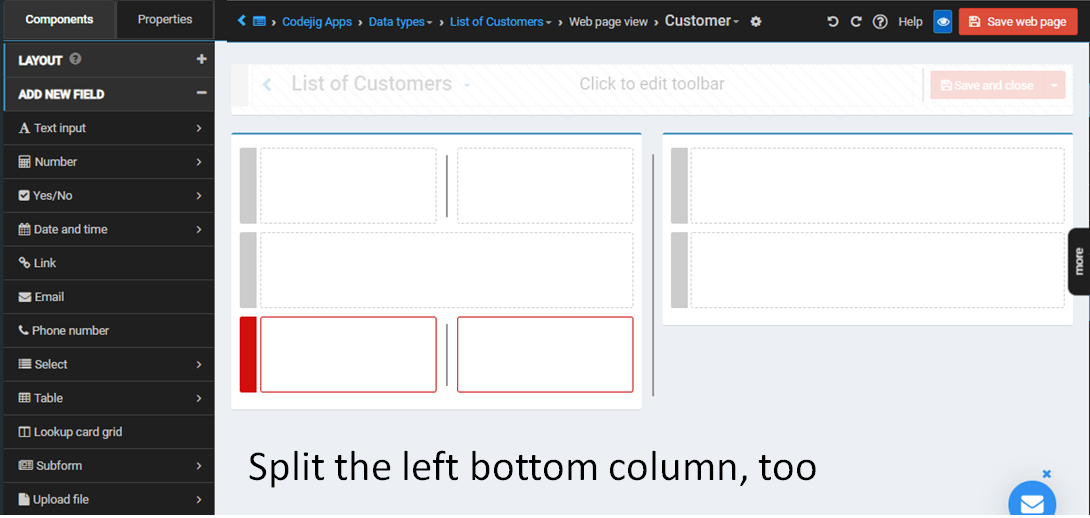
Split the left bottom column, too.
ADD ELEMENTS
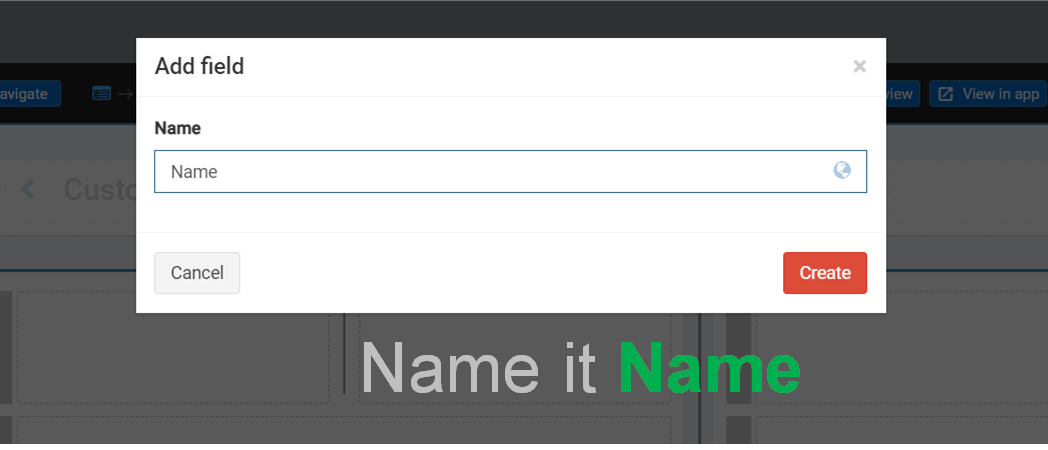
From the Components panel ⇒ ADD NEW FIELD drag and drop Text input element.

Set the Name value to Name. In that field you can enter first names of the customers.
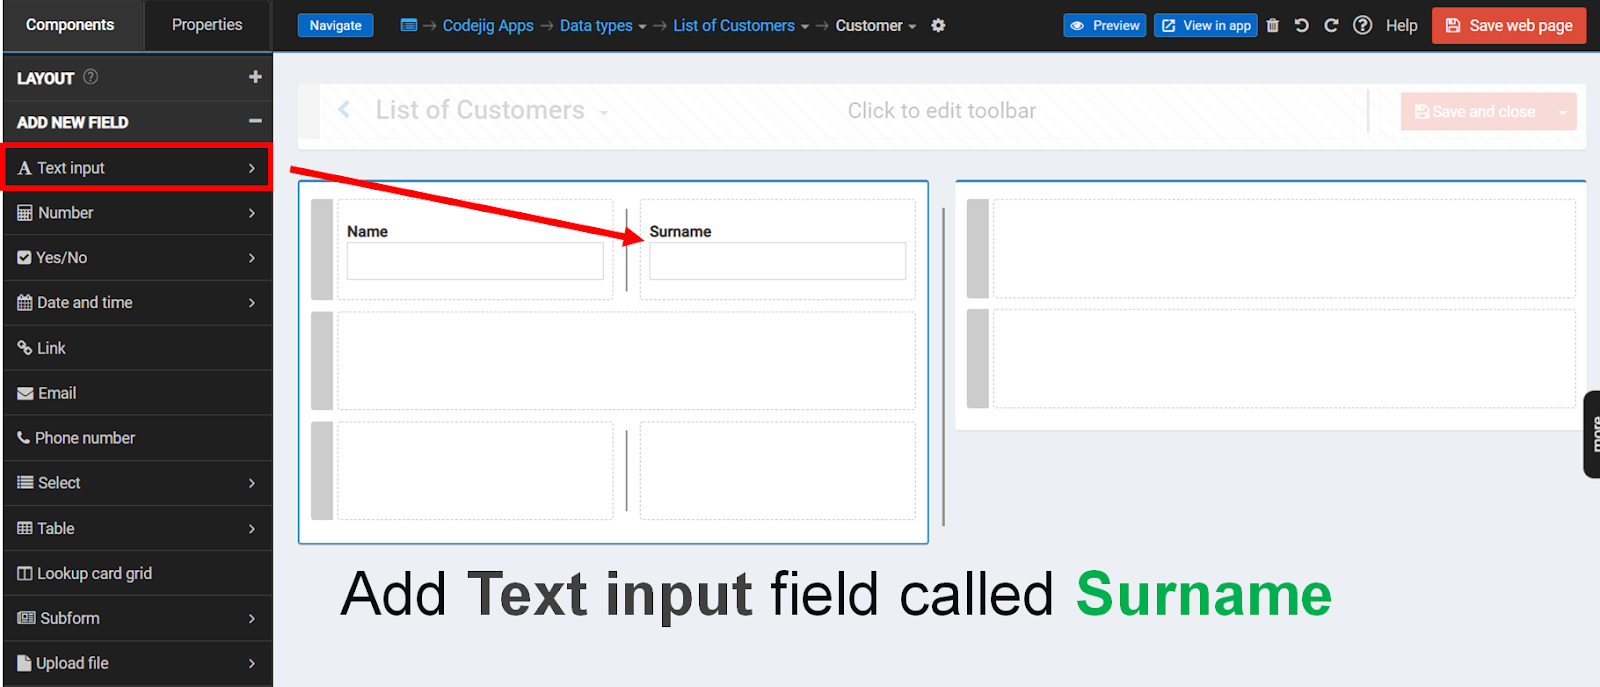
Add one more Text input field and call it Surname.
SET VALIDATION
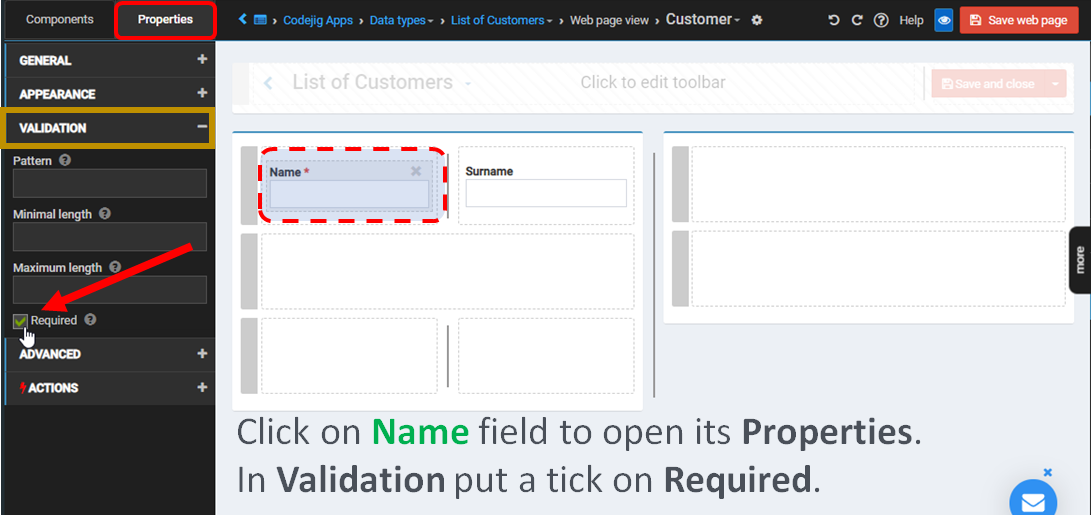
It is required for a Customer to have a Name and Surname data.
Click on the Name element to open its Properties. In the VALIDATION mark Required checkbox.
Repeat the steps for the Surname field.

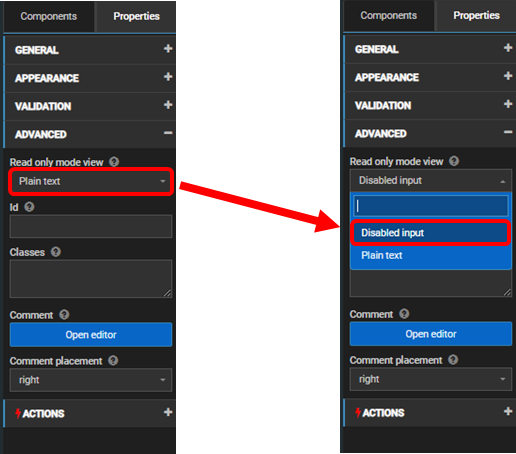
DISABLE FIELD
From Components ⇒ ADD NEW FIELD drag and drop Text input field and name it Full name.


Click on the Full name to open its Properties panel.
In General put a tick on the Disabled checkbox. Users can no longer edit the Full name field. We will implement the autofill logic later.

In ADVANCED, set Read only mode view to Disabled Input.
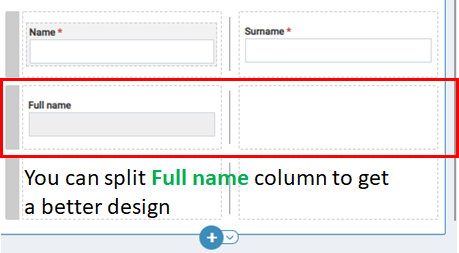
You can split the Full name field column if you want to get a better design.
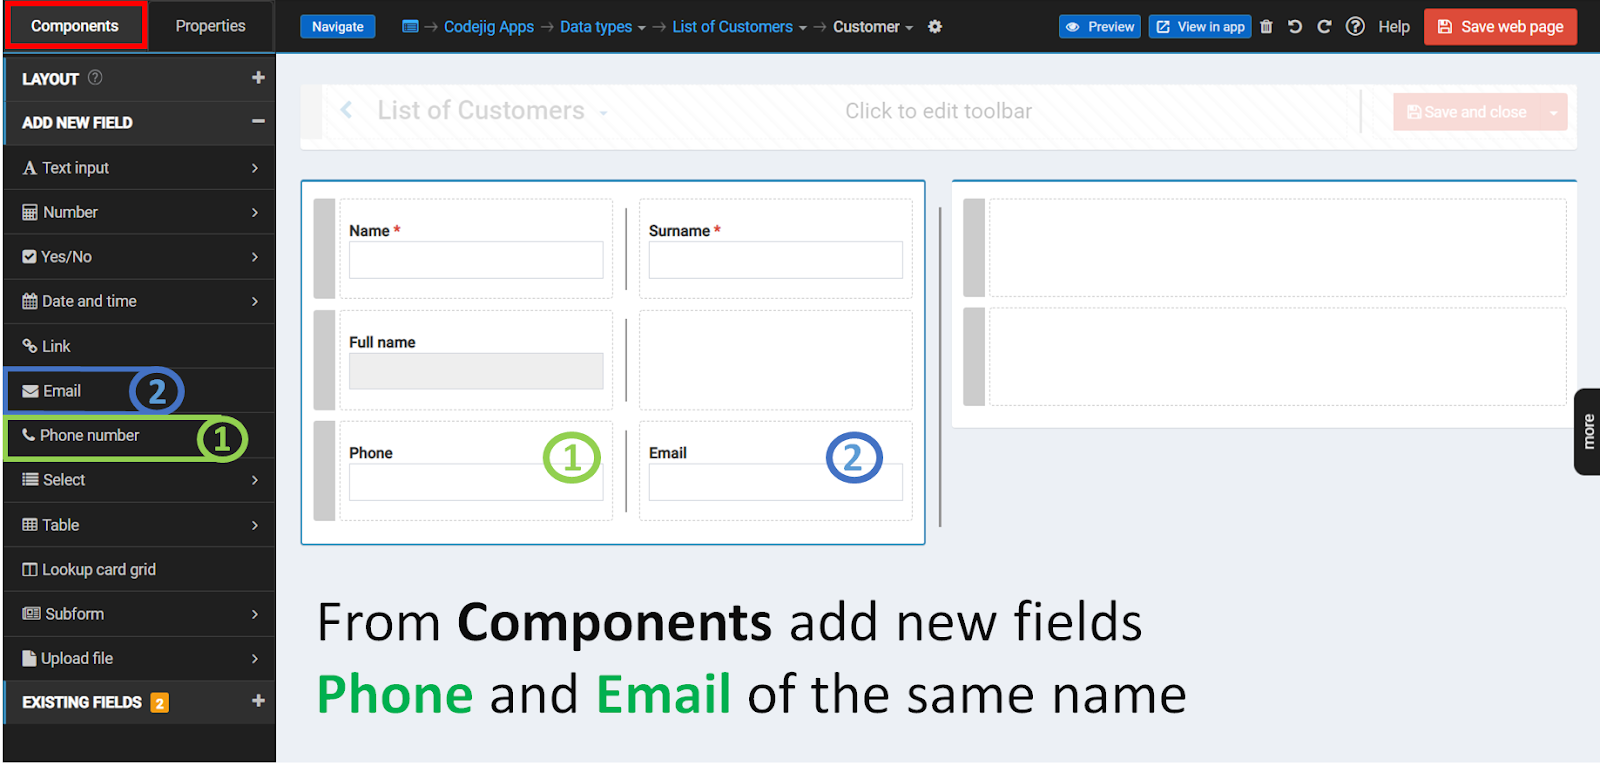
ADD PHONE AND EMAIL
From Components ⇒ ADD NEW FIELD drag and drop Phone number field and name it Phone.
Drag and drop the Email field, too. Name it Email.
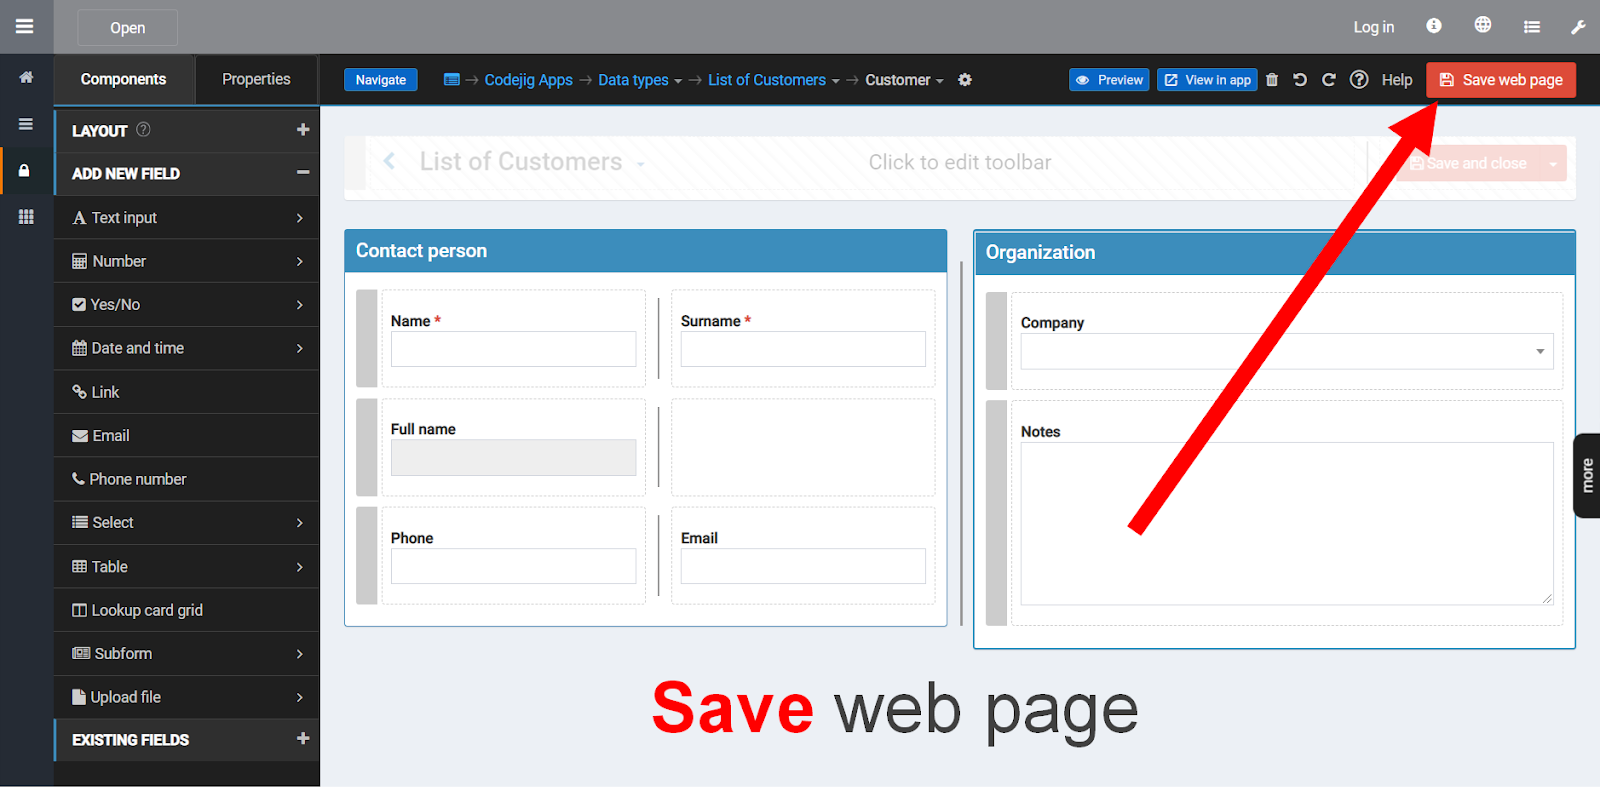
Don’t forget to save your web page!
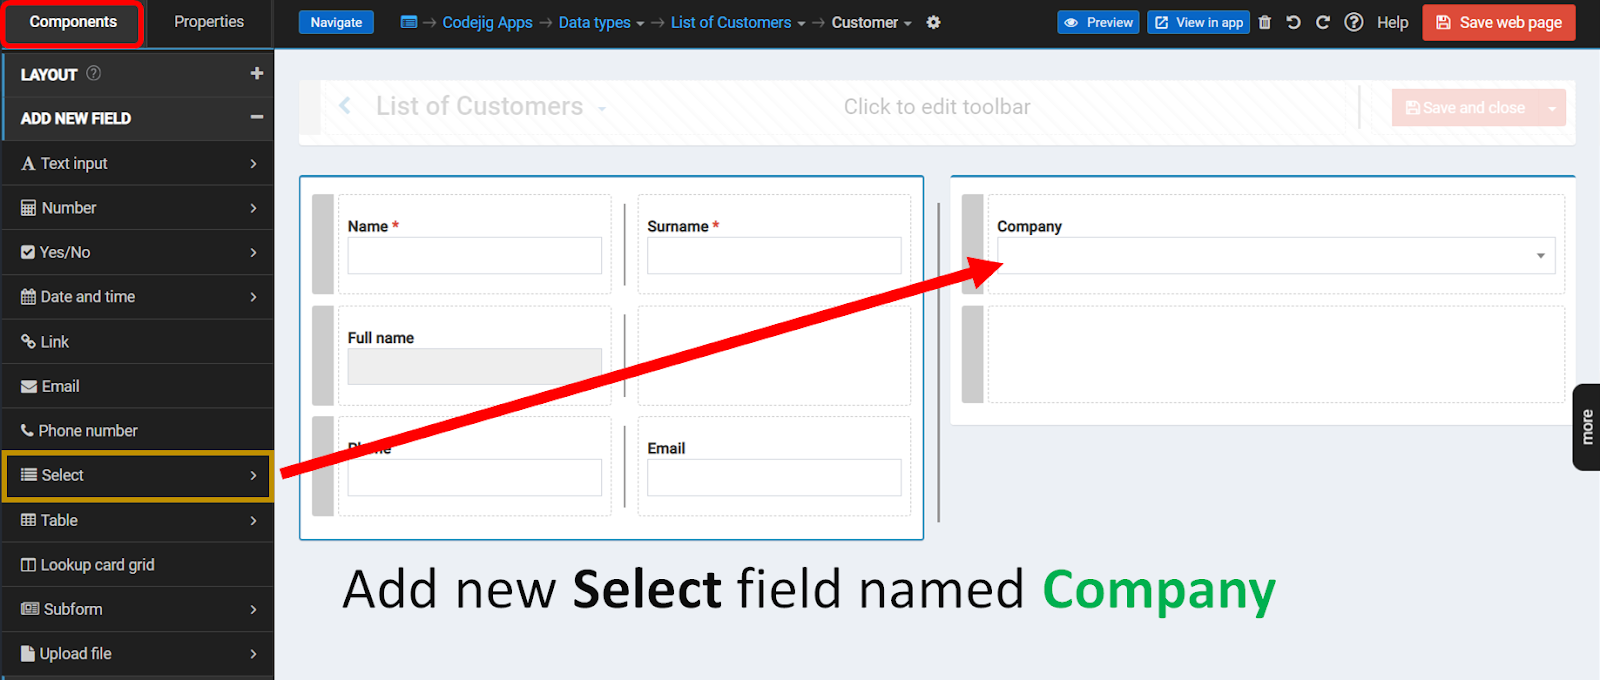
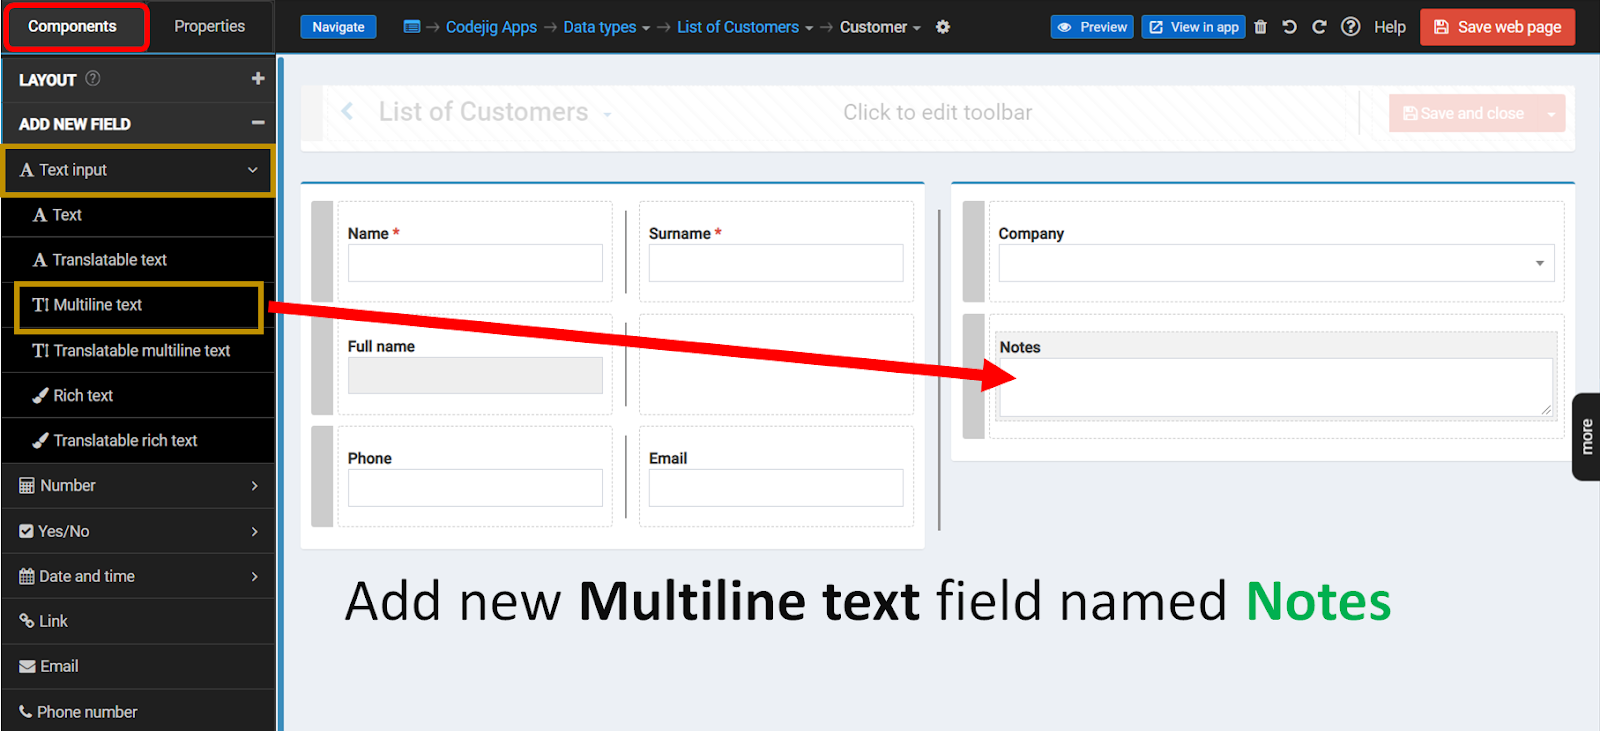
ADD COMPANY AND NOTES
To add a selectable field, from Components ⇒ ADD NEW FIELD drag and drop Select. Give it the name Company. That would be the company a user belongs to.
Drag and drop Text Input and name it Notes. Here you can store some additional information.
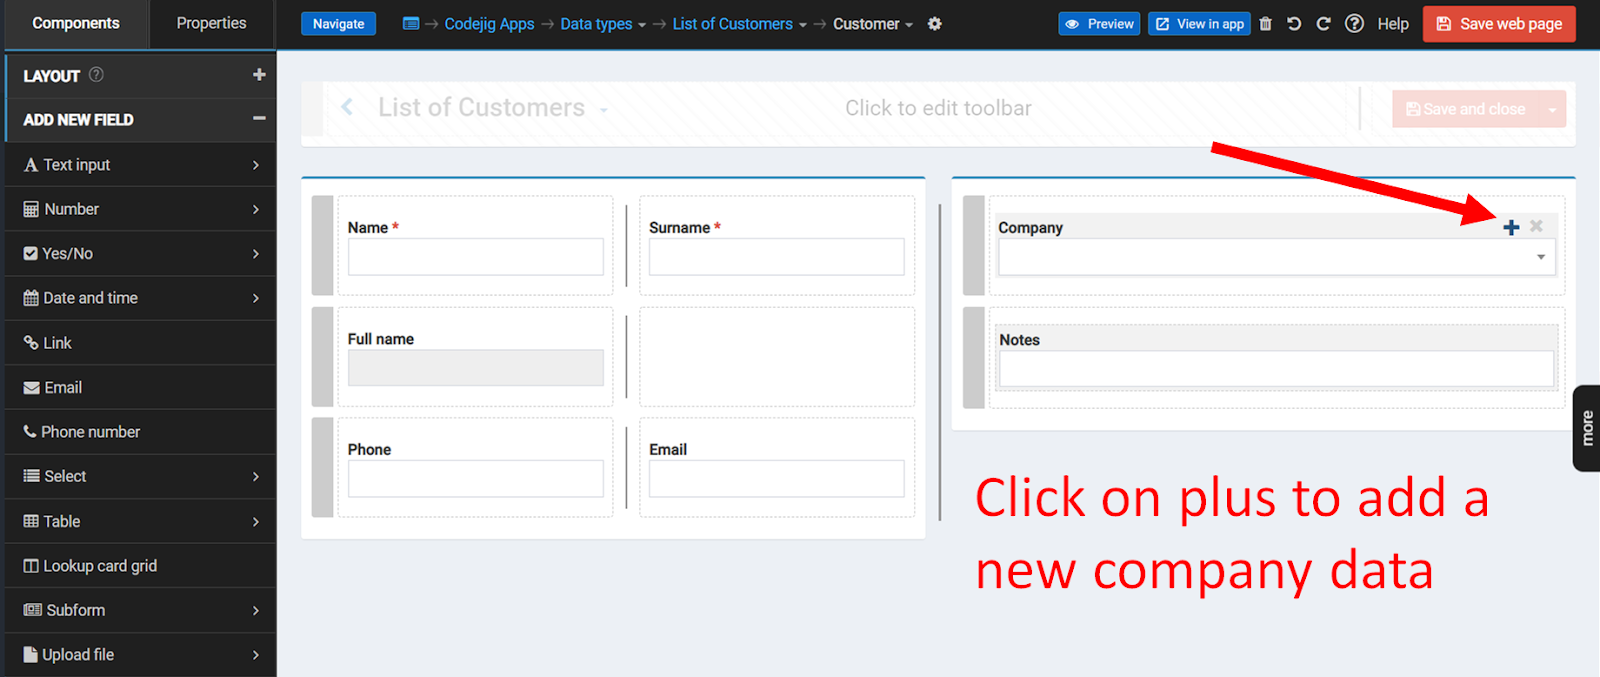
ADD COMPANIES
To add predefined companies, click on plus near the Company field.
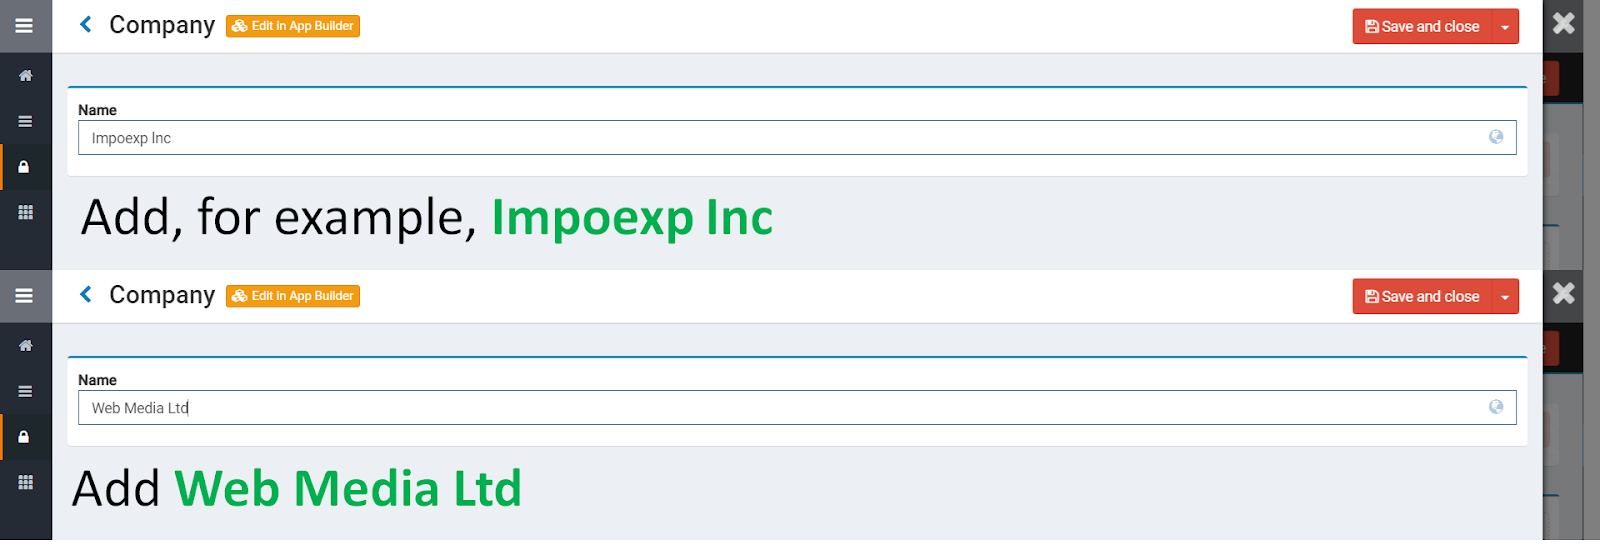
Enter the name of a company, for example, ABC Software. Save and close.

Add a few more companies, for instance, Impoexp lnc and Web Media Ltd.
CHANGE APPEARANCE
Click on the Notes Text field to open the Properties panel.
Set Size to 7. The Notes field will now have a size of seven text rows.
Make sure that the text field is multiline to see the changes.

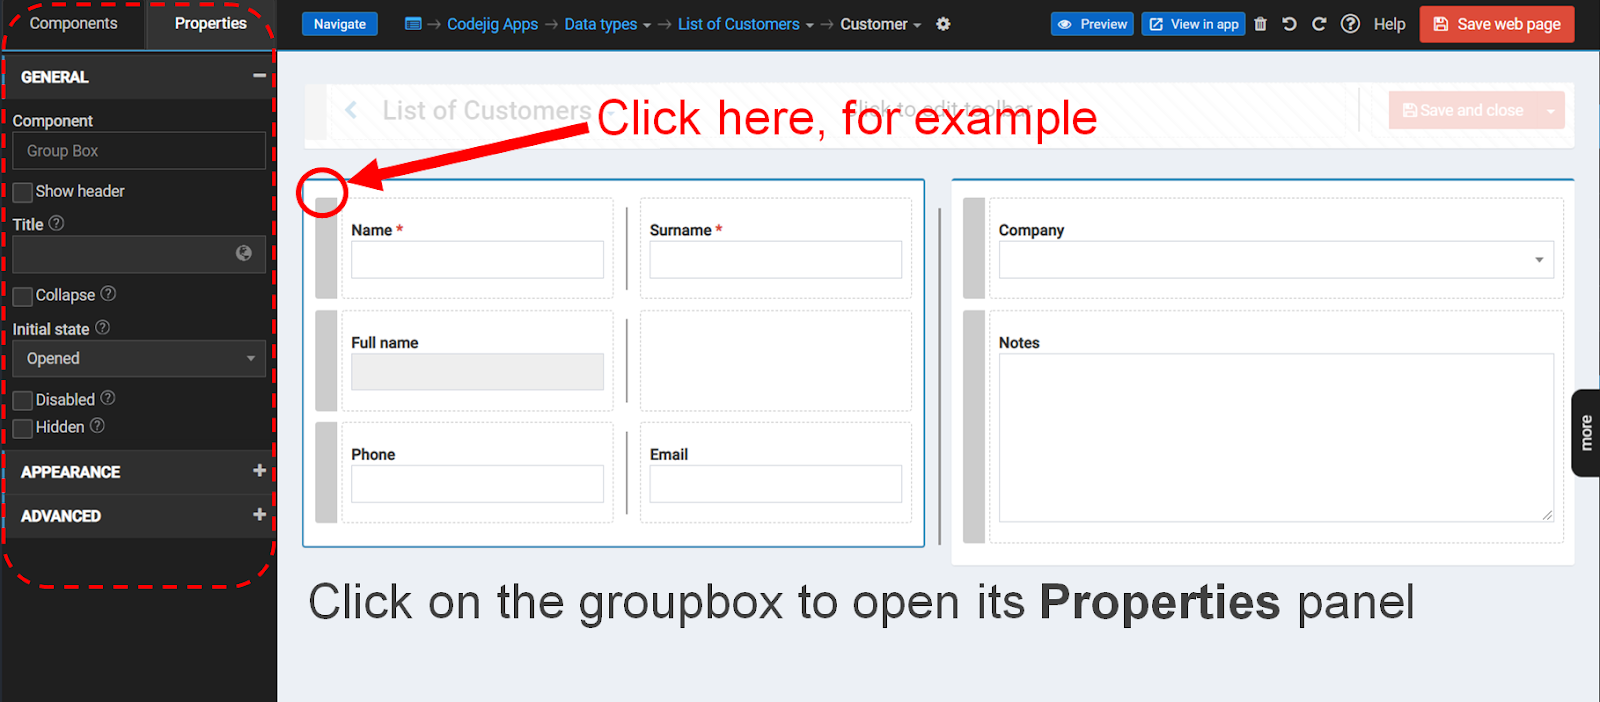
STYLE GROUPBOXES
Click on the unoccupied area of the first group box to open its Properties panel.
In GENERAL mark Show header.
Set Title to the Contact person.
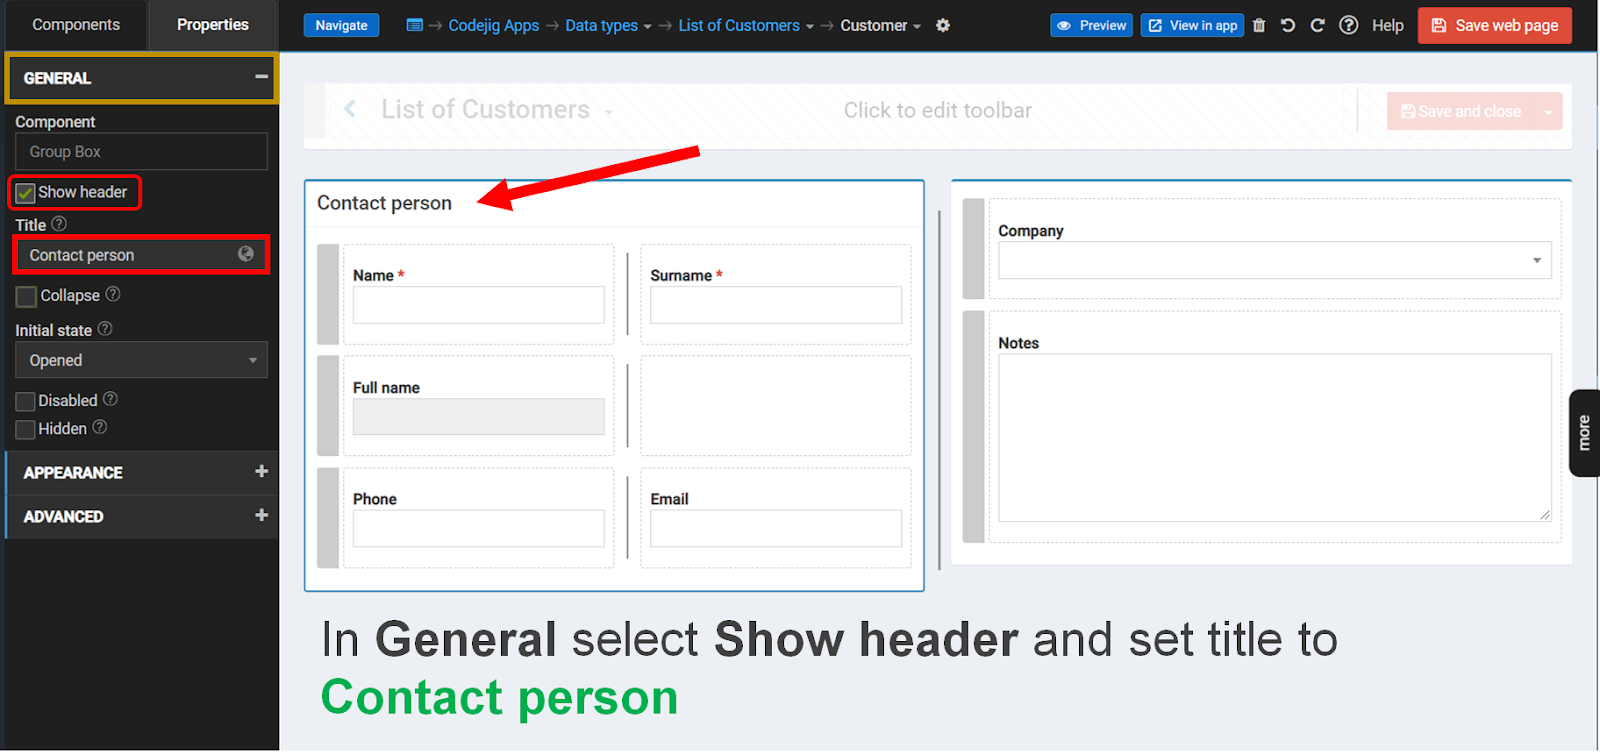
For the second group box, set the title to Organization.

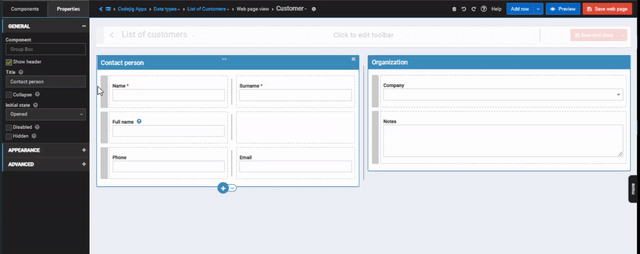
CHANGE GROUPBOX APPEARANCE
In the groupbox Properties ⇒ APPEARANCE set Show as ⇒ solid.
Make a solid appearance for both Contact person and Organization groupboxes.

Save the web page.
RENAME TOOLBAR
Click on the Toolbar to start editing it.
Click on List of customers and in its Properties set Title to Customer.
You can open the page preview using the Preview button.
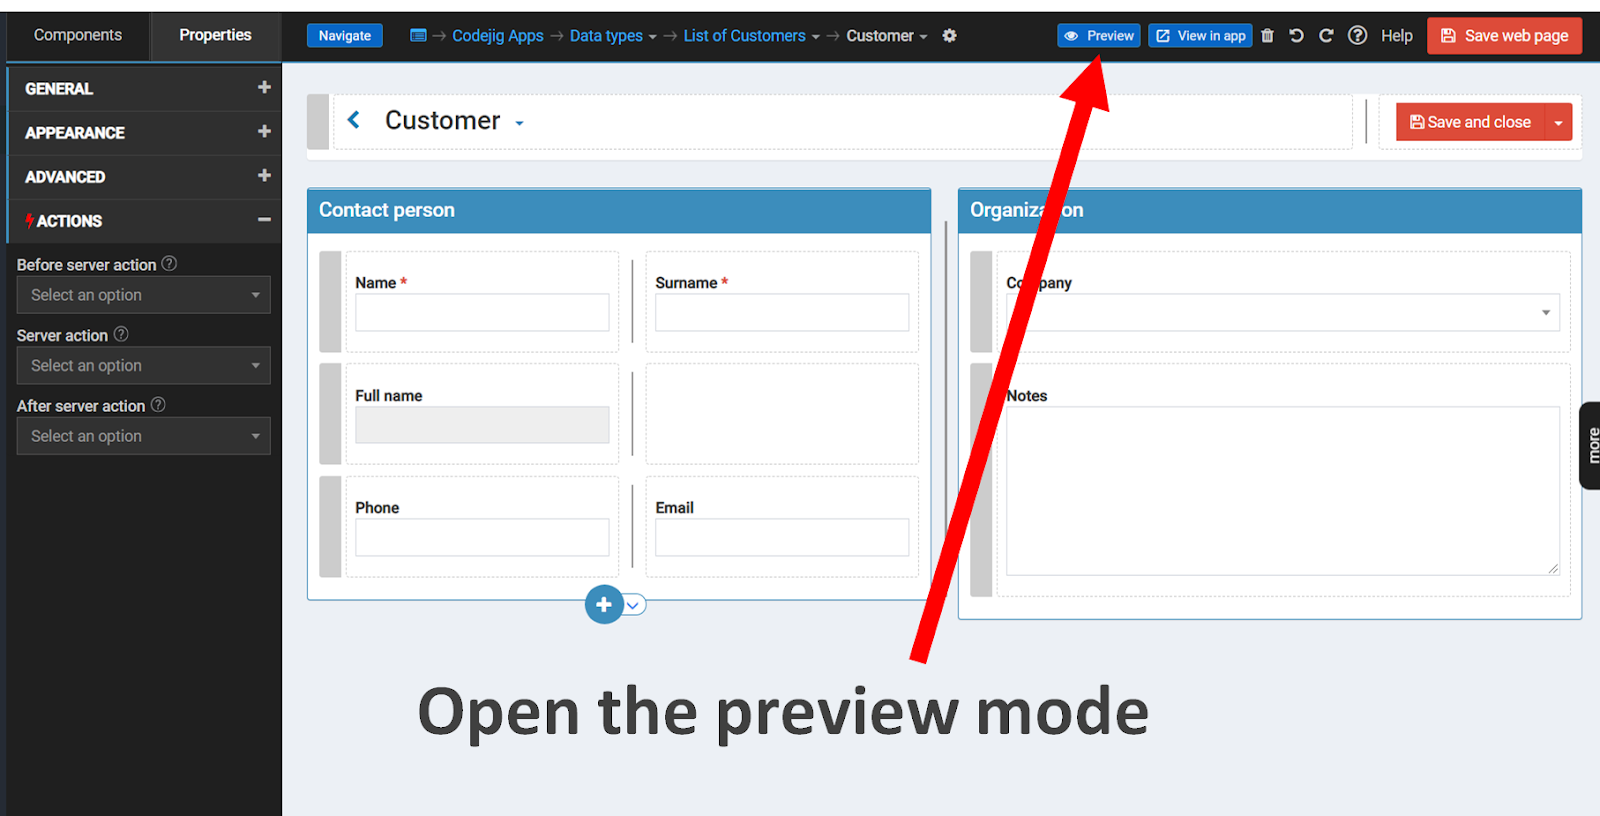
The design is completed.

Quit the preview mode
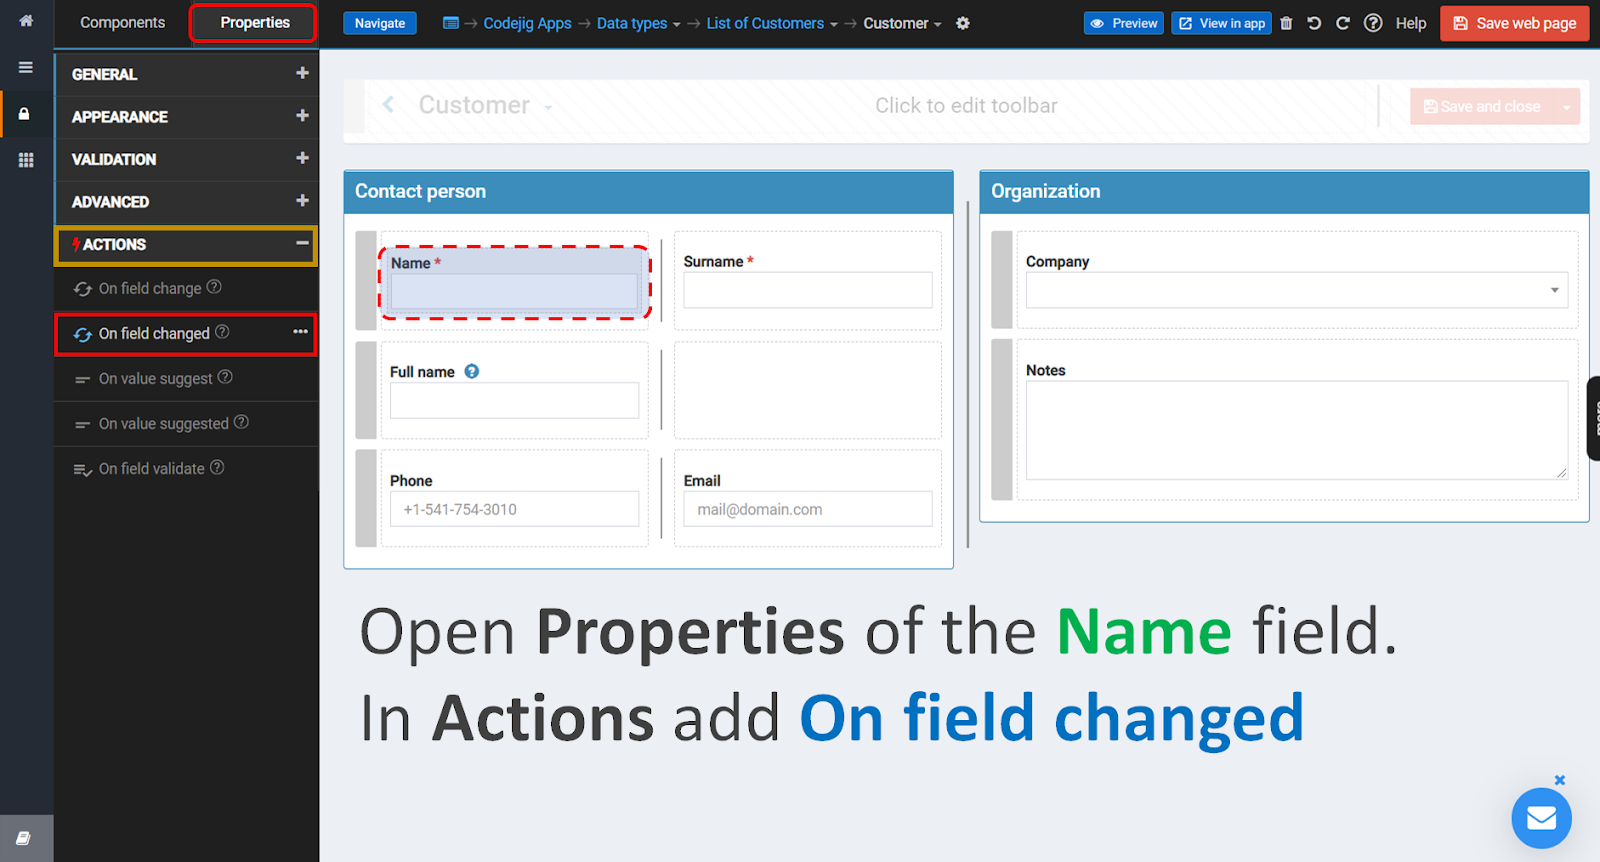
ADD ON FIELD CHANGED ACTION
Click on the Surname field. In
Properties ⇒ ACTIONS click on the
On field changed.

A new client action will be created.
INTRO BLOCKS
You were redirected to the Code Blocks Editor.
You can drag and drop blocks into a Working area from the Blocks panel on the left or create/add variables from the Data panel on the right.
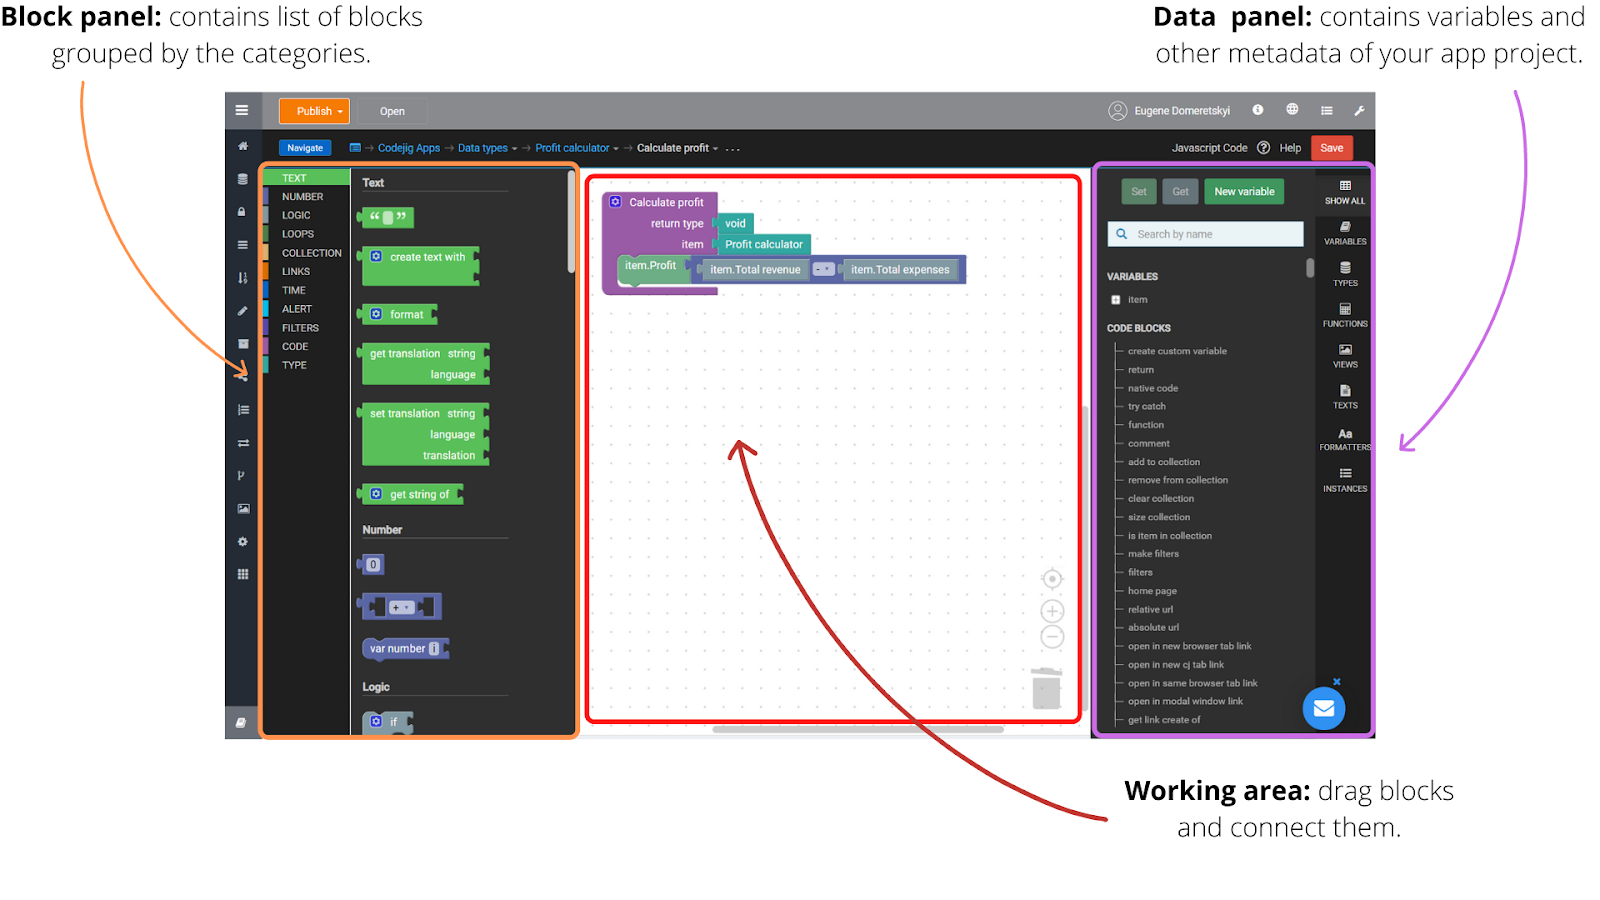
SELECT VARIABLES
In the action we will create Full name data from the Name and Surname.
On field changed action is automatically triggered if one makes any changes to the Surname field on the App page.
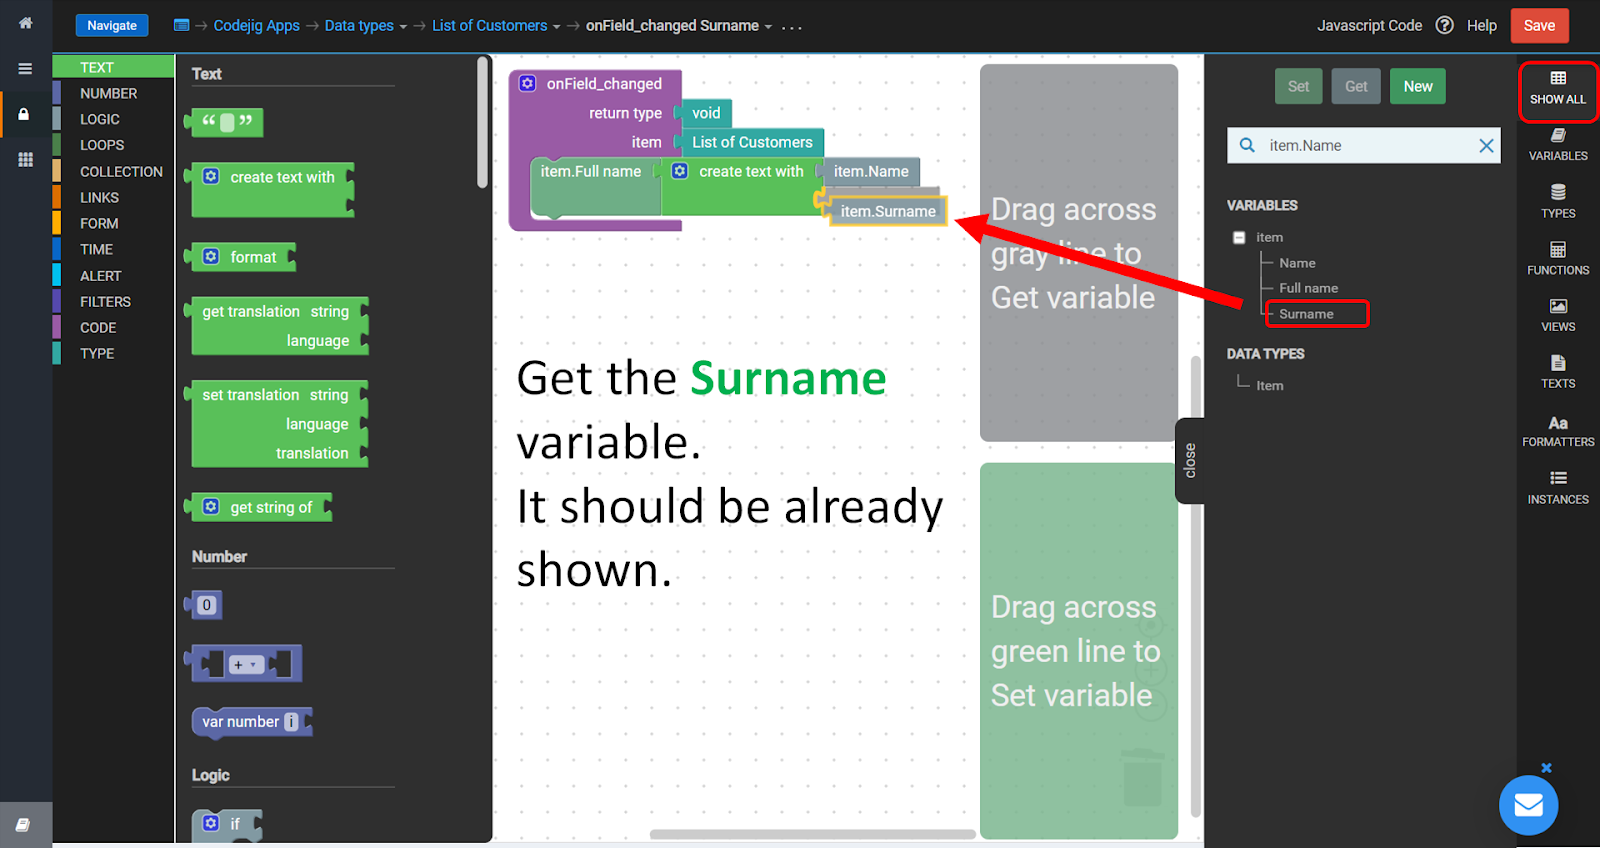
In the Data panel find item.Full name variable. Drag it across the green line to make a setter.

You can open Data panel by clicking on the Show all on the right.
ADD CREATE TEXT WITH
From BLOCKS ⇒ TEXT Drag and drop create text with block.

Type item.Name in the search box. Find item.Name and connect it with the create text with block.

Find item.Surname and connect it with the create text with block.
ADD TEXT BLOCK
After that, the Full name needs a separator between words.
Click on the gear icon near the block.
Drag and drop one more slot.

Add a new text block and enter there one space.

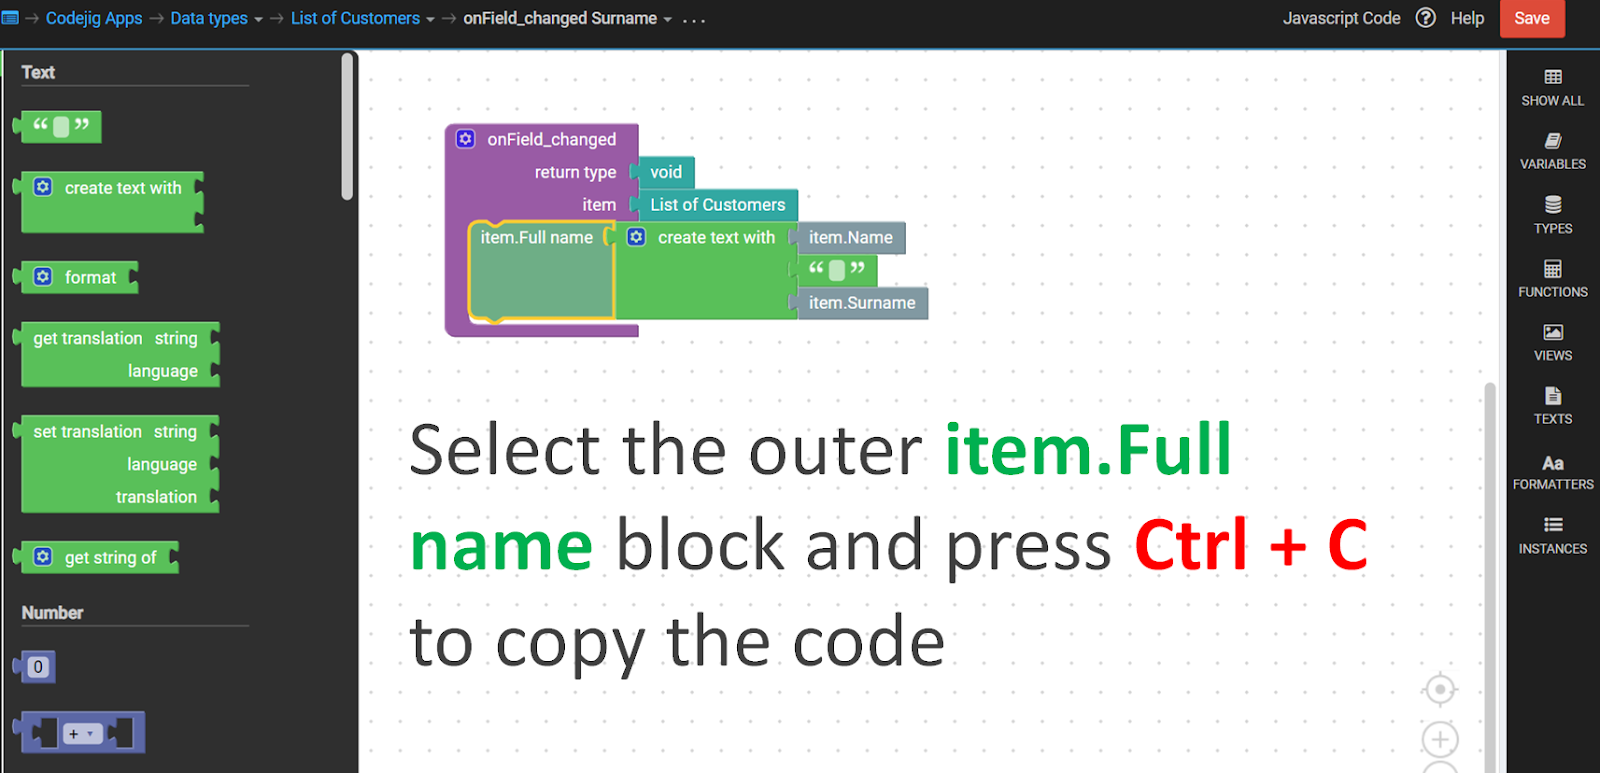
COPY YOUR CODE
Finally, save your code blocks:

Select the most left block (that is item.Full name) and press Ctrl + C to copy the code.
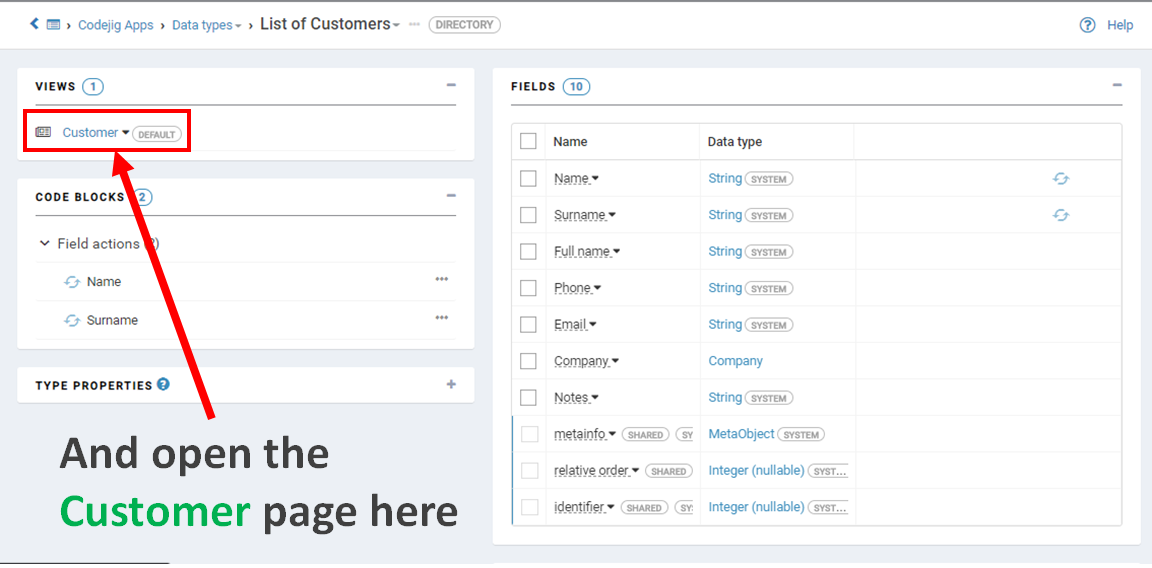
RETURN TO THE CUSTOMER PAGE
Switch back to the Web page view. Alternatively, you can click on the name List of Customers in the Navigation bar.

And then, in the Data Types Panel, open the customer Web Page.
PASTE YOUR CODE
Click on the Name field. In its Properties ⇒ ACTIONS create one more On field changed event.
You can paste the code by pressing
Ctrl + V. Drag and drop the newly appeared code blocks onto the onChanged action.

TEST YOUR APP!
You have successfully built the web page to save the data of general customers.
Publish your application by clicking on the Publish button on the Header bar.

Wait for some seconds. After your app is published, open it by clicking the Open button on the Header bar. Test out your Codejig App!