Time Tracker
INTRO TO THE ENVIRONMENT
This tutorial shows how to create a Timesheet application that will allow your employees to report working time.
The resulting application will look like as below:

After you learn the basis, feel free to improve and play with the created application!
CREATE A NEW WEB PAGE
From the Web pages section click on the Add page button and name the new web page Time Tracker.


ADD TEXT FIELD
From the Components panel -> ADD NEW FIELD choose Text input and drag in Text field.

Name it Employee.

ADD DATETIME FIELD
From the Components panel -> ADD NEW FIELD -> Date and time choose Date and time field, drag it to the Working area and name Start.


SPLIT COLUMN
Hover the mouse over the top middle of the column. The blue two-sided arrow should appear. Click it to split the column.

You will get two of them.
ADD DATE FIELDS
From the Components panel -> ADD NEW FIELD choose Date and time and select the Date field. Drag it to the Working area and name Date.

Also, add a Date and time field and name it Finish.

ADD NUMBER FIELD
From the Components panel -> ADD NEW FIELD drag in the Number. Drop it below the Start field from the first column and name it Worked hours.

Note: in terms of tutorial, the Worked hours field is Integer. That is, 7.3 hours becomes 7.
SPLIT THE GROUPBOX
Hover the mouse over the top middle of the Groupbox. The blue two-sided arrow should appear. Click it to split the groupbox.

The process of splitting either a column or a Groupbox is very similar, so be careful not to confuse them.
You should get the following result:

ADD BUTTON
From Components ⇒ LAYOUT drag and in a Button and drop it below the Finish field.

Click on the new button to open its Properties panel.
In General, set the Title to Calculate.

PUBLISH THE APP
Before we continue, let’s take a quick look at what has been made so far.
Save the progress by clicking on the red Save web page button on the Navigation bar.

Press on the Publish button. The orange color indicates that you need to build and deploy the app in order to see the changes you’ve made.

Publishing consists of two steps: Build (compiles app project into an executable file) and Deploy (stops app container and runs it with a new version of executable). The whole process takes about 40 sec. when performed for the first time.
Once publishing is completed, Open the app.

After the publishing and opening the app you will see the page like shown in the screenshot below.

But the application is not functional.
We will add the code to calculate the worked hours as well as enhance the look of the page in the next steps.
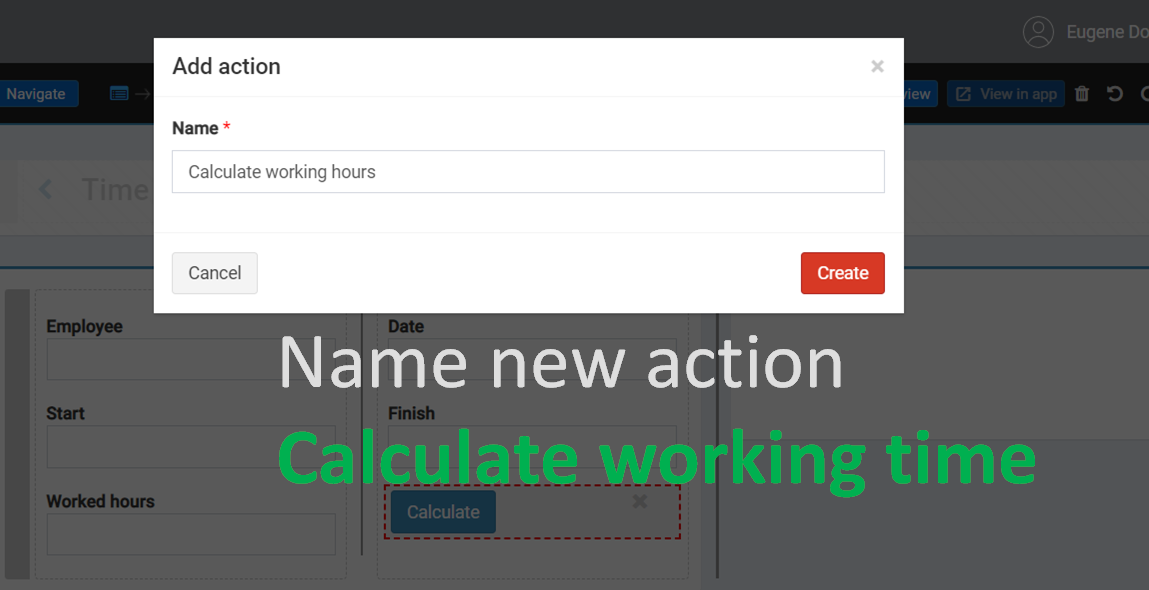
ADD ACTION
Go back to the Time tracker page inside the Builder.
In the Calculate button Properties ⇒ ACTIONS unfold the Before server action and click on the Create new.

Name the new action Calculate working hours and click Create.
Save the web page and go to the block.

SET FIELD
The one-line equation for the action is Worked hours = Finish - Start.
As you will store the calculated result
in the Worked hours field, you need to set some new value to this field.
Click Show all on the left to open the data panel.

In the search box, enter item.Worked hours. (Alternatively, you can find it by unfolding the plus near item).
Drag the block across the green line to create a setter and connect it with the action body.

GET SUM BLOCK
In the Block panel, select category Number. Drag and connect the sum block with the item.Worked hours.

Set the action of the block to minus.

TIME FUNCTION
To calculate the number of hours of the fields Start and Finish we will use a special get block from the TIME category.
In the Block panel, select category TIME. Drag and connect get time from to the first part of the minus block.

Change the actions to hour-of-day because we need to get hours for our time calculations.

GET FIELDS
In the Data panel ⇒ SHOW ALL ⇒ select the field item.Finish. Drag it across the grey line.
Connect it with the get hour of day block.

In the same way, add get hour of day from item.Start to the second part of the minus operation.

MOVE BACK
Save your progress by clicking on the Save button on the Navigation bar.

Go to the Web pages section in the Project menu and move to the Time Tracker web page.

MAKE FIELDS REQUIRED
To make the field Employee required, click on it, in the Properties panel -> VALIDATION put a tick on the option Required.

Repeat the same step for the fields Date, Start, Finish to make all of them required.

HIDE THE RIGHT GROUP BOX
Click on the right group box, go to the Properties panel ⇒ GENERAL and put a tick on the Hidden option.
You will see that the right groupbox has been shaded.

DISABLE FIELD
To disable Worked hours field, click on it, in the Properties panel ⇒ GENERAL, put a tick on the option Disabled.

GROUP BOX HEADER
Select the main group box where all fields are located. In the Properties panel ⇒ GENERAL, click on the option Show header. In the Title field specify the header ADD TIME LOG.

TEST YOUR APP!
Publish the app again if you need (if the Publish button is orange). And then open it and test out!

Now, think for a minute how you can improve your app.
You can do the following:
1. Add a Select Employee field instead of Text.
2. Add ON FIELD CHANGED action for time fields directly. There is no need to click on the Calculate button if the code actions will be triggered after the fields Start and Finish were changed.
3. Your time tracker can keep track of the description, completed tasks, lunch breaks and everything you need!
Here is an example of an improved Time Tracker app.